
Scenario Framework Setup Tutorial – Arma Reforger
This Tutorial will quickly show you how to setup ScenarioFramework for a new world and create simple scenario.
It is also highly recommended to read through the Scenario Framework documentation or have it open and ready.
World Setup
Open World Editor and load the world of your choice with File > Load World (or Ctrl + O).
For the purposes of this tutorial, we will use Arland.
Create a new world using File > New World (or Ctrl + N); in the popup window, select "Sub-scene (of current world)" and click OK.
Once the process is done, save the file using File > Save World (or Ctrl + S), save in the directory of your choice.
Try and use the same directory structure as Arma Reforger has, so e.g MyModDirectory
Scenario Framework Setup
Once we have that, we need to setup necessary things for the Scenario Framework to work.
Open the Game Mode Setup plugin through Plugins > Game Mode Setup.
- Use the two dots (..) in the Template field to target ScenarioFramework.conf. Once done, click Next.
- The World Scan screen appears asking if you want to scan the world for proper game mode setup. As this is a clean copy of a world, this is not required - click Skip.
- The World Configuration screen appears to ask if you want to create required entities - click Create entities this time to generate all the required entities.
- The World Configuration Completed screen appears now, with a potential list of issues to fix; click Next.
- The Mission Header screen asks about creating a mission header in order for the scenario to appear in the main menu's scenario list - click Create header to do so, then Next on its confirmation and Close on the ending screen.
Once you are finished, you can find the created entities in the current layer.
Scenario Framework Usage
Spawn Area Creation
Before we start creating all the fancy tasks and scenario workflows, we need to add a spawn for the player.
- To keep things organised, we create a layer: right-click on the world's subscene (named as the created world, at the bottom of the Hierarchy panel) and we name it "Start".
- Then we make it the active layer by right-clicking on it and choosing "Set as active" (a double-click on it does the same thing).
- Then we add a Scenario Framework Area by going to the ArmaReforger
/Prefabs /Systems /ScenarioFramework /Components directory and drag and dropping it into the scene (Area.et) - Then drag a Layer, but this time drop it on the Area in the Hierarchy panel in order to have it as a child entity of the Area
- Then drag a Slot on the previously created Layer so it looks like this:
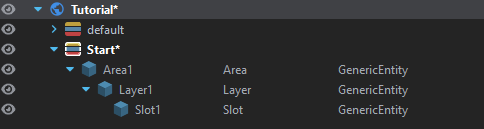
- Now, select the Slot ("Slot1") in the Hierarchy tab and find the SCR_ScenarioFrameworkSlotBase component to click on it in the Object Properties panel.
- Under the Asset category, we click on two dots (..) for the Object To Spawn attribute to assign it the SpawnPoint_US.et Prefab. That way, we have added spawning Spawnpoint for the US Faction using the Scenario Framework.

Press Ctrl + S to save the world.
You can already try if it is working for you and if you will get spawned on the position where you put that Slot which holds the Spawnpoint by pressing the World Editor's Play button (or F5).
Let's add another Slot under the same Layer to give players the Arsenal in order for them to customise their loadout.
We will do it the same way as with the SpawnPoint but using ArsenalBox_US.et (the one in Prefabs
In order to give a player some vehicle to move around, we will add a third slot and use the M1025.et Prefab (or the M1025_MERDC.et for the camo version).
In a similar fashion, you can build up your starting area any way you like.
The end result should look like this:

Add a Move Task
Now is the time for some Tasks to be created.
For starters, we will create one of the most simple task that is Task Move.
- Before we start, it is good to organise these things via layers in a similar fashion as the Start layer, so we will create the FirstTask layer and set it as active (see Spawn Area Creation above for a reminder of how to create a layer and set it as current).
- Then we find a suitable location and we create an Area there by drag and dropping it from the Components folder the same way we did with the spawn area.
- But then, instead of the Layer, we will find the LayerTaskMove.et, drag and drop it in the freshly created Area (Area2 if you did not rename any).
- Then, we drag and drop a SlotMoveTo.et into this LayerTaskMove.
- Notice that the slot's sphere is larger. This visualises the trigger radius for the Task Move you just created.
- All you have to do now is launch the game (Play button or F5), open the map and then open the Task List (default J) to see the Task.
And when you move your character in the trigger, you will complete the objective.
Add a Random Destroy Task
Since this was pretty easy, let's expand this scenario a little bit by adding a Task Destroy vehicle once you complete the Task Move.
- To keep things organised, we create another layer and name it SecondTask, then set it as active.
- Again, we create an Area, but to make it more interesting, we will randomise the kind of vehicle we will want to destroy.
It can be achieved in various ways but the safest approach is to put a LayerTaskDestroy.et under Area3 hierarchy - After selecting the SCR_ScenarioFrameworkLayerTaskDestroy component, set its Spawn Children attribute value to RANDOM_ONE and change the Activation Type to ON_TRIGGER_ACTIVATION
- Now, add two Layers under this hierarchy
- Under each of these Layers, add a SlotDestroy.et Prefab
- Now let's define what we want to destroy. In SlotDestroy1 we will put UAZ469.et and in the SlotDestroy2 Ural4320_transport_covered.et as Object To Spawn.
- Then we will head back to the FirstTask layer where we added the Task Move, select the LayerTaskMove1, click on its SCR_ScenarioFrameworkLayerTask component and in the category OnTaskFinished, we will add an Action by clicking on the plus + icon
- Search for "SpawnObjects" to find the SCR_ScenarioFrameworkActionSpawnObjects action and select it
- Now we expand the action by clicking on that arrow and click on the plus + icon in the Name Of Objects To Spawn On Activation attribute
- And then input the LayerTaskDestroy1 name as the first item in the list
- Now you can try it in-game. This setup will result in a behavior that will not spawn Task Destroy right away, but only after you complete the Task Move. Since we added the RANDOM_ONE and two layers under the LayerTaskDestroy1, it will randomly pick one of the two SlotDestroy, helping to make less repetitive scenarios.
Add a Game Over
- To conclude this scenario, we can end it by adding an EndMission action in the OnTaskFinished on the LayerTaskDestroy1
- Tick the Override Game Over Type attribute checkbox
- Set Game Over Type to FACTION_VICTORY_SCORE which will end the mission upon completing Task Destroy.
That's it!
Now go ahead and try other Layer/Slot types.
If needed, see the Scenario Framework documentation for more details!