Scope 3D – Arma 3
(Created page with "Category:Arma 3: Editing {{Stub}} __ToC__ This page will show you how to make a 3D scope, step by step. == The black tunnel == 700px Cut a...") |
Lou Montana (talk | contribs) m (Text replacement - "\{\{GameCategory *\| *arma3 *\| +" to "{{GameCategory|arma3|") |
||
| (12 intermediate revisions by 4 users not shown) | |||
| Line 1: | Line 1: | ||
{{GameCategory|arma3|Weapon & Magazine Configuration}} | |||
{{ | {{Wiki|stub}} | ||
__ToC__ | __ToC__ | ||
| Line 8: | Line 8: | ||
[[File:arma3_scope3d_01.jpg|700px]] | [[File:arma3_scope3d_01.jpg|700px]] | ||
Cut a black tunnel through ViewPilot | Cut a black tunnel through the LOD ''ViewPilot'', so it is see-through from aiming point of view. (''Take advantage of one-sided polygons'') | ||
If the shape is unsuitable, don't be afraid to deform it - it will be visible only from 1st person, so it might not look so apparent. | |||
== Alpha planes == | == Alpha planes == | ||
| Line 18: | Line 20: | ||
* Scope reticle | * Scope reticle | ||
* Rear scope shadow | * Rear scope shadow | ||
* | * Fake lens (Optional, eyepiece glass, decorative only) | ||
* Holosight reticle | * Holosight reticle | ||
* | * Holosight glass (Optional, decorative only) | ||
== Sort alpha == | == Sort alpha == | ||
*Select alpha element that is supposed to be furthest from the eye, then pick Faces - Move top, | *Select the alpha element that is supposed to be furthest from the eye, then pick Faces - Move top, | ||
*Select next alpha element and repeat, | *Select the next alpha element and repeat, | ||
*Do this for all alphas until you have all in proper succession, from top to bottom ''(above image)'': holosight glass, fake lens, rear shadow, holo reticle, scope reticle, front shadow. | *Do this for all alphas until you have all in proper succession, from top to bottom ''(above image)'': holosight glass, fake lens, rear shadow, holo reticle, scope reticle, front shadow. | ||
| Line 30: | Line 32: | ||
Look on example package for specifics and more detailed materials and textures setup. | Look on example package for specifics and more detailed materials and textures setup. | ||
The parallax effect of holosight and scope elements is activated inside .RVMAT (material). When you assign such material to a model, it will start working automatically. | The parallax effect of the holosight and the scope elements is activated inside .RVMAT (material). When you assign such material to a model, it will start working automatically. | ||
*For regular parallax effect, the .rvmat | * For regular parallax effect, the .rvmat must include an entry ''uvSource="texCollimator";'' | ||
*For inverted parallax effect, the .rvmat | * For inverted parallax effect, the .rvmat must include an entry ''uvSource="texCollimatorInv";'' | ||
== Troubleshooting == | == Troubleshooting == | ||
If | If an error saying "collimator is probably not planar" is shown by the game, it means the active planes must be moved closer together in X axis and make their unwraps similar texel and size. | ||
If you see light blue inside of the scope, alpha are incorrectly sorted, double check the step "Sort alpha". | |||
If you see | If you see white inside scope, it means that at least a texture is missing. | ||
There can be an issue in the game where your entire attachement will turn blue at certain ranges or view angles. This may have to do with a lack of resolution LOD, but this is not entirely certain. Make sure that you have up to 6 or 7 resolution LOD, as this seemed to have fixed it. This can also happen to other attachements (e.g. Bipods) | |||
Latest revision as of 19:47, 24 April 2021
This page will show you how to make a 3D scope, step by step.
The black tunnel
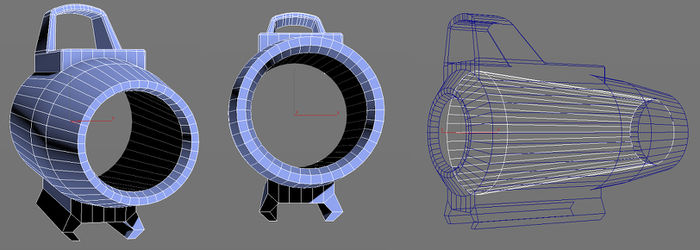
Cut a black tunnel through the LOD ViewPilot, so it is see-through from aiming point of view. (Take advantage of one-sided polygons)
If the shape is unsuitable, don't be afraid to deform it - it will be visible only from 1st person, so it might not look so apparent.
Alpha planes
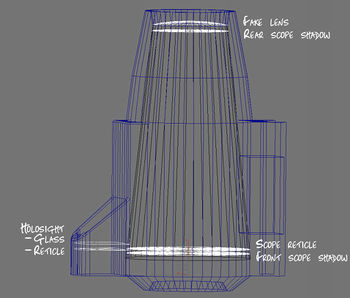
Add inside alpha planes, as described on the picture:
- Front scope shadow
- Scope reticle
- Rear scope shadow
- Fake lens (Optional, eyepiece glass, decorative only)
- Holosight reticle
- Holosight glass (Optional, decorative only)
Sort alpha
- Select the alpha element that is supposed to be furthest from the eye, then pick Faces - Move top,
- Select the next alpha element and repeat,
- Do this for all alphas until you have all in proper succession, from top to bottom (above image): holosight glass, fake lens, rear shadow, holo reticle, scope reticle, front shadow.
Assign respective textures and materials to alpha planes
Look on example package for specifics and more detailed materials and textures setup.
The parallax effect of the holosight and the scope elements is activated inside .RVMAT (material). When you assign such material to a model, it will start working automatically.
- For regular parallax effect, the .rvmat must include an entry uvSource="texCollimator";
- For inverted parallax effect, the .rvmat must include an entry uvSource="texCollimatorInv";
Troubleshooting
If an error saying "collimator is probably not planar" is shown by the game, it means the active planes must be moved closer together in X axis and make their unwraps similar texel and size.
If you see light blue inside of the scope, alpha are incorrectly sorted, double check the step "Sort alpha".
If you see white inside scope, it means that at least a texture is missing.
There can be an issue in the game where your entire attachement will turn blue at certain ranges or view angles. This may have to do with a lack of resolution LOD, but this is not entirely certain. Make sure that you have up to 6 or 7 resolution LOD, as this seemed to have fixed it. This can also happen to other attachements (e.g. Bipods)


