Faction Creation – Arma Reforger
(added enfusion links) |
|||
| Line 86: | Line 86: | ||
* Common parts of equipment (jacket, pants, boots and accessories) | * Common parts of equipment (jacket, pants, boots and accessories) | ||
In this example, | In this example, [enfusion://ResourceManager/~ArmaReforger:Prefabs/Characters/Core/Character_Base.et '''Character_Base.et'''] prefab is used to create '''Character_SampleFactionREDFOR_Base'''.et - a base for all REDFOR faction characters. Inheriting from [enfusion://ResourceManager/~ArmaReforger:Prefabs/Characters/Core/Character_Base.et '''Character_Base.et'''] prefab should provide a solid base with all necessary components in a state, where only minor adjustments are necessary. | ||
=== Configuring new characters === | === Configuring new characters === | ||
Revision as of 11:25, 27 May 2022
Goals of this tutorial
In this tutorial you will learn about:
- Configuration of characters
- Preparation of units groups
- Creation of new factions
- Integration of new faction into in-game editor
- Integration of new faction into Conflict game mode
Introduction
In this tutorial, process of creating new faction is explained and as an example, secrets of preparing Sample Faction - REDFOR will be unveiled.
This page goes through topics like preparing new characters, tweaking their configuration, creating new groups, preparing general faction configs & finally, integration into both in-game editor & Conflict game mode.
While the tutorial covers mostly process of creating faction out of already existing assets (or retextures of that content), same principle applies also to new content.
Since process of retexturing character equipment is slightly different from other assets like cars, buildings or weapons, this tutorial also contains small explanatory chapter about it.
Sample New Faction contains three new factions & this tutorial describes only steps necessary to prepare SampleFactionREDFOR. Steps for BLUFOR & GREENFOR factions are basically the same as for REDFOR faction.
File structure
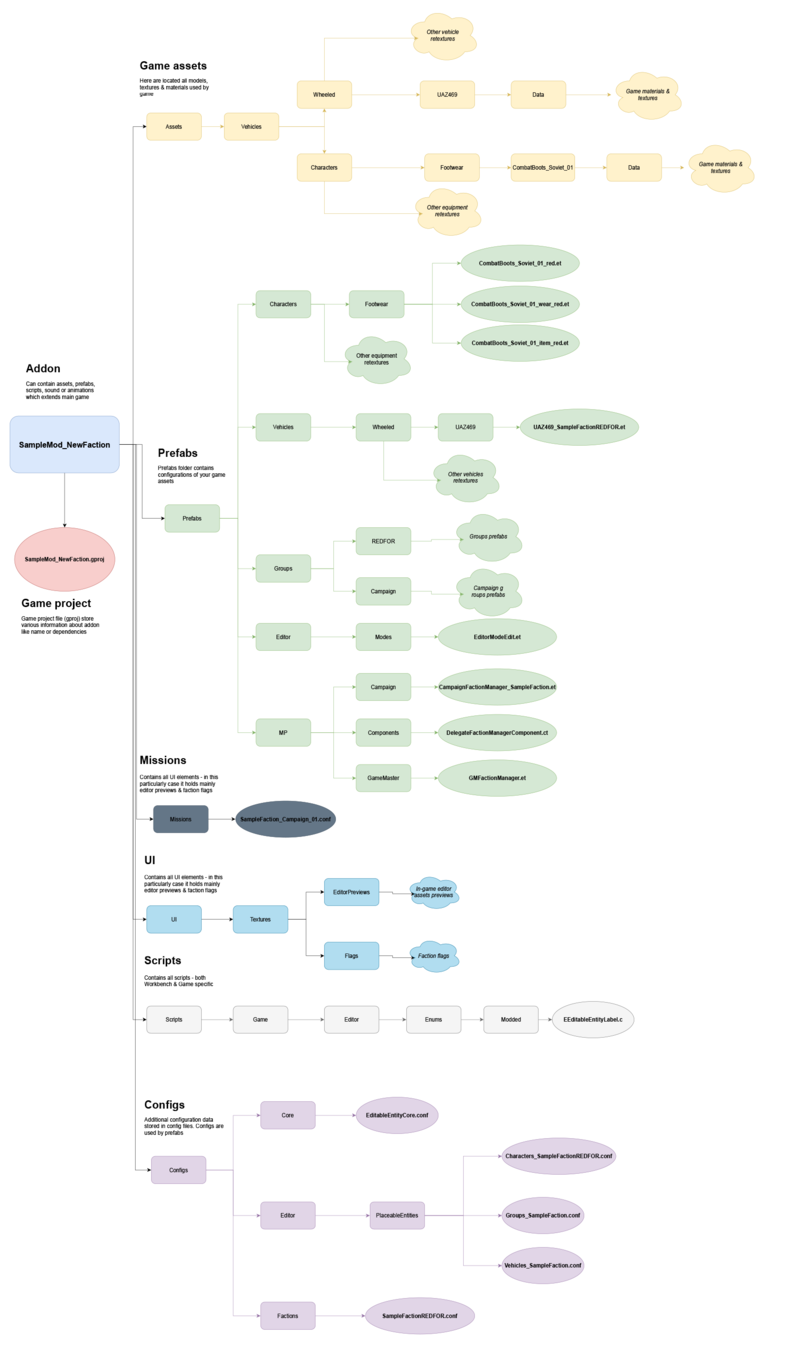
New faction requires quite elaborate structure and below there is tear down of it:
Character configuration
Retexturing existing equipment
One of the first steps of creating a retextured piece of equipment is actually creating a new prefab. In this tutorial, a new red variant of CombatBoots_Soviet_01.et prefab will be created. This can be done either through:
- Create Inherited Prefab option in Resource Browser attached to World Editor
- By dropping instance of prefab to World Editor & then making a new prefab by grabbing that instance back selected folder in Resource Browser
In both cases, goal is to create CombatBoots_Soviet_01_red.et prefab inside Sample New Faction addon structure.
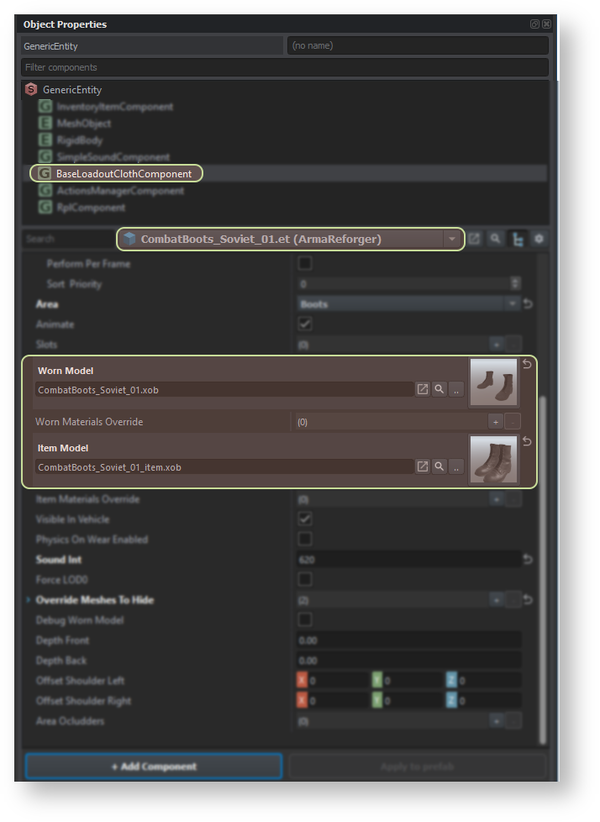
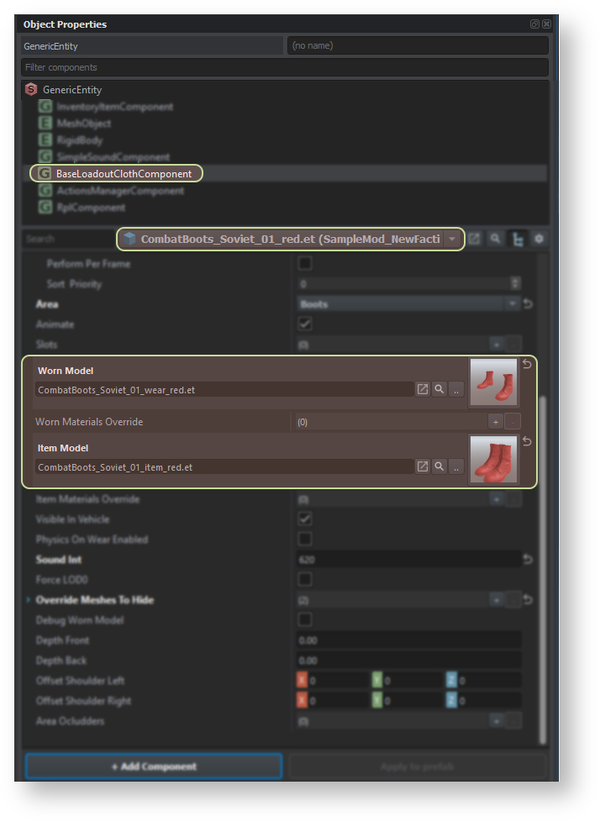
In comparison to other assets, character equipment is bit more complicated to retexture. MeshObject component of wearable equipment is actually not being used for showing the object and instead, visuals are controlled through Worn Model & Item Model properties. One of them define model which is visible when character is wearing given object (Worn Model property) and the other one is used when item is lying on a ground as an prop which can be picked up by other characters (Item Model property).
Those two parameters accept both XOB models and prefabs as well. Depending on complexity of meshes it might be either eiser to use prefabs or Worn/Item Materials Override paramters.
Creating retextures using prefabs
Creating prefabs for retextures is quite easy since process process is exactly same as for regular items.
Those new prefabs should be as simple as possible and they can be created by simply dragging XOB model to World Editor view port. As a result of that action, a new Generic Entity instance with MeshObject component is created and there, assigned materials can be changed as on any other entity. Once assigned materials are adjusted, this entity can be transformed to prefab by grabbing it from Hierarchy list to desired folder in Resource Browser window.
File:armareforger-new-faction-equipment-new-variant.mp4
Creating retextures using overrides
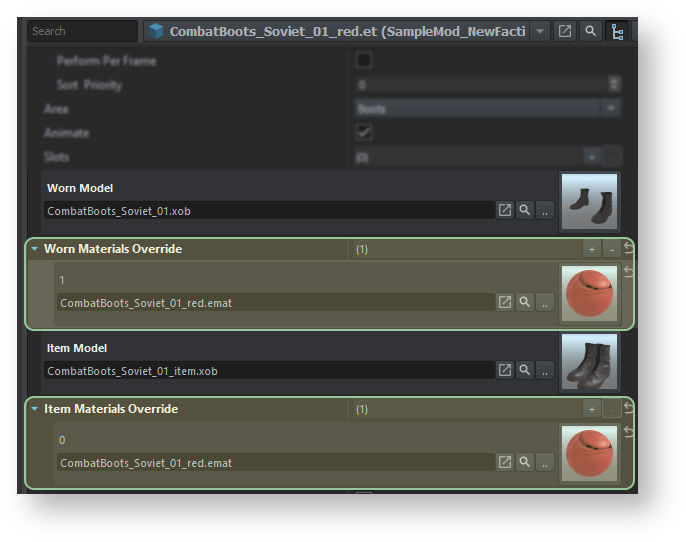
Alternatively, as mentioned before, it is also possible to use Materials Override parameters which are located under Worn & Item Model parameters.
In this case, it is necessary to add new element in Materials Override list and after that assign desired material to that property. If everything is done correctly, Workbench view port should show changed materials.
Under the hood, engine is remaping all materials assigned to this asset in order specified by Materials Override list, therefore caution is recommended since it might happen that order of materials changes after some data tweak. In this case responbility falls into user hands and order of the materials has to be adjusted manually by the author of mod!
Those steps need to be performed for both Worn & Item Models. After that is completed, those new prefabs can be assigned to those two respective fields in BaseLoadoutClothComponent.
In this tutorial, following prefabs (with respective item & worn variants) were created for REDFOR faction:
- CombatBoots_Soviet_01_red.et + ( CombatBoots_Soviet_01_item_red.et & CombatBoots_Soviet_01_wear_red.et ) - retexture of CombatBoots_Soviet_01.et
- Helmet_SSh68_01_red.et + ( Helmet_SSh68_01_item_red.et & Helmet_SSh68_01_wear_red.et ) - retexture of [1]
- Jacket_M88_red.et + ( Jacket_M88_item_red.et & Jacket_M88_wear_red.et ) - retexture of Jacket_M88.et
- Pants_M88_red.et + ( Pants_M88_item_red.et & Pants_M88_wear_red.et ) - retexture of Pants_M88.et
- Vest_Lifchik_red.et + ( Vest_Lifchik_item_red.et & Vest_Lifchik_wear_red.et ) - retexture of Vest_Lifchik.et
- Vest_Lifchik_GL_red.et + ( Vest_Lifchik_GrenadeBelt_item_red.et & Vest_Lifchik_GrenadeBelt_wear_red.et ) - retexture of Vest_Lifchik_GL.et
This set should be enough to have truly red faction.
Creating new characters prefabs
Preparing base character
Before proceeding with creating specific characters types like rifleman, medic or driver, it is generally a good practice to establish a base prefab, which will be used through the faction. Such prefab can contain common configuration like:
- Faction
- Radio protocol
- Identity
- Common parts of equipment (jacket, pants, boots and accessories)
In this example, Character_Base.et prefab is used to create Character_SampleFactionREDFOR_Base.et - a base for all REDFOR faction characters. Inheriting from Character_Base.et prefab should provide a solid base with all necessary components in a state, where only minor adjustments are necessary.
Configuring new characters
Below there is a table with most essential components which will be adjusted in further steps
| SCR_CommunicationSoundComponent | Defines radio protocol which will be used by this character |
| SCR_CharacterInventoryStorageComponent | Main component which controls character inventory |
| CharacterIdentityComponent | This component holds information about identity of character like head, base body & voice type |
| BaseWeaponManagerComponent | This component controls which weapon is equipped by default |
| BaseLoadoutManagerComponent | Defines character loadout like uniform, vest or harness, headgear, etc |
| FactionAffiliationComponent | Defines to which faction this unit belongs to. |
| SCR_EditableCharacterComponent | This component contains in-game related configuration like preview pictures, attributes, display name or budget |
| SCR_InventoryStorageManagerComponent | This components controls what items are preassigned to character & in which part of equipment they should be stored in |
| CharacterWeaponSlotComponent | Those components are used to control how many weapons (& what types of weapons) can have, |
| CharacterGrenadeSlotComponent | This slot controls hand grenade logic |
Changing used radio protocol
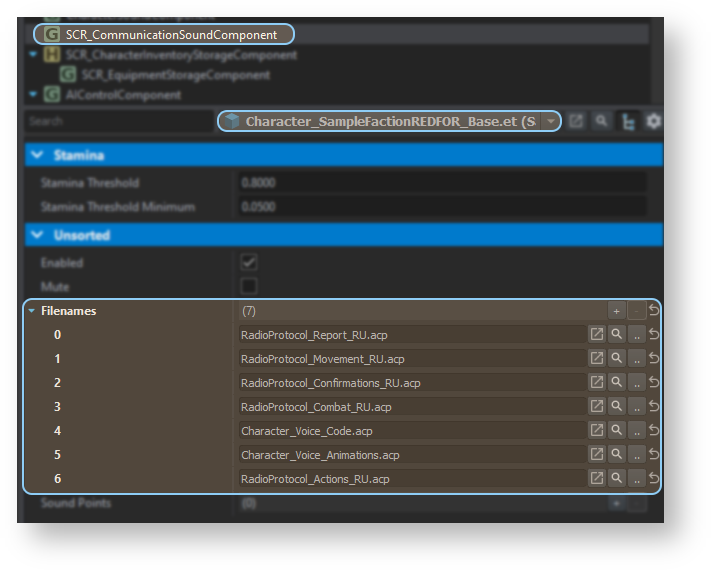
Starting with SCR_CommunicationSoundComponent, a default radio protocol will be changed by adjusting assigned audio configuration project files in Filenames property. In this tutorial, default, English radio protocol will be replaced with Russian variant, which uses _RU suffix.
Changing character identity
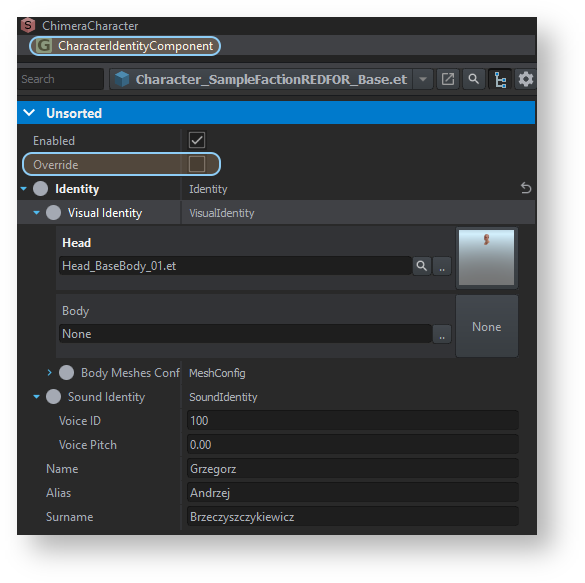
Identity of character defines their voice variant (Voice parameter), visual appearance (Head & Body parameters) & name - all that configuration is stored in CharacterIdentityComponent. Unless working with custom model, there is no need to touch Body Meshes Config, since default values provide optimal configuration for wounded & healthy character materials.
By default, character identity will be randomly generated using parameters stored in faction config (this described later on that page) and values used in this component will be used only if Override property is checked.
Changing character faction
Character faction affiliation determines faction to which unit belongs to. Unlike in previous Arma titles made on Real Virtuality engine, characters in Reforger are no longer divided into few hardcoded sides but instead, faction system is used. In this setup, it is possible to setup alliances between factions in more flexible way depending on the mission creator needs.
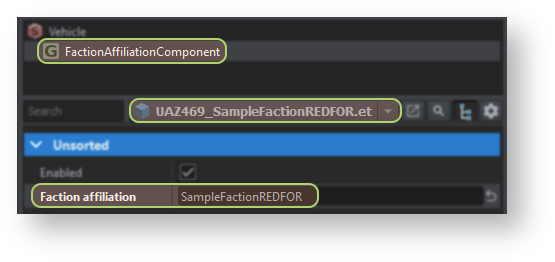
Faction affiliation property is stored in FactionAffiliationComponent. This is fairly simple component which accepts name of faction provided as string in Faction affiliation parameter. Even without faction config ready (which creation process will be described in later part of this document), it is possible to write name of desired faction - in this case it is SampleFactionREDFOR - and create rest of configuration later. {{Clear}
Changing character outfit
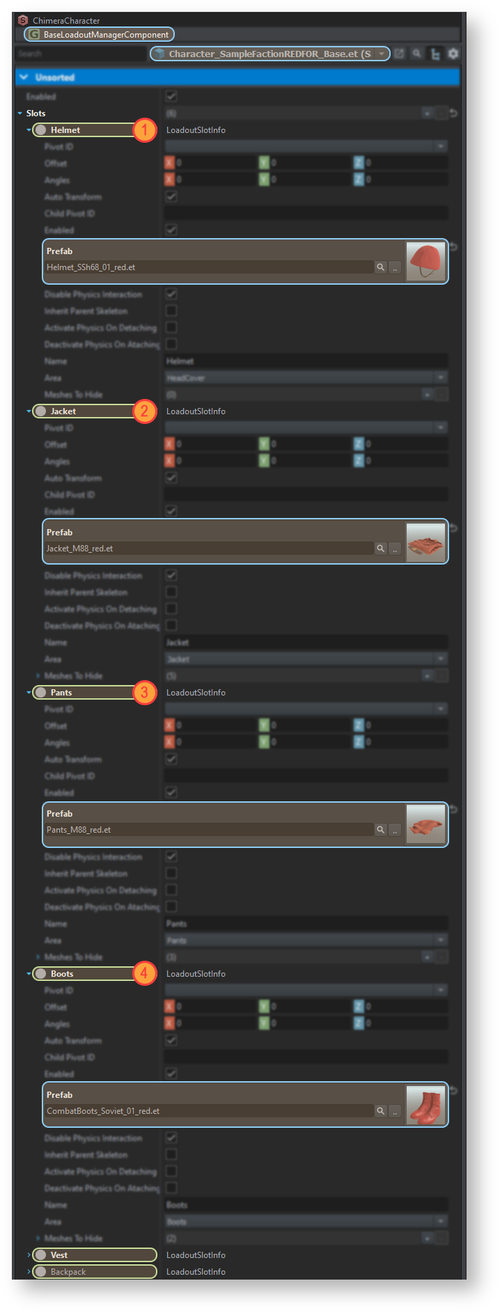
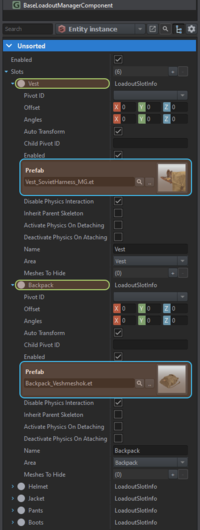
Main character equipment configuration is stored in BaseLoadoutManagerComponent. In this component, it is possible to add slots, which determine what kind of prefabs are attached to the character, their type (used by inventory system) and what part of base body should be hidden when selected piece of equipment is worn - both to save performance and avoid mesh clipping.
Character_Base prefab contains six major slots which are currently handled by inventory system and in most cases there is no need to add more of them. Below is list of all currently supported slots:
- Helmet
- Jacket
- Pants
- Boots
- Vest
- Backpack
Slots inherited from Character_Base contain properly defined Name, Area & Meshes To Hide properties so in this case, only thing to do is changing prefab (through Prefab property ) which is used on selected slots.
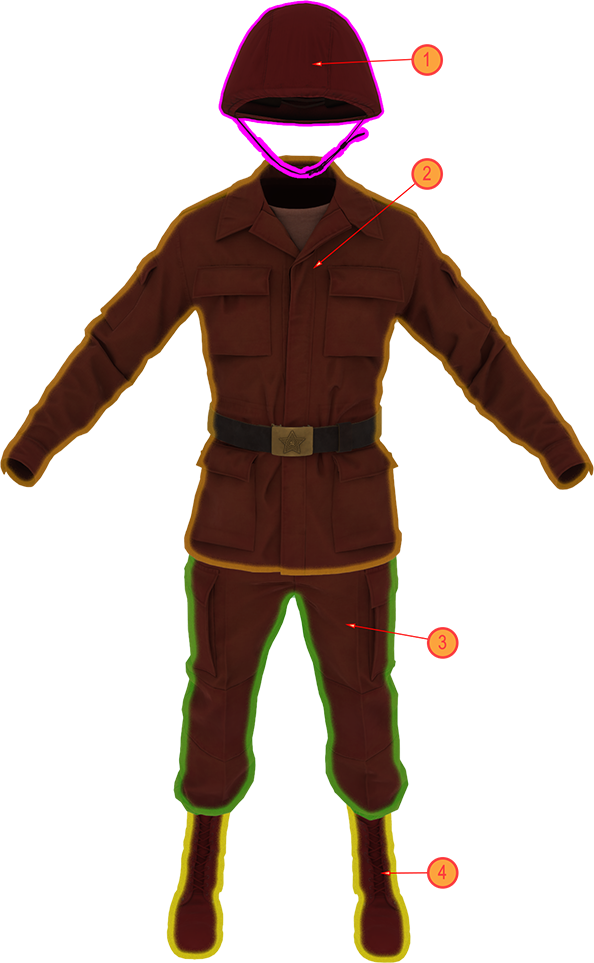
In this tutorial all REDFOR faction characters are using same Helmet, Jacket, Pants & Boots, so it's safe to proceed further and assign previously created Helmet_SSh68_01_red.et, Jacket_M88_red.et, Pants_M88_red.et, CombatBoots_Soviet_01_red.et to their respective slots in SampleFactionREDFOR_Base prefab. Vest & backpack will be assigned in later part of this tutorial to appropriate character classes.
Adding items to character storage
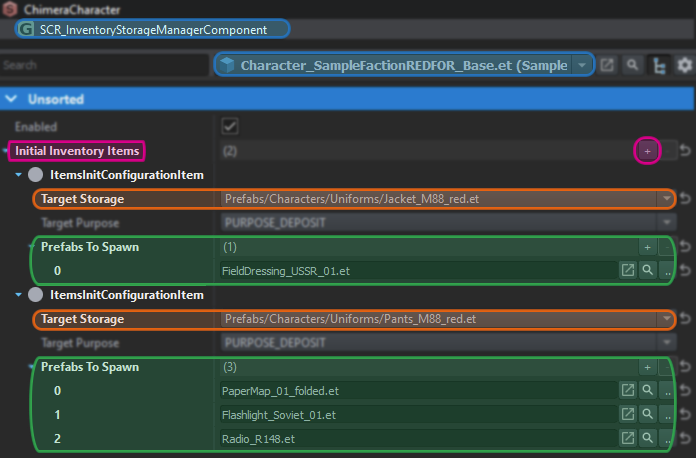
Once character have basic clothing assigned, it is possible to start linking some key items to REDFOR faction base prefab. Items are linked via SCR_InventoryStorageManagerComponent and with this component it is possible to precisely select where given items are stored.
Goal here would be equipping Character_SampleFactionREDFOR_Base with single first aid kit to jacket & few other elementary items like compass, map & radio to character pants.
By default, Initial Inventory Items array is empty and new elements have to be added via plus button . Each element in the array represents a single container which is linked through Target Storage property to one of the prefabs attached to character. Jacket & pants are two separate containers so two new ItemsInitConfigurationItem elements have to be created in Initial Inventory Items array.
Once that is done, it is possible to change Target Storage of those newly created Initial Inventory Items elements. Starting with first element, Prefabs/Characters/Uniforms/Jacket_M88_red.et was selected from Target Storage drop-down menu of first entry of Initial Inventory Items array. This mean that Jacket_M88_red that all prefabs listed in Prefabs to Spawn array will be created in this container. New elements in Prefabs To Spawn array can be added via plus button and in this case only single new entry has to be added. After that is complete, first aid kit ( FieldDressing_USSR_01.et) prefab can be assigned to that newly created slot.
Exactly same procedure can be used to add map ( PaperMap_01_folded.et), compass ( Compass_Adrianov.et ), flash light ( Flashlight_Soviet_01.et ) & radio ( Radio_R148.et) to pants. In this case Prefabs/Characters/Uniforms/Jacket_M88_red.et should be used Target Storage and Prefabs To Spawn array should consist from 3 elements. {{Clear}
Creating character variants
Creating inherited variants
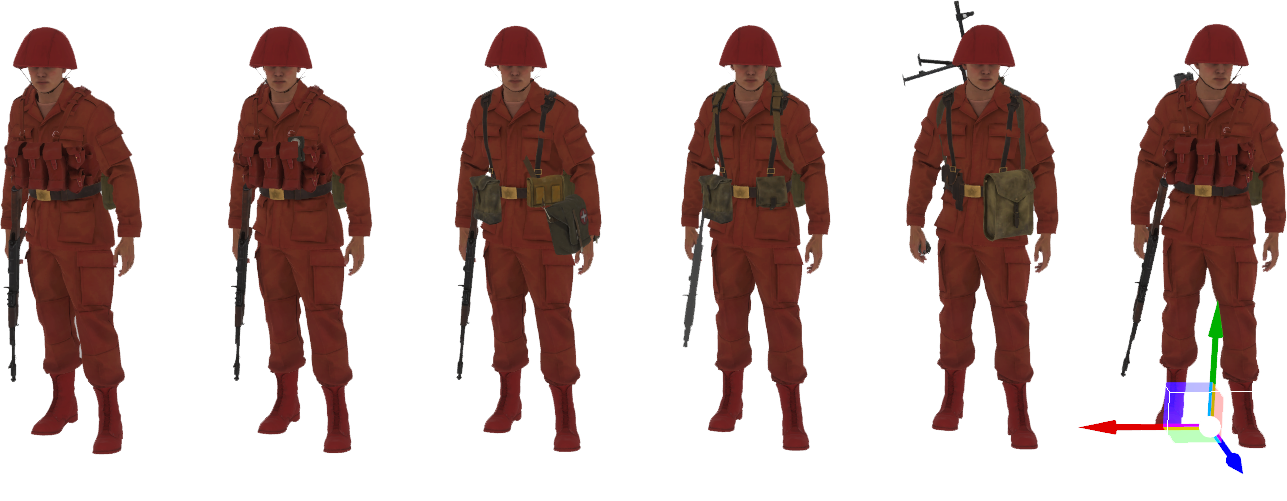
With base character ready, it is time to create actual units which can be used in various game modes or in-game editor. Using Create Inherited Prefab option in Resource Browser attached to World Editor, following new prefabs were prepared:
- Unarmed - Character_SampleFactionREDFOR_Unarmed.et
- Grenadier - Character_SampleFactionREDFOR_GL.et
- Rifleman - Character_SampleFactionREDFOR_Rifleman.et
- Medic - Character_SampleFactionREDFOR_Medic.et
- Machine Gunner - Character_SampleFactionREDFOR_MG.et
- Squad Leader - Character_SampleFactionREDFOR_SL.et
At this point, all those prefabs have identical equipment and their individual equipment can be tweaked. In case of Unarmed character, it can be left as it is, since equipment from base class should fit that role. Rest of the classes require some additional work and in this tutorial whole process of adding weapon & additional equipment to character will be explained on Machine Gunner character.
First thing in that process is adding additional equipment - in this case it is harness with pouch for machine gun magazine & backpack. Machine gunner harness ( Vest_SovietHarness_MG.et ) has to be assigned to Vest slot & backpack for extra magazines ( Backpack_Veshmeshok.et ) has to be assigned to Backpack slot.
Changing weapons
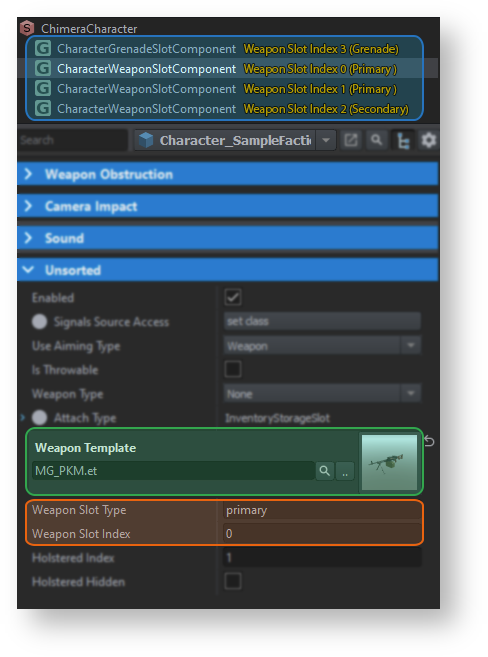
Characters inheriting from Character_Base are using 4 weapon slots. Three of them are using CharacterWeaponSlotComponent, where two of those are used for primary weapons like rifles or launchers, one is used for secondary armament like handguns and single CharacterGrenadeSlotComponent is used, as name would suggest, for throw able items like hand grenades.
Machine Gunner class prepared in this tutorial is supposed to have following loadout:
- PKM machine gun on first primary slot ( MG_PKM.et )
- Makarov handgun on secondary slot ( Handgun_Makarov.et )
- RGD-5 grenade on grenade slot ( Grenade_RGD5.et)
Starting with PKM machine gun, first thing to do is locating correct CharacterWeaponSlotComponent. Since goal is to have that PKM machine gun in first primary slot, values of Weapon Slot Type & Weapon Slot Index has to be verified. In this case, component with Weapon Slot Type should have value " primary" and Weapon Slot Index should be set to 0.
Once that component is located, the only thing left to do is changing assigned prefab in Weapon Template by either clicking on select button or by dragging & dropping MG_PKM.et prefab on Weapon Template property.
Next on the list is Makarov handgun, which should be assigned to CharacterWeaponSlotComponent with Weapon Slot Type set to " secondary" and Weapon Slot Index set to 2. Same as with PKM machine gun, Weapon Template property has to be modified so Handgun_Makarov.et is assigned to that field.
Grenades follow exactly same logic and in this case its even bit easier, since there is only one CharacterGrenadeSlotComponent . After locating that component, Grenade_RGD5.et prefab can be assigned to Weapon Template property.
Adding magazines to loadout
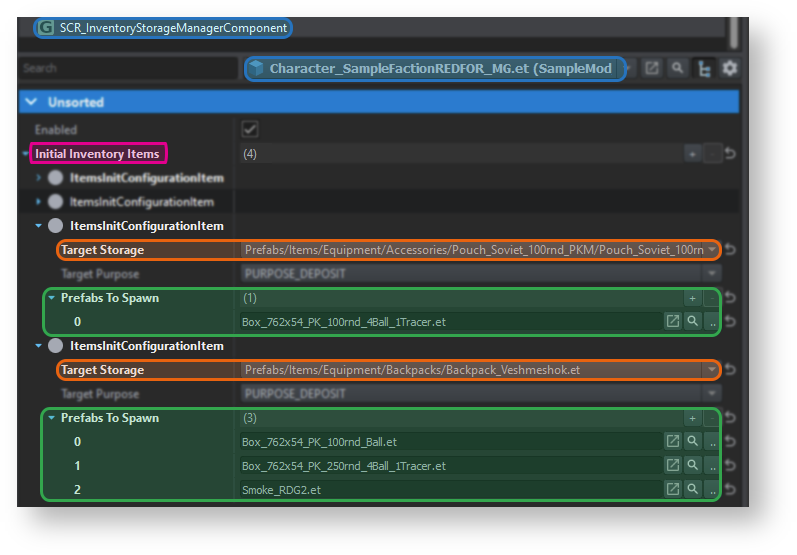
In principle, procedure of adding magazines to loadout is same as for items. In case of machine gunner, additional complication is fact that there are more prefabs to choose from due to additional loadout elements like harness and backpack. Equipment prefabs can consist of multiple child prefabs and in case of Vest_SovietHarness_MG.et , magazine pouch is a separate item attached to the harness itself.
In this example, one magazine is added to Prefabs/Items/Equipment/Accessories/Pouch_Soviet_100rnd_PKM/Pouch_Soviet_100rnd_PKM.et - which is part of Vest_SovietHarness_MG.et prefab - and two magazines goes to backpack Prefabs/Items/Equipment/Backpacks/Backpack_Veshmeshok.et. Additionally, one smoke grenade was added to backpack
Vehicle configuration
Creating vehicle variants
Creating vehicle variants is fairly simple as it can be done in two steps:
- Creating inherited variant ( either through Create Inherited Prefab action in Resource Browser attached to World Editor or in World Editor view port itself ) of selected vehicle prefab in target addon
- Changing Faction affiliation parameter in FactionAffiliationComponent
Even if materials of vehicles are not changed, changing faction affiliation is quite important for AI systems and some of the game modes, so those extra faction specific prefabs are sort of mandatory if its planned to equip new faction with some vehicles.
Groups
Creating groups
It is recommended to create new groups by inheriting from Group_Base.et prefab which has all necessary components already in place. Procedure for it is same as for any other prefabs and it is possible to either use Create Inherited Prefab option in Resource Browser attached to World Editor or go through World Editor view port flow.
Similar as with characters, when preparing set of new groups for a faction, it is also good habit to create base prefab for all groups so the first step here will be creating Group_SampleFactionREDFOR_Base.et which is inheriting from Group_Base.et . After that, rest of the groups can be created using previously prepared Group_SampleFactionREDFOR_Base.et prefab as base. In this tutorial, following small unit rooster is prepared:
- Group_SampleFactionREDFOR_RifleSquad.et
- Group_SampleFactionREDFOR_FireGroup.et
- Group_SampleFactionREDFOR_LightFireTeam.et
Basic group setup
Starting with adjusting Group_SampleFactionREDFOR_Base.et, adjustment has to be performed in properties located directly in entity configuration.
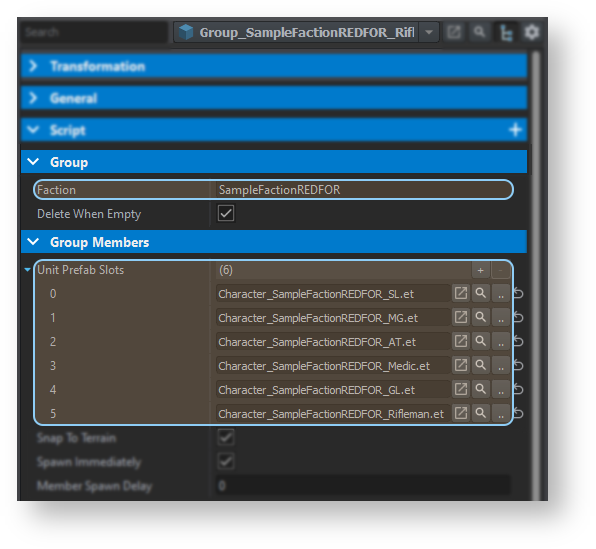
First step towards having a working group prefab will be modifying Faction property located in Groups tab & filling into that property name of target faction - SampleFactionREDFOR in this case.
Next on the list is adjusting of SCR_GroupIdentityComponent and setting there identity used by all SampleFactionREDFOR unit. This component is purely used for UI representation of group in game and it affects what kind of icon is used in both 3D interface and on 2D map. Changing Identity property to OPFOR will be result in hostile forces markers according to NATO APP-6 specification. Rest of those parameters like Icons or Amplifiers can be changed per specific group and is described in detail in later part of this tutorial.
Changing group composition
After basics are done, it is time to move forward and start editing actual composition of groups. Composition of groups is set directly in entity properties and is controlled through Unit Prefab Slot parameter in Group Members tab. Over there it is possible to simple add new groups slots via plus button and then assign character prefabs to them.
Factions
Creating faction config
Basic configuration
New faction configs can be only created either by duplicating (via Duplicate in "addon name" option) one of the existing configs one or by inheriting from existing faction through Inherit in "addon name" option.
First of all, it is necessary to get configs which we want to duplicate or inherit from in the addon itself. To do so, first we navigate to Configs→ Factions folder and there, it is possible to use Override in addon functionality located in context menu of Resource Browser. OPFOR.conf (both of them are located in Configs/Faction folder) can be used for inheritance and USSR.conf for duplication.
Retail version of game has packed data and its content locked - that's why such workaround has to applied. In all other cases this step can be skipped
Next step is creating either inherited config (in case OPFOR.conf was copied) through Create Inherited File option or creating duplicated file via Duplicate option if USSR.conf was transferred to addon. In both cases, a new config will be ready to be filled with actual data relevant to new faction.
| Faction Key | Unique identifier of the faction that was filled in i.e. FactionAffiliationComponent | SampleFactionREDFOR |
| Faction Color | This option determines which color will be used to represent this faction in various UIs like in-game editor or game modes | 244,5,6,255 |
| Name | Display name of faction | Sample Faction - REDFOR |
| Description | Description to be displayed in players UI | |
| Icon | Icon representing this faction in players UI. Recommended size: 256x128px | flag_red_ca.edds |
| Name Upper | Display name of faction in upper case | SAMPLE NEW FACTION - REDFOR |
| Identity of soldiers | FactionIdentity_USSR.conf | |
| Is Playable | Controls if the faction will appear in players respawn menu | True |
| Faction Flag | Flag representing this faction in players UI. Recommended size: 256x128px. Same texture as for Icon can be used | flag_red_ca.edds |
| Default Loadout | Default faction loadout - this option is currently used (& defined) in Conflict only | |
| Callsign Info | This class controls group callsigns available to this faction. Used in Conflict & in-game editor | Callsigns_USSR.conf |
| Arsenal Config | This parameter holds list of available arsenal items. It is recommended to separate that list to separate config | ArsenalConfig_OPFOR.conf |
Faction identity
In case of Identity of soldiers & Callsign Info, it is possible to use already existing configs, which can serve as a templates. Here, SampleFactionREDFOR is going to use FactionIdentity_USSR.conf & ArsenalConfig_OPFOR.conf . This can be achieved by drag & dropping those config files on respective fields:
- FactionIdentity_USSR.conf (Configs/Identities) is assigned to Identitiy of soldiers parameter
- ArsenalConfig_OPFOR.conf (Configs/Callsigns) is assigned to Callsign Info property
Integration with in-game editor
Adding new faction to in-game editor
Adding new faction label
All labels usable by in-game editor are defined in EEditableEntityLabel enumerator. New entries can be added to it by using modded keyword. To do so, a new script file have to be created and in this tutorial EEditableEntityLabel.c file was created in Scripts\Game\Editor\Enums\Modded folder. Afterwards, adding new labels is as simple as adding new all caps entry & assigning to it a number.
modded enum EEditableEntityLabel
{
	FACTION_REDFOR = 14,

	FACTION_BLUFOR = 15,

	FACTION_GREENFOR = 16
}
Once that is done, scripts can be recompiled and new label should be available in drop down menu of various in-game editor properties.
Adding new faction to Editable Entity Core
Once there is a label available, it is possible to
- Use Override in addon function on EditableEntityCore.conf located in Configs/Core folder
- Add new entry to Entity Labels array. Info part is using typical SCR_UIInfo layout
| Name | Display name of faction | REDFOR |
| Description | Description to be displayed in players UI | |
| Icon | Icon representing this faction in players UI. Recommended size: 256x128px | flag_red._ca.edds |
| Icon Set Name | - | |
| Order | Integer used to manually modify order of label. Labels with higher numbers are listed first | |
| Label Type | Label from EEditableEntityLabel enum which should be evaluated | FACTION_REDFOR |
| Label Group Type | Type of label - is it faction, trait, vehicle? | FACTION |
| Filter Enabled | True |
Registering characters, groups & vehicles
Detailed instructions on how to add assets to in-game editor can be found on Sample Mod - Adding addons to in-game editor page and it is highly recommended to make yourself familiar with before proceeding anywhere further. Below are some general notes on how the process was performed for SampleFactionREDFOR related assets.
Adjusting generators configs
Register Placeable Entities plugin is using EditablePrefabsConfig.conf to trigger desired action. This config links to few more sub configs and in case of Characters & Vehicles,
EditablePrefabsComponent_EditableEntity.conf is used to determine faction label.
New rule can be added to EditablePrefabsComponent_EditableEntity.conf in few steps described below:
- Use Override in addon function on EditablePrefabsComponent_EditableEntity.conf located in Configs/Workbench/EditablePrefabs folder
- Add EditablePrefabsLabel_Faction entry to Entity Label Rules array
- Select FACTION_REDFOR in Label drop down menu
- Adjust Faction To Check parameter by typing name of faction: SampleFactionREDFOR (it should be same string as in Faction affiliation parameter in FactionAffiliationComponent of characters or units)
Once those steps are complete, it is important to save all changes through Ctrl+S shortcut. In some rare cases changes applied to that config might need full restart of the Workbench.
Adding assets to register
After EditablePrefabsComponent_EditableEntity.conf is adjusted, it is time to move forward and start t
- Create new config files using SCR_PlaceableEntitiesRegistry class for:
- Characters ( Characters_SampleFactionREDFOR.conf )
- Groups ( Groups_SampleFaction.conf )
- Vehicles ( Vehicles_SampleFaction.conf)
- Adjust Addon parameter in all those configs so it matches target addon (SampleMod_NewFaction)
- Adjust Source Directory to match location of the prefabs
Once those steps are completed, it is now possible to use Register Placeable Entities plugin on all assets which should be available in in-game editor. This action should both generate placeholder images for assets previews & adjust Auto L abels assigned in one of the respective components like SCR_EditableCharacterComponent, SCR_EditableVehicleComponent or SCR_EditableGroupComponent.
Adjusting editable prefabs configuration
After processing prefabs with Register Placeable Entities plugin, assets will still need some manual adjustment to i.e. Authored Labels or Military Symbol (in case of groups) configuration. Also, in most cases it will be necessary to add proper display name to assets. In case of characters, some existing localized strings can be used
Table with localized strings
Characters
In case of characters, beside changing Name of assets in in-game content browser, few additions are necessary to Authored Labels array in SCR_EditableCharacterComponent. Plugin responsible for automatic assignment of labels is not being able to distinguish character types automatically in current state so character role types has to be adjusted by hand. For example, Squad Leader (Character_SampleFactionREDFOR_SL) can receive ROLE_LEADER, Medic can get ROLE_MEDIC, Machine gunner - ROLE_MACHINEGUNNER and so on.
Additionally, characters can also receive additional traits like, TRAIT_ARMED, TRAIT_UNARMED or TRAIT_MEDICAL, which improves filtering in in-game content browser.
Vehicles
When it comes to vehicles, it usually boils down to adding special vehicle traits like TRAIT_ARMED, TRAIT_UNARMED, TRAIT_REFUELING, etc. Some custom labels can be also established based on the needs but by no means its not necessary.
Groups
Similar to characters, also groups can use one of the already existing strings for Name property.
Table with localized strings
Compared to vehicles & characters though, there are no group related labels which have to be filled manually. However, groups also have special Military Symbol class, which holds information about icon which is visible in in-game editor above groups. Using checkboxes & drop menus available there, it is possible to assign one of NATO APP-6 icon to selected group.
Adding new faction to Faction Manager
One of the remaining steps towards integrating new faction into in-game editor is adding it to list of available factions. This can be done in two easy steps:
- Use Override in addon function on FactionManager_Editor.et located in Prefabs/MP/Managers/Factions folder
- Add new element to Factions array by drag and dropping faction config on that property
After that, faction should be selectable in respawn menu during game master sessions & assets should be using proper colorization in content browser.
Generating editor previews
Units, groups & vehicle previews used by in-game editor can be easily generated by using steps described on Editor: Editable Entities: Image Configuration - New Method page & by loading Eden_AssetImages.ent world to generate those pictures. If previous steps were done correctly & assets were correctly registered, then new images should be immediately available after generation process is completed.
Making screenshots disables debug console. It is necessary to restart whole Workbench to restore that functionality.
Integration with Conflict game mode
Adding Conflict specific prefabs & configs
Creating Conflict specific configs
Faction config
Conflict is using extended version of regular faction config, which allows to configure ranks, available structures, default AI groups, vehicles or radio equipment. Since this specialized version of config is extension of default SCR_Faction class, it is recommended to inherit from previously created SCR_Faction config - in this case it is SampleFactionREDFOR.conf.
Easiest way to create such config is using Create Inherited File option on SampleFactionREDFOR.conf. Once new config is created - named i.e. SampleFactionREDFOR_Campaign.conf. After this is complete, this file can be edited in text editor of your choice and SCR_Faction on first line of file
SCR_Faction : "{C93D9F19E9F3CD97}Configs/Factions/SampleFactionREDFOR.conf" {
|
can be replaced with SCR_CampaignFaction like on example below.
SCR_CampaignFaction : "{C93D9F19E9F3CD97}Configs/Factions/SampleFactionREDFOR.conf" {
|
Once this adjustment is saved, it might be necessary to restart whole Workbench in order to have that change correctly loaded.
Afterward, class indication SampleFactionREDFOR_Campaign.conf should correctly show SCR_CampaignFaction class (see green area on picture below).
By default, resulting config will be quite empty and most of the Conflict specific parameters have to be filled by hand. Using table below, SampleFactionREDFOR_Campaign.conf was populated with all necessary data.
| Ranks | Ranks that players can gain through the game | |
| Radio | Faction Radio Encryption Key
Faction Radio Frequency |
Controls default frequency and |
| AI | AI Group Prefab
AI Vehicle Prefab Defenders Group Prefab Default Transport Prefab Spawn AIs |
Configuration of AI groups like base defenders or attacking squads |
| AI (Independent) | Remnant Groups | AI groups spawned by INDFOR side on territory they are controlling. |
| Structures | Radio Prefab
Base Building XXX |
Buildings & equipment used by factions |
| Compositions | Campaign Slot Compositions | Compositions which can be build by this faction |
Vehicle list
Pool of available for request vehicles is defined in config file using SCR_CampaignVehicleAssetList class. By default, Conflict is using VehicleAssetList.conf located in Configs/Campaign folder and this file is a good candidate for a custom variant. After clicking on VehicleAssetList.conf with Righ Mouse Button , Duplicate option can be selected from context menu and new config file - like VehicleAssetList_SampleNewFaction.conf - can be prepared.
It is also possible to create new SCR_CampaignVehicleAssetList config from scratch through Create→ Config File too.
Having a new config file ready, it is possible to start adjusting thing inside of it. Every element inside of Vehicle Asset List array represents an vehicle which can be requested at Vehicle Depot by one of the sides participating in Conflict game mode. In case when VehicleAssetList.conf was duplicated, only things which need to be changed are Prefab & Prefab Opposite parameter.
Prefab parameter controls which asset will be spawned when this vehicle is requested in-game. In this tutorial REDFOR faction vehicles are going to be replaced with variants used by SampleFactionREDFOR faction and for instance UAZ469.et prefab is being replaced with UAZ469_SampleFactionREDFOR.et.
Once replacement is completed on REDFOR vehicles, it also necessary to go through BLUFOR vehicles and update there assets assigned in Prefab Opposite parameter with current SampleFactionREDFOR counterparts. This parameter is mainly used when opposing faction captures vehicle depot with some vehicles being still availble there. In this scenario, enemy vehicles will be still available to request but they will also consume total capacity of such depot. For instance if BLUFOR captures depot with 8 UAZs, then in next reinforcement wave only two additional M151A2 cars will be added to the pool.
Conflict game mode supports only three sides in game and those are available in Faction drop down menu:
- BLUFOR - represent first playable team, which fights for control over the island with REDFOR & INDFOR forces
- REDFOR - represent second playable team, which fights for control over the island with BLUFOR & INDFOR forces
- INDFOR - represent non playable independent forces which are fighting with both BLUFOR & REDFOR forces. This faction holds at the begining majority of the bases
Actual factions linked to BLUFOR, REDFOR & INDFOR are defined in CampaignMPGameMode prefab which is placed and can be modified in Campaign world itself. More information about this feature can be found in chapter describing Conflict world.
Since SampleFactionREDFOR is using color retextures of existing vehicles, it is possible to leave Display Name & Display Name UC parameters intact.
In case config is being set of scratch, following table can be used as reference for making list of availble vehicles.
| Prefab | Prefab of a vehicle which can be requested |
| Faction | One of the |
| Display Name | Name which will be shown in UI (i.e. request menu) |
| Display Name UC | Same as above but in upper case |
| Rank ID | Lowest rank which can request this vehicle |
| Max | Max amount of assets of that type that a base can hold |
| Starting Amount | Amount of vehicles available at mission start |
| Reinforcements Amount | Amount of vehicles which are added in reinforcement wave |
| Prefab Opposite | Opposing faction vehicle counterpart. This parameter is used mainly to correctly recognize maximal capacity of a vehicle depot |
Adding Conflict specific prefabs
Conflict game mode requires few specialized prefabs in order to run proberly. For starter, Conflict requires unique character prefabs - both for AI & players. All those Conflict specific characters are located in Prefabs/Characters/Campaign folder and similar structure is used also for REDFOR faction. Player characters used in Conflict game are typical characters, often derived from existing troops, with addition of few extra components:
- SCR_CampaignInteractionsComponent - used for handling Conflict related interactions
- SCR_CampaignBuildingComponent - used for handling of in-game construction of structures
- MapDescriptorComponent - used for correctly showing unit on map
Player Character
Beginning with Conflict player character, a new Campaign_SampleFactionREDFOR_Player.et prefab can be created by inheriting from one of already existing SampleFactionREDFOR character - i.e. Character_SampleFactionREDFOR_Rifleman.et - using for example Create Inherited Prefab option.
In case of SCR_CampaignInteractionsComponent, CampaignInteractions.ct component template can be used to fill necessary values. This can be achieved by drag & dropping CampaignInteractions.ct from Resource Browser onto ChimeraCharacter in Object Properties window. After that, a new SCR_CampaignInteractionsComponent component will be created with values filled from component template used before.
Remaining two components - SCR_CampaignBuildingComponent & MapDescriptorComponent - have to be added manully through "+ Add Component" button. Once those components are added, following tweaks can be applied:
- SCR_CampaignBuildingComponent
- Building Radius should be changed to 500
- Preview Entity Prefab should be changed to BuildPreview.et
- Building Entity Prefab should be changed to BuildEntity.et
- MapDescriptorComponent
- Descriptor Visible should be unchecked
- Descriptor Type Enum should be changed to Unit
- Descriptor Unit Enum should be changed to Infantry
AI Character
Next on the list is preparing friendly AI prefab - Campaign_SampleFactionREDFOR_AI.et - which can be i.e. spotted in friendly bases. Similar to player character, Character_SampleFactionREDFOR_Rifleman.et can be used as base for such prefab.
Once new AI character is created, CampaignInteractions.ct can be applied to this prefab in same way as for player prefab. This is the only required prefab for AI character and after it is added, Campaign_SampleFactionREDFOR_AI.et should be ready for action!
Obsolete?
Adding Conflict specific groups
Main playable factions require only few extra groups which can be created based on existing group prefabs. Main difference for non playable factions (INDFOR) is presence of Remnants Groups, which are using unique group compositions and their group members are also not being spawned immediately when given prefab is created.
This delayed spawning behavior is achieved by setting Spawn Immediately property to unchecked state.
Remnants group can be prepared in few simple steps. Whole process begins with creating faction specific Remnant group base ( Group_SampleFactionREDFOR_Remnants_Base.et ) prefab using Group_Remnants_Base.et prefab as parent.
In this new base prefab it is necessary to adjust Faction parameter and change it to name faction codename - SampleFactionREDFOR.
Next, it is possible to use that new prefab to create some extra groups like:
- Patrol Group ( Group_SampleFactionGREENFOR_Remnants_Patrol.et )
- Fire Team ( Group_SampleFactionGREENFOR_Remnants_FireTeamet )
- AT Team ( Group_SampleFactionGREENFOR_Remnants_AT.et )
- MG Squad ( Group_SampleFactionGREENFOR_Remnants_MG.et )
- Sniper Team ( Group_SampleFactionGREENFOR_Remnants_Sniper.et )
Once those prefabs are created, only remaining thing to do is adjusting composition of those groups according to their purpose. This can be done by changing Unit Prefab Slots array. It's worth to mention, that remnants groups can use regular character prefabs. For example, AT group can consist of Character_SampleFactionREDFOR_AT.et prefab.
After all groups are created & adjusted, it is possible to assign them to remnants forces rooster. This can be done by adding new elements to Remnant Groups array in SampleFactionREDFOR_Campaign.conf. From this list, game will try to pick random groups depending on the context of area where they are supposed to be spawn ( SCR_CampaignREmnantsSpawnPoint). This is done by setting Probability & Type in SCR_CampaignRemnantsGroup entry in Remnant Groups array.
Conflict attackers & defenders AI groups consist of previously created Conflict variant of AI characters. Configuration of those groups is basically the same as regular ones. Defenders groups are spawned in bases controlled by this faction and they are tasked with defending this territory. Attackers on the other hand should actively try to capture enemy bases using vehicle defined in faction config.
Starting with creation of base group for both attackers & defender, a new Group_SampleFactionREDFOR_Campaign_Base.et prefab, inheriting from regular Group_SampleFactionREDFOR_Base.et group, was created.
In this base prefab there is only one thing which need to be adjusted:
- Unit Prefab Slots array should be tweaked so only 3 Campaign_SampleFactionREDFOR_AI.et prefabs are present.
Next, using Group_SampleFactionREDFOR_Campaign_Base.et as paraent, Group_SampleFactionREDFOR_Campaign_Defenders.et was prepared. This prefab doesn't need any additional refinments.
Similar to defenders group, attacker group - Group_SampleFactionREDFOR_Campaign.et - was prepared using Group_SampleFactionREDFOR_Campaign_Base.et as parent. This prefab needs two tweaks:
- Unit Prefab Slots array should consist from 7 Campaign_SampleFactionREDFOR_AI.etcharacters
- Spawn Immedietely parameter should be unchecked. This is done to avoid spike in load when spawning those groups across the island
Finally, when those groups are ready, they can be assinged to apprioriate fields in SampleFactionREDFOR_Campaign.conf
- AI Group Prefab → Attacker group - Group_SampleFactionREDFOR_Campaign.et
- Defenders Group Prefab → Defenders group - Group_SampleFactionREDFOR_Campaign_Defenders.et
Creating new Conflict world
Using Conflict template
Adjusting scenario
After sucesfully copying template to the addon, it's time to change playable faction in this scenario.
In logic layer, there are three entities which have to be adjusted:
- CampaignFactionManager1 → This entity holds information about factions which can be used in this scenario
- CampaignMPGameMode1 → One of the core Conflict entities - here it is possible to adjust all kind of Conflict gameplay options.
- CampaignLoadoutManager_1 → Defines characters (loadouts) which players can select in respawn menu
Faction Manager
SCR_CampaignFactionManager Faction Manager contains list of all factions that participate in Conflict game-mode. Main parameter of that entity is Factions array where it is possible to add or replace existing factions with custom ones.
In this tutorial, default USSR faction is being replaced with SampleFactionREDFOR. Such replacement can be achieved by drag & dropping SampleFactionREDFOR_Campaing.conf on SCR_CampaignFaction element representing USSR faction inside Factions array.
Another notable thing which is set in CampaignFactionManager1 is Vehicle Asset List, which contains link to a config file containing list of available for request vehicles. In this tutorial, previously created VehicleAssetList_SampleNewFaction.conf is assigned to this parameter.
Game Mode tweaking
SCR_GameModeCampaignMP CampaignMPGameMode1 entity contains also of various parameters but since goal here is just to change the playable faction, only faction key wil be changed. Faction keys are used to connect factions defined in faction manger to one of the three playable sides in Conflict game mode.
In this tutorial, OPFOR Faction Key, located in Unsorted group of parameters, is changed from USSR to SampleFactionREDFOR.
Loadouts
SCR_LoadoutManger Loadout manager controls which classes player can select in respawn menu. In this case, USSR loadout will be replaced with SampleFactionREDFOR variant and following parameters will have to be adjusted:
- Loadout Name → Display name of loadout in respawn menu. Here it is replaced iwth REDFOR string
- Loadout Resource → Prefab of spawned character. This parameter can be replaced with previously created Conflict character - Campaign_SampleFactionREDFOR_Player.et .
- Affiliated Faction → Defines to which factions belongs this loadout. Parameter was replaced with SampleFactionREDFOR
Testing results in game
Once all those changes are done, it is possible to switch into play mode by either clicking on button with green arrow or by pressing F5 shortcut.

