Retexturing with setObjectTexture: Difference between revisions
Lou Montana (talk | contribs) m (Fix link) |
Lou Montana (talk | contribs) m (Add Procedural Textures link) |
||
| Line 1: | Line 1: | ||
{{TOC|side}} | {{TOC|side}} | ||
{{Feature|informative|Textures can also be generated by the engine; see [[Procedural Textures]].}} | |||
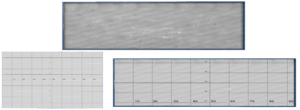
If you want to retexture an asset with the [[setObjectTexture]] command it is necessary to work with the original texture. As an example we will be using the [[Arma_3:_CfgVehicles_EMPTY|Wall Sign]] ({{hl|Land_WallSign_01_F}}). Contrary to other signs, such as the advertisment signs ({{hl|SignAd_...}}), a texture with the usual dimensions (2<sup>x</sup> * 2<sup>y</sup>, eg. 256x256, 512x512, ...) will display the image wrong. This is because the texture also contains the texture for the back and sides of the board, not only the "content". With the following steps you can correctly retexture such assets. | If you want to retexture an asset with the [[setObjectTexture]] command it is necessary to work with the original texture. As an example we will be using the [[Arma_3:_CfgVehicles_EMPTY|Wall Sign]] ({{hl|Land_WallSign_01_F}}). Contrary to other signs, such as the advertisment signs ({{hl|SignAd_...}}), a texture with the usual dimensions (2<sup>x</sup> * 2<sup>y</sup>, eg. 256x256, 512x512, ...) will display the image wrong. This is because the texture also contains the texture for the back and sides of the board, not only the "content". With the following steps you can correctly retexture such assets. | ||
[[Image:setObjectTexture comparison.png|thumb|right|The same texture is applied to a 1x1 User Texture (bottom left) and a Land_WallSign_01_F (top with default textures, bottom right with the custom texture). The custom texture is cut off when applied to the wall sign.]] | [[Image:setObjectTexture comparison.png|thumb|right|The same texture is applied to a 1x1 User Texture (bottom left) and a Land_WallSign_01_F (top with default textures, bottom right with the custom texture). The custom texture is cut off when applied to the wall sign.]] | ||
Revision as of 17:30, 21 April 2023
If you want to retexture an asset with the setObjectTexture command it is necessary to work with the original texture. As an example we will be using the Wall Sign (Land_WallSign_01_F). Contrary to other signs, such as the advertisment signs (SignAd_...), a texture with the usual dimensions (2x * 2y, eg. 256x256, 512x512, ...) will display the image wrong. This is because the texture also contains the texture for the back and sides of the board, not only the "content". With the following steps you can correctly retexture such assets.
Prerequisites
For this tutorial you will need:
- Arma 3 Tools
- Access to the game files. You can:
Steps
Finding the original texture
Your safest bet to find textures is to look in the config. If you want to use setObjectTexture there has to be an attribute called hiddenSelectionTextures which contains at least one entry. In case of the wall sign it looks like this:
hiddenselectionstextures[] = { "a3\Structures_F_Orange\Signs\Special\Data\WallSign_01_F_wood_CO.paa", "a3\Structures_F_Orange\Signs\Special\Data\WallSign_01_F_wood_CO.paa" };
It is also possible to find this path using Eden. You can place down an object, open its attributes (right click >> Attributes... or double click), scroll down to "Object Specific - Object: Wall Sign" and the texture paths should be listed as Texture #0 to Texture#N.
If you have the game data unpacked you simply follow that path and find the paa file. If not it will be a bit more tricky. Most of the game's data is located in the Addons folder in your game directory. But with the release of DLCs the content is way more split up. In the case of our example it is part of the Laws Of War DLC but in the game files it is called "Orange". So if we go into Arma 3
Opening the paa
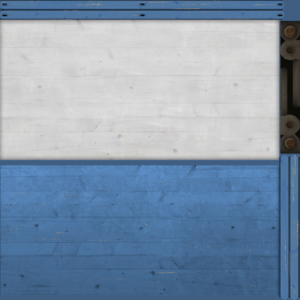
The paa file can be opened with the TexView 2 program that is part of Arma 3 Tools. Opening the paa will show us the problem that we were facing initially. The texture handles the entire sign, including the back of it. What you have to do is to only modify the white part of the board.
Editing the paa
You can't directly edit paa. Instead you have to convert paa to png using TexView 2 first. Then you can edit the png file and convert pack to paa with TexView 2 again.
Applying the texture
Your paa file has to be placed in the mission folder or your mod folder. To set the texture you can use setObjectTexture or its global variant setObjectTextureGlobal.


