Eden Editor: Switching from 2D Editor: Difference between revisions
(Created page with "WIP Switching from 2D Editor Switching from 2D Editor") |
Lou Montana (talk | contribs) m (Some wiki formatting) |
||
| (5 intermediate revisions by 2 users not shown) | |||
| Line 1: | Line 1: | ||
{{TOC|side}} | |||
[[ | While Eden Editor is based on the good old 2D Editor, there are some major differences. | ||
Apart from the obvious addition of the 3D view, many new features were introduced or improved, while a few other, less important ones, had to be discontinued. | |||
== Discontinued Features == | |||
* Map object interaction (e.g., attaching waypoints to map objects) | |||
* AND and OR waypoints for logics | |||
* '''Special''' object attribute: | |||
** ''Flying'' is set by increasing altitude. | |||
** ''Formation'' is available in the context menu. | |||
** ''In Cargo'' is achieved by moving characters to vehicles directly. | |||
== Placing Entities == | |||
To place an entity in the 2D editor, you first had to select an editing mode (e.g., Objects), then double-click in the map and select type in the attributes window. | |||
In Eden Editor, the order is different. You first pick a type from the Asset Browser (e.g., Rifleman in Objects) and then simply click {{Controls|LMB}} in the view to place the new entity. | |||
Holding {{Controls|ctrl}} while clicking will let you place multiple entities of the same type in a row. | |||
== Logics and Modules == | |||
Logics and Modules are now grouped together under systems. Their icons were tweaked to make them easily recognisable. | |||
== Groups Mode == | |||
Groups ({{Controls|F2}}) were renamed to '''Compositions''' and apart from infantry or tank formations, you can also find composition of props there. Perfect when you want to quickly build a camp or an outpost. | |||
== Empty Vehicles == | |||
Empty Vehicles are no longer mixed together under '''Props'''. | |||
To place a vehicle without default crew, find it under its side (e.g., BLUFOR Hunter) and hold '''Alt''' while placing it. | |||
== Vehicle Crew == | |||
[[File:3den crewBox.jpg|300px|center]] | |||
You can now edit vehicle crew individually. When you hover the cursor over a vehicle, an interactive list of all crew members inside will be expanded next to the vehicle icon. | |||
When the vehicle has visible crew positions (e.g., soldiers sitting inside a car), you can also see icons directly on each member. | |||
== Placing Waypoints == | |||
While placing waypoints from the Waypoints (F4) list is still possible, you can also hold {{Controls|ctrl}} and press {{Controls|RMB}} to quickly add a waypoint. | |||
== Attaching Waypoints == | |||
When you place a waypoint on another object, it will be attached to it. While in 2D Editor there was no way how to detach it afterwards, you can now simply drag it away from the object. | |||
Dragging the waypoint back onto the object will attach it again. | |||
== Synchronisation == | |||
[[File:3den entityMenuConnect.jpg|300px|center]] | |||
Synchronisation mode is gone. Instead, you can pick a specific connection type from the entity context menu (press {{Controls|RMB}} on it). | |||
Grouping characters together can also be achieved by holding {{Controls|ctrl}} and dragging a line from one character to another. | |||
== Group Entity == | |||
Group is now an editable entity, its icon shown above its leader. Selecting it will also select all of its members. You can also access its attributes when you double-click on it. | |||
To avoid scene cluttering, group icons are not drawn above a lone unit unless it is selected. | |||
== Editing Multiple Entities == | |||
[[File:3den attributesMulti.jpg|300px|center]] | |||
Double-clicking on an entity will open its attributes. | |||
When you have multiple entities selected, you can edit their attributes together by opening the context menu {{Controls|RMB}} and picking the '''Attributes''' option. | |||
If the attribute value is not shared by all selected entities, the attribute will be disabled in the window. To apply its value to all selected entities, you have to manually enable it using a check box on the right. | |||
== Undo == | |||
And last, but not least, you can now undo recent changes you've made. | |||
Please keep in mind that history is reset every time you play the scenario or load another one. | |||
[[Category:Eden Editor: Getting Started|Switching from 2D Editor]] | [[Category:Eden Editor: Getting Started|Switching from 2D Editor]] | ||
Latest revision as of 13:23, 21 March 2024
While Eden Editor is based on the good old 2D Editor, there are some major differences. Apart from the obvious addition of the 3D view, many new features were introduced or improved, while a few other, less important ones, had to be discontinued.
Discontinued Features
- Map object interaction (e.g., attaching waypoints to map objects)
- AND and OR waypoints for logics
- Special object attribute:
- Flying is set by increasing altitude.
- Formation is available in the context menu.
- In Cargo is achieved by moving characters to vehicles directly.
Placing Entities
To place an entity in the 2D editor, you first had to select an editing mode (e.g., Objects), then double-click in the map and select type in the attributes window.
In Eden Editor, the order is different. You first pick a type from the Asset Browser (e.g., Rifleman in Objects) and then simply click ![]() in the view to place the new entity.
Holding Ctrl while clicking will let you place multiple entities of the same type in a row.
in the view to place the new entity.
Holding Ctrl while clicking will let you place multiple entities of the same type in a row.
Logics and Modules
Logics and Modules are now grouped together under systems. Their icons were tweaked to make them easily recognisable.
Groups Mode
Groups (F2) were renamed to Compositions and apart from infantry or tank formations, you can also find composition of props there. Perfect when you want to quickly build a camp or an outpost.
Empty Vehicles
Empty Vehicles are no longer mixed together under Props.
To place a vehicle without default crew, find it under its side (e.g., BLUFOR Hunter) and hold Alt while placing it.
Vehicle Crew
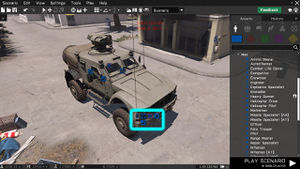
You can now edit vehicle crew individually. When you hover the cursor over a vehicle, an interactive list of all crew members inside will be expanded next to the vehicle icon.
When the vehicle has visible crew positions (e.g., soldiers sitting inside a car), you can also see icons directly on each member.
Placing Waypoints
While placing waypoints from the Waypoints (F4) list is still possible, you can also hold Ctrl and press ![]() to quickly add a waypoint.
to quickly add a waypoint.
Attaching Waypoints
When you place a waypoint on another object, it will be attached to it. While in 2D Editor there was no way how to detach it afterwards, you can now simply drag it away from the object. Dragging the waypoint back onto the object will attach it again.
Synchronisation
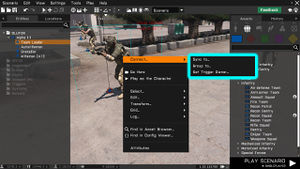
Synchronisation mode is gone. Instead, you can pick a specific connection type from the entity context menu (press ![]() on it).
on it).
Grouping characters together can also be achieved by holding Ctrl and dragging a line from one character to another.
Group Entity
Group is now an editable entity, its icon shown above its leader. Selecting it will also select all of its members. You can also access its attributes when you double-click on it.
To avoid scene cluttering, group icons are not drawn above a lone unit unless it is selected.
Editing Multiple Entities
Double-clicking on an entity will open its attributes.
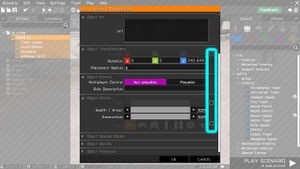
When you have multiple entities selected, you can edit their attributes together by opening the context menu ![]() and picking the Attributes option.
and picking the Attributes option.
If the attribute value is not shared by all selected entities, the attribute will be disabled in the window. To apply its value to all selected entities, you have to manually enable it using a check box on the right.
Undo
And last, but not least, you can now undo recent changes you've made.
Please keep in mind that history is reset every time you play the scenario or load another one.


