MaskMapper Tutorial for Visitor3: Difference between revisions
No edit summary |
No edit summary |
||
| Line 10: | Line 10: | ||
=== Preparing your mask === | === Preparing your mask === | ||
To prepare a mask you need to either create the mask yourself in a program such as photoshop, or source it from GIS data. In this example | To prepare a mask you need to either create the mask yourself in a program such as photoshop, or source it from GIS data. In this example I will be generating mine entirely from photoshop. I made an image of the "island" from Visitor 3, then imported this in photoshop, and painted the areas I wanted. | ||
In preparing your mask, you need to pay special attention to the masks resolution. This means how much area each pixel of your mask is going to represent. Too higher resolution will take too long to process and reduce variation opportunities in your color range. Too low resolution will make the objects look placed within obvious sharp edged patterns. As a good rule of thumb, I have been using a mask that is either the same resolution as your height map, or half of that. So a resolution of between 5-10 meters per pixel is ideal. My map used for this tutorial is based off real world data, with a heightmap resolution of 7.5m (4096x4096), so I use a similar sized mask for import. I do a seperate mask for each type of vegetation I wish to import. Sometimes running the same mask several times, if I have different types of a similar object (for example several variations of pines). | In preparing your mask, you need to pay special attention to the masks resolution. This means how much area each pixel of your mask is going to represent. Too higher resolution will take too long to process and reduce variation opportunities in your color range. Too low resolution will make the objects look placed within obvious sharp edged patterns. As a good rule of thumb, I have been using a mask that is either the same resolution as your height map, or half of that. So a resolution of between 5-10 meters per pixel is ideal. My map used for this tutorial is based off real world data, with a heightmap resolution of 7.5m (4096x4096), so I use a similar sized mask for import. I do a seperate mask for each type of vegetation I wish to import. Sometimes running the same mask several times, if I have different types of a similar object (for example several variations of pines). | ||
| Line 16: | Line 16: | ||
==== Creating the Mask ==== | ==== Creating the Mask ==== | ||
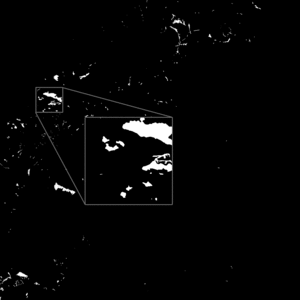
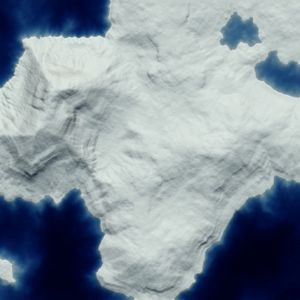
Here is | Here is my vegetation mask for Pines on my map alongside a the heightmap (provided for the sake of comparison): | ||
[[Image:Maskmapper visitor3 tutorial mask vegetation.gif|300px|Vegetation Mask]][[Image:Maskmapper_visitor3_tutorial_falseheightmap.jpg|300px|Embossed Heightmap for comparison]] | |||
'Points to note: | |||
* Dimensions of image must be square | |||
* Image must be greyscale' | |||
==== Converting Mask to text ==== | ==== Converting Mask to text ==== | ||
Download | Download and install [http://rsb.info.nih.gov/ij/ ImageJ], which is able to read BMP files and export them as Ascii Text. Open your mask within this, and then select | ||
Revision as of 12:19, 15 November 2009
Outline
The purpose of this is to place large quantities of vegetation and other objects within certain areas of a map for ArmA/ArmA2. Previously, object placement was either via import from a previous map or manual placement. On most maps there may be as many as several hundred thousand individual objects, many of which are vegetation.
In this tutorial, we will take a "mask", and run that through a computer program that will generate objects randomly according to our specifications within that mask. This program will generate the output as a file that Visitor can read through its import process.
Instructions
We are going to input vegetation for this tutorial. Vegetation input is one of the last steps I take when preparing my map. In order to decide where you want the vegetation placed, you need to create a mask. This mask decides where vegetation will be placed and where it will not. It is similar, in principle, to masks used when spraypainting words on the side of containers.
Preparing your mask
To prepare a mask you need to either create the mask yourself in a program such as photoshop, or source it from GIS data. In this example I will be generating mine entirely from photoshop. I made an image of the "island" from Visitor 3, then imported this in photoshop, and painted the areas I wanted.
In preparing your mask, you need to pay special attention to the masks resolution. This means how much area each pixel of your mask is going to represent. Too higher resolution will take too long to process and reduce variation opportunities in your color range. Too low resolution will make the objects look placed within obvious sharp edged patterns. As a good rule of thumb, I have been using a mask that is either the same resolution as your height map, or half of that. So a resolution of between 5-10 meters per pixel is ideal. My map used for this tutorial is based off real world data, with a heightmap resolution of 7.5m (4096x4096), so I use a similar sized mask for import. I do a seperate mask for each type of vegetation I wish to import. Sometimes running the same mask several times, if I have different types of a similar object (for example several variations of pines).
Creating the Mask
Here is my vegetation mask for Pines on my map alongside a the heightmap (provided for the sake of comparison):


'Points to note:
- Dimensions of image must be square
- Image must be greyscale'
Converting Mask to text
Download and install ImageJ, which is able to read BMP files and export them as Ascii Text. Open your mask within this, and then select
