Visual scripting introduction – Ylands
No edit summary |
mNo edit summary |
||
| Line 78: | Line 78: | ||
*[https://workshop.ylands.com/asset/590 Adventure] | *[https://workshop.ylands.com/asset/590 Adventure] | ||
---- | |||
{{Ylands scripting navbox}} | |||
Revision as of 16:34, 7 October 2018
Game objects
In Ylands editor you will encounter two basic kinds of objects which you can place into the scene and that will help you create your own level / scenario / game. Those are Entities and Game logics. Both are very important and by having a closer look at them, we will show you how they can be useful to you.
Entities
These are objects you normally see in the game when you play. It can be tree, building block, animal or NPC character. When you place them into the scene inside editor and then play this custom level, all those objects will behave the same way as you are used to in any other Ylands game. You will be able to cut down trees, kill animals, that will run around as usual, and so on. In general, entities are objects that create the environment of your level.
Game logic
These are special objects that are visible only in the editor and help you control your game. For example Trigger zone is object that marks certain area, and when it's entered or leaved by some player, it can perform various actions. Game logics are invisible when the level is being played, but they still react to player or events and perform what they are designed to do.
Object selection and properties
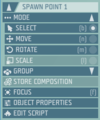
Both Entities and Game logics can be, when placed into the scene, edited and adjusted. Object properties panel can be opened by simply double-clicking any object, or by selecting it and clicking on Object properties button in Object selection panel. Depending on what object are you editing, you will be shown parameters which you can change. For example, when editing a tree you will be able to modify it's color, hitpoints or choose to make it indestructible. Or, if the object you are editing is a door, you can select if it's locked or wide open.
Some Game logics, like Trigger zone, can't change it's color or can't be made indestructible, since the player will never see them while playing or be able to focus them. But you can change their size or shape and modify what type of objects is going to trigger them.
Visual scripting
The best thing about Game logics and Entities is that they are able to interact with each other. You can place door near Trigger zone and make the door to be unlocked when player walks trough the Trigger zone. Or you can replace Trigger zone with lever and unlock the door when player pulls levelers handle. Or the door can be unlocked only when player enters the Trigger zone with some specific item in his inventory. The possibilities are endless.
The thing that glues Entities and Game logics together is Visual scripting.
Visual scripting basics
Visual scripting is simple but powerful tool for creating custom games. Scripting is object oriented and underlying code is based on Java Script, which will in future be possible to edit directly. Because of this we will try to adhere to similar conventions.
Visual scripting code can be attached to any object in the game, which means that you can add custom script to both Entities and Game logics to make them behave the way you want. To start scripting, double-click some object while holding SHIFT, or select it first and then click Edit script in the Object selection panel.
Scripts are assembled from "script tiles" (or just tiles), which can serve various purposes. Scripting itself is performed by looking for script tiles that contain desired function from the menu on the left and then dragging those pieces of code to the area on the right, where those pieces can be assembled into functioning code. Let's have a closer look on what kinds of tiles you may encounter.
Script tiles
Visual scripting code is composed from script tiles. There are three basic types of tiles: events, instructions and literals. Tiles can be snapped together to create a sequence, but sequence is valid only when it starts with event tile, otherwise it won't execute. Also, lonely tiles which are not part of any valid sequence are not executed either.
For example - doors, when opened by player, will execute On Open event. So, if door entity has a script and in this script there are instructions attached to On Open event, the code (tiles) under it will execute every time a player will open this door. If the code sequence don't include the On Open event tile, the game wouldn't know when this sequence is supposed to execute and it never would.
- Tile - One piece of visual scripting code
- Event - Special tiles, serving as anchor for instruction blocks. Each Entity and Game logic object has a specific set of events. Just like with Object properties, there was no sense for Trigger zone to have option for changing it's color, there is no sense for it to have for example On Open event available. These will be available only for door-like objects. On the other hand, Trigger zone will have events On Trigger Enter and On Trigger Exit, which would make no sense on doors.
- Instruction - Command tiles performing various functions. They can be attached to other tiles. Most of the tiles are instructions and their functions will be explained separately.
- Literal - Tiles that can be placed inside instruction tiles as an input. They can contain texts, boolean values (true / false), reference to specific entity in the scene etc.
- Sequence - An assembly of tiles.
Working with tiles
New tiles are dragged from left panel to the working area on the right. To quickly search for desired tile, search bar can be used. Tiles can be snapped / unsnapped together via mouse dragging. Literals are inserted in instruction tiles and usually serve as input value for that instruction. Event tiles can be placed freely in the canvas and serve as starting point of a sequence. Already existing tiles can be duplicated by holding CTR while dragging. To pull single tile from sequence hold SHIFT while dragging. For easy navigation trough complex script, use key F to cycle trough top-level tiles of stacks.
Scripting examples
Scripted game logic
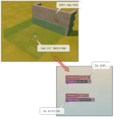
In a simple scene, we have a wall with a torch and trigger zone. We want the torch to react to players presence, so we will setup a trigger zone that upon entering will lit the torch and after leaving it, the torch will be extinguished.
After placing the trigger zone into the level and opening script editor (double-click the trigger zone while holding shift), specific tiles for both actions (Light and Extinguish) can be found in category Entities -> Actions. For those actions to be executed they have to be attached to corresponding events On Trigger Enter and On Trigger Leave, which can be found in Events category. To select target for an instruction, click the eyedropper in entity literal, which will then allow you to pick an entity from scene.
Scripted entity
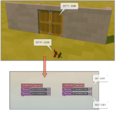
Scripts on entities work in the same manner as on game logics. After opening script editor, list of appropriate events can be used to execute various instructions. In this scene, we want a lever to open and close doors. So we will edit lever script and add Open instruction to n Switch On event and Close instruction to On Switch Off event, both events can be found again in Events category and both instructions in Entities -> Actions.
Further examples
To have look at Visual scripting at work, check official games developed by Ylands team available at Ylands workshop:


