MP Warlords – Arma 3
Lou Montana (talk | contribs) m (Text replacement - "\| ?a3" to "| arma3") |
Lou Montana (talk | contribs) m (Text replacement - "};</syntaxhighlight>" to "}; </syntaxhighlight>") |
||
| Line 204: | Line 204: | ||
default = 3600; | default = 3600; | ||
}; | }; | ||
};</syntaxhighlight> | }; | ||
</syntaxhighlight> | |||
=== 2. Custom asset lists === | === 2. Custom asset lists === | ||
| Line 330: | Line 331: | ||
}; | }; | ||
}; | }; | ||
};</syntaxhighlight> | }; | ||
</syntaxhighlight> | |||
=== 4. Blacklisting assets from AI purchase lists === | === 4. Blacklisting assets from AI purchase lists === | ||
Revision as of 09:58, 25 May 2021
Warlords for Arma 3 is a multiplayer mode set up as a sort of Sector Control / CTI hybrid supporting TvT, PvP as well as COOP and even solo play against the AI.
Eden editor
Here you will find the summary of work that needs to be done in the scenario editor.
1. Place Warlords modules
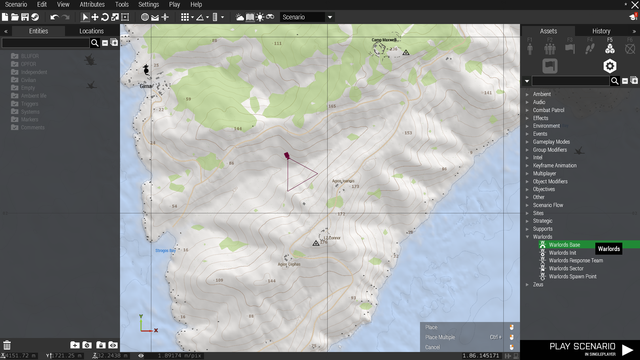
- All Warlords modules can be found under Systems > Warlords.
- Place the Warlords Init module anywhere on the map (its position is irrelevant).
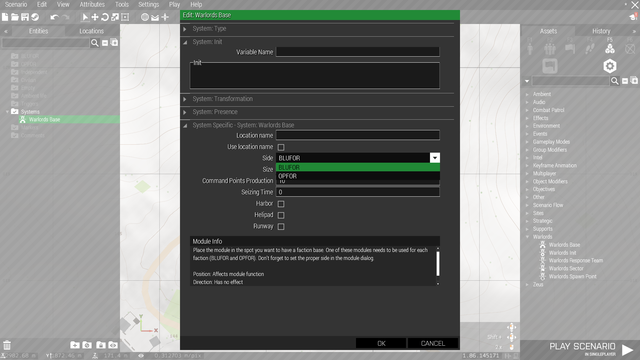
- Feel free to tweak the settings in the module window (you open this window by double clicking on a placed module icon). Check the tooltips for each parameter.
- Place two Warlords Base modules (one for each faction) on the locations you want to have the starting faction bases.
- Don't forget to properly set up the side parameter in the module window!
- Place Warlords Sector modules on desired sector locations.
- You can change various parameters for individual sectors and bases in their module windows.
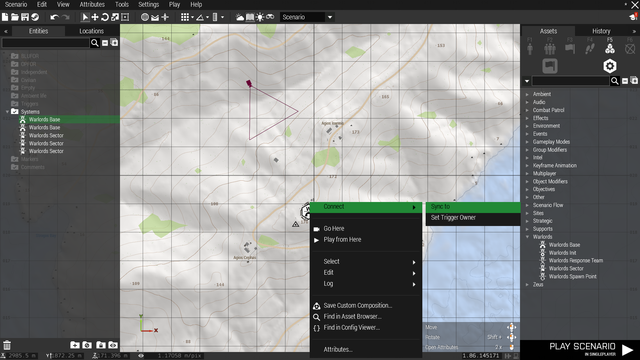
- Connect the bases and the sectors by right clicking on any of them, selecting "Connect > Sync to" and left clicking on the sector or base you want to connect.
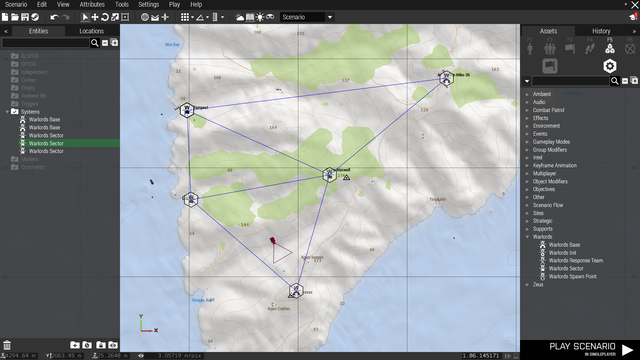
- Connecting sectors defines which sectors need to be captured before unlocking a new sector.
- Repeat this for other sectors until you've got all the sectors and bases linked in a reasonable way.
- If you don't want to rely on random spawn positions, you can use Warlords Spawn Point modules.
- You can also use empty triggers in the same way (in case you reach maximum group limit).
- Feel free to experiment with the other Warlords modules as well, you will find details on how to use them in their module windows.
2. Place playable units
- You should place the playable units inside their respective faction bases.
- The type or number of playable units is up to you.
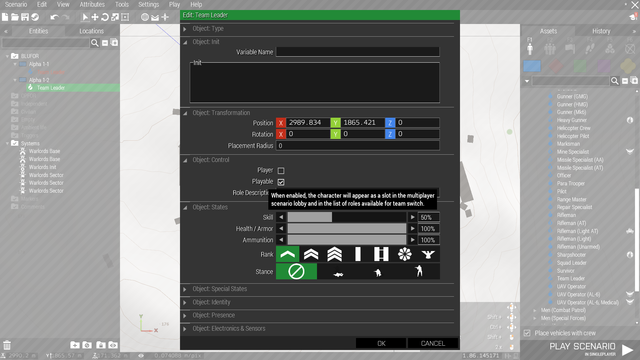
- Make sure all of them are set as Player or Playable.
- Make sure that all playable units are in separate groups.
3. Set up multiplayer rules
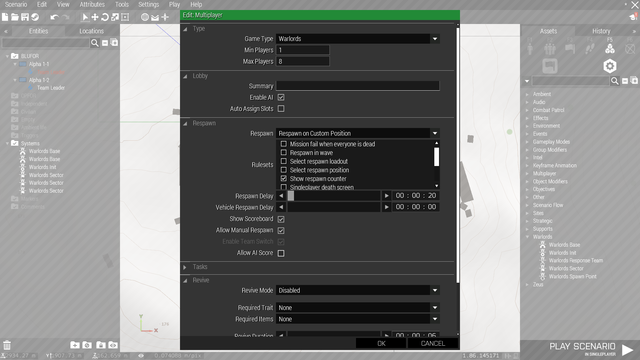
- You will find these settings under Attributes > Multiplayer... in the toolbar at the top of the screen.
- You can set most of these to your liking, however there is one attribute that needs to be set up specifically in order for the mode to work properly:
- Respawn has to be set to Respawn on Custom Position
- Respawn delay is up to you, the default used in all official missions is 20 seconds.
4. (OPTIONAL) Set up vehicles
By default, the sectors spawn only infantry garrison. If you want the independent faction to utilize vehicles as well, you can easily set it up in the editor:
- Place the vehicle (with crew) you want to be spawned inside an independent sector. The vehicle will be spawned at the location you placed it on once this sector is targeted by one of the playable factions.
- You can also assign some waypoints to this vehicle.
- Connect the vehicle to the sector in the same way you linked sectors together (via Connect > Sync to).
5. Done!
Congratulations, your scenario is ready! These were all steps required to have a fully working Warlords mission. Following are some more in-depth customization options.
Additional options
Here you will learn how to enable Warlords parameters in the multiplayer lobby, and how to use your custom assets in the in-game Request menu.
1. Parameters
- If you enable these Parameters in your scenario, players will be able to tweak and override the scenario rules set up in the Init module.
- Save your scenario via Scenario > Save As... from the toolbar at the top of the screen.
- Name the scenario, select the MPMissions folder and hit Save.
- Switch to your desktop and open your scenario folder. You can find it in Documents\Arma 3\MPMissions\ (you should see a file called mission.sqm here).
- Inside this folder, create a file called description.ext.
- Copy/paste this text into the file and save it:
class Params
{
	class BIS_WLStartingDaytime
	{
		title = $STR_A3_combatpatrol_params_1;
		values[] = { 100, -6, 0, 6, -12 };
		texts[] = { $STR_A3_WL_param37_value1, $STR_A3_combatpatrol_params_3, $STR_A3_MP_COOP_m03_noon, $STR_A3_MP_COOP_m03_evening, $STR_A3_combatpatrol_params_6 };
		default = 100;
	};
	class BIS_WLTimeAcceleration
	{
		title = $STR_A3_WL_param2_title;
		values[] = { 1, 2, 4, 6, 8, 10, 12, 14, 16, 18, 20, 22, 24 };
		texts[] = { $STR_special_none, "x2", "x4", "x6", "x8", "x10", "x12", "x14", "x16", "x18", "x20", "x22", "x24" };
		default = 1;
	};
	class BIS_WLProgress
	{
		title = $STR_A3_WL_param1_title;
		values[] = { 1, 2, 3, 4, 5, 6, 7, 8, 9, 10, 11, 12, 13 };
		texts[] = {
			$STR_special_none,
			$STR_A3_WL_forcedProgress_perc_1,
			$STR_A3_WL_forcedProgress_perc_2,
			$STR_A3_WL_forcedProgress_perc_3,
			$STR_A3_WL_forcedProgress_perc_4,
			$STR_A3_WL_forcedProgress_perc_5,
			$STR_A3_WL_forcedProgress_perc_6,
			$STR_A3_WL_forcedProgress_perc_7,
			$STR_A3_WL_forcedProgress_perc_8,
			$STR_A3_WL_forcedProgress_perc_9,
			$STR_A3_WL_forcedProgress_perc_10,
			$STR_A3_WL_forcedProgress_perc_11,
			$STR_A3_WL_forcedProgress_perc_12
		};
		default = 1;
	};
	class BIS_WLFTEnabled
	{
		title = $STR_A3_fastravel1;
		values[] = {1, 0, 2, 3, 4};
		texts[] = { $STR_A3_WL_param3_value1, $STR_A3_WL_param3_value2, $STR_A3_WL_param3_value3, $STR_A3_WL_param3_value4, $STR_A3_WL_param3_value5 };
		default = 1;
	};
	class BIS_WLScanEnabled
	{
		title = $STR_A3_WL_param4_title;
		values[] = { 1, 0 };
		texts[] = { $STR_DISP_OPT_ENABLED, $STR_DISP_OPT_DISABLED };
		default = 1;
	};
	class BIS_WLVotingResetEnabled
	{
		title = $STR_A3_WL_menu_resetvoting;
		values[] = { 1, 0 };
		texts[] = { $STR_DISP_OPT_ENABLED, $STR_DISP_OPT_DISABLED };
		default = 1;
	};
	class BIS_WLAIVoting
	{
		title = $STR_A3_WL_param5_title;
		values[] = { 1, 0 };
		texts[] = { $STR_DISP_OPT_ENABLED, $STR_DISP_OPT_DISABLED };
		default = 0;
	};
	class BIS_WLArsenalEnabled
	{
		title = $STR_A3_Arsenal;
		values[] = { 1, 0 };
		texts[] = { $STR_DISP_OPT_ENABLED, $STR_DISP_OPT_DISABLED };
		default = 1;
	};
	class BIS_WLMarkersTransparency
	{
		title = $STR_A3_WL_param7_title;
		values[] = { 4, 3, 2, 1, 0 };
		texts[] = { $STR_A3_WL_param7_value1, $STR_A3_WL_markerAlpha_perc_1, $STR_A3_WL_markerAlpha_perc_2, $STR_A3_WL_markerAlpha_perc_3, $STR_A3_WL_param7_value2 };
		default = 2;
	};
	class BIS_WLPlayersTransparency
	{
		title = $STR_A3_WL_param8_title;
		values[] = { 4, 3, 2, 1, 0 };
		texts[] = { $STR_A3_WL_param7_value1, $STR_A3_WL_markerAlpha_perc_1, $STR_A3_WL_markerAlpha_perc_2, $STR_A3_WL_markerAlpha_perc_3, $STR_A3_WL_param7_value2 };
		default = 2;
	};
	class BIS_WLFatigueEnabled
	{
		title = $STR_A3_fatigue1;
		values[] = { 1, 0 };
		texts[] = { $STR_DISP_OPT_ENABLED, $STR_DISP_OPT_DISABLED };
		default = 1;
	};
	class BIS_WLMusic
	{
		title = $STR_A3_rscattributemusic_title;
		values[] = { 1, 0 };
		texts[] = { $STR_DISP_OPT_ENABLED, $STR_DISP_OPT_DISABLED };
		default = 1;
	};
	class BIS_WLVoice
	{
		title = $STR_A3_orange_faction_idap_cfgidentities_expo_name;
		values[] = { 1, 0 };
		texts[] = { $STR_DISP_OPT_ENABLED, $STR_DISP_OPT_DISABLED };
		default = 1;
	};
	class BIS_WLStartCP
	{
		title = $STR_A3_WL_param12_title;
		values[] = { 0, 100, 250, 500, 1000, 2500, 5000 };
		texts[] = { "0", "100", "250", "500", "1000", "2500", "5000" };
		default = 500;
	};
	class BIS_WLCPMultiplier
	{
		title = $STR_A3_WL_param13_title;
		values[] = { 1, 2, 3, 4, 5 };
		texts[] = { "1x", "2x", "3x", "4x", "5x" };
		default = 1;
	};
	class BIS_WLVotingTimeout
	{
		title = $STR_A3_WL_param14_title;
		values[] = { 5, 10, 15, 20, 25, 30 };
		texts[] = { "5", "10", "15", "20", "25", "30" };
		default = 15;
	};
	class BIS_WLVehicleSpan
	{
		title = $STR_A3_WL_param15_title;
		values[] = { 900, 1800, 3600, 5400, 7200, 1000000 };
		texts[] = { "15", "30", "60", "90", "120", $STR_A3_WL_param15_value1 };
		default = 3600;
	};
};
2. Custom asset lists
- Assets available in the Request menu can be customized by creating new class in CfgWLRequisitionPresets.
- You can have the config entry in an addon or put it directly into your mission's description.ext file which we covered in the previous section. Syntax is following:
class CfgWLRequisitionPresets
{
	class MyWLAssetList // --- class name used in the Init module
	{
		class WEST // --- assets available for BLUFOR
		{
			class Infantry
			{
				class B_Soldier_F // --- must be asset class name
				{
					cost = 100; // --- Command Points required
					requirements[] = {}; // --- dispositions required ("A" = airstrip, "H" = helipad, "W" = water (harbor))
				};
			};
			class Vehicles
			{
				class B_Quadbike_01_F
				{
					cost = 50;
					requirements[] = {};
				};
			};
			class Aircraft
			{
				class B_Plane_CAS_01_F
				{
					cost = 7500;
					requirements[] = { "A" };
				};
			};
			class Naval
			{
				class O_Boat_Armed_01_hmg_F
				{
					cost = 500;
					requirements[] = { "W" };
				};
			};
			class Gear
			{
				class Box_NATO_Ammo_F
				{
					cost = 200;
					requirements[] = {};
				};
			};
			class Defences
			{
				class B_HMG_01_F
				{
					cost = 250;
					requirements[] = {};
					offset[] = { 0, 5.3, 0 }; // --- custom offset (optional)
				};
			};
		};
		class EAST // --- assets available for OPFOR
		{
			// --- rest of input
		};
	};
};
- In your scenario's Warlords Init module window, find the parameter called Asset list.
- If you've been using the default one until now, it should say ['A3DefaultAll']. Rewrite it to ['MyWLAssetList'] or any other name you've picked for the class name.
- If you want to use custom assets for the garrison units that get spawned in the scenario automatically, you'll need to change the individual faction class names in the same module window.
3. Custom factions
- Custom factions can be used by changing the BLUFOR / OPFOR / Independent faction config classes in the Warlords Init module window in the editor.
- These class names can be find by opening the Config viewer from the editor and navigating to CfgFactionClasses.
- You can further customize the types of units and groups to be spawned by using special class CfgWLFactionAssets. See the example below:
class CfgWLFactionAssets
{
	class WEST // --- BLUFOR
	{
		class InfantryUnits // --- for BLUFOR and OPFOR, only individual unit classnames are defined as the system doesn't spawn predefined groups
		{
			class B_Story_SF_Captain_F {}; // --- asset classname to be added to the spawn list
		};
	};
	class EAST // --- OPFOR
	{
		class InfantryUnits
		{
			class O_V_Soldier_hex_F {};
			class O_V_Soldier_M_ghex_F {};
		};
	};
	class INDEP // --- Independent
	{
		class InfantryGroups // --- independent faction uses group configs to spawn garrisons; you can define various group types to be randomly used
		{
			groups[] = {
				"'Indep' >> 'IND_G_F' >> 'Infantry' >> 'I_G_InfSquad_Assault'", // --- use this part of the config path found in the Config viewer (CfgGroups)
				"'Indep' >> 'IND_C_F' >> 'Infantry' >> 'BanditCombatGroup'" // --- NOTE THE QUOTATION MARKS AND APOSTROPHES
			};
		};
		class MotorizedGroups
		{
			groups[] = {

			};
		};
		class MechanizedGroups
		{
			groups[] = {

			};
		};
		class ArmoredGroups
		{
			groups[] = {

			};
		};
	};
};
4. Blacklisting assets from AI purchase lists
- You might want to keep certain assets purchasable only by players. In vanialla, this is utilized for crewmen, pilots etc.
- Use this syntax in your scenario's description.ext:
WLAIRequisitonBlacklist[] = {
	"B_crew_F",
	"B_Helipilot_F",
	"B_Pilot_F",
	"O_crew_F",
	"O_Helipilot_F",
	"O_Pilot_F",
	"B_T_crew_F",
	"B_T_Helipilot_F",
	"B_T_Pilot_F",
	"O_T_crew_F",
	"O_T_Helipilot_F",
	"O_T_Pilot_F"
};
5. Overriding asset costs
- Below you see an example of changed costs:
class CfgWLAssetCostOverride
{
	B_Soldier_F = 50;		// --- example asset classname
	Scan = 200;				// --- sector scan
	Airdrop = 200;			// --- airdrop
	FastTravel = 200;		// --- fast travel
	LastLoadout = 200;		// --- last loadout
	Arsenal = 200;			// --- arsenal
	FundsTransfer = 200;	// --- funds transfer
	ResetVoting = 200;		// --- voting reset
};
Updating scenarios using the Workshop version of the mode
- All scenarios you've created using the Workshop version should be easy to update to use the new version. Simply remove the JEZ_ prefix from all module class names and properties in mission.sqm.
Easiest way to do this would probably be mass replacing
"JEZ_ModuleWL
with
"ModuleWL

