Main Menu – Arma 3
Lou Montana (talk | contribs) m (Text replacement - "\[\[Eden( |_)Editor(\||\])" to "[[:Category:Eden Editor$2") |
Lou Montana (talk | contribs) m (Text replacement - "Category:Eden Editor" to "Eden Editor") |
||
| Line 65: | Line 65: | ||
=== Default Scenario with Camera === | === Default Scenario with Camera === | ||
# Open [[:Category:Eden Editor]] on the desired terrain | # Open [[:Category:Eden Editor|Eden Editor]] on the desired terrain | ||
# Switch to ''Intro'' [[Eden_Editor:_Scenario_Phases|phase]] and place a player character (the system will not work without a player!) | # Switch to ''Intro'' [[Eden_Editor:_Scenario_Phases|phase]] and place a player character (the system will not work without a player!) | ||
# Save the scenario using the name defined by ''directory'' property in config (''MyScene.MyWorld'' in our example) | # Save the scenario using the name defined by ''directory'' property in config (''MyScene.MyWorld'' in our example) | ||
Latest revision as of 13:26, 9 July 2023
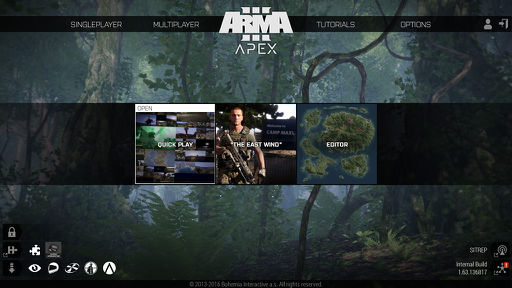
Arma 3 Apex introduces a new main menu defined in the RscDisplayMain ressource.
World Scene
World scene is a scenario shown behind main menu when a specific terrain is loaded and -skipIntro is not used. If you're playing on Altis and leave to main menu, Altis scene will be used.
The scene must be defined in an addon either in the terrain configuration or later by overwriting the existing configurations.
Guidelines
By default, the scene uses a camera but any scriptable system can be used, such as OGV videos.
- All content of the scenario should be placed in the Intro phase.
- The scene should work on 16:9 screen. Multiple monitors doesn't need to be considered, as the main menu shows a grey background there.
For a better player experience, the scene should meet following criteria:
- Lower performance makes navigating the menu uncomfortable.
- Low view distance (~200 m) is recommended.
- Avoid Camera looking down or towards sloped terrain, so the view distance is not as apparent.
- Avoid Unlit night scenes (dark menus on dark scene don't look well).
- Avoid Bad weather (hides shadows).
Configuration for Stratis Terrain
config.cpp (must be binarized)
class CfgPatches
{
	class mainmenu
	{
		units[] = {};
		weapons[] = {};
		requiredVersion = 0.1;
		requiredAddons[] = { "A3_Data_F_Enoch_Loadorder" };
	};
};

class CfgWorlds
{
	class CAWorld;
	class Stratis : CAWorld
	{
		cutscenes[] = { "MyWorldScene" }; // Class names of used scenes. When more than one is present, the system will pick one randomly.
	};
	initWorld = "Stratis";
	demoWorld = "Stratis";
};

class CfgMissions
{
	class Cutscenes
	{
		class MyWorldScene // Class referenced in 'cutscenes' property in CfgWorlds
		{
			directory = "MyAddon\MyScene.Stratis"; // Path to scenario with the scene
		};
	};
};
Default Scenario with Camera
- Open Eden Editor on the desired terrain
- Switch to Intro phase and place a player character (the system will not work without a player!)
- Save the scenario using the name defined by directory property in config (MyScene.MyWorld in our example)
- Open scenario folder (Scenario > Open Scenario Folder)
- Create initIntro.sqf file, it will be run automatically at the scene start
- Copy the code below to the fileThe script will automatically add a subtle vignette and play main menu theme repeatedly.[ //--- Underwater plane { ["InitDummy", ["Stratis", [1445.92,4802.16,-4.05235], 140.191, 0.27, [-9.09091,-10.4773], 2.74605, 0, 1049.08, 0.00329716, 1, 1.10852, -0.157568, 1.23792]] call BIS_fnc_camera; setViewDistance 200; }, //--- Aegis { ["InitDummy", ["Stratis", [2622.76,580.76,16.5994], 25.2349, 0.53, [-44.4346,0], 0, 0, 526.374, 0.00669019, 1, 1, 0, 1]] call BIS_fnc_camera; } ] call BIS_fnc_initWorldScene;
- Replace scenes in the array with your scenes captured by Arma 3: Splendid Camera. Make sure to use "InitDummy" string at the beginning. The example currently uses two Stratis scenes, you replace them with as many scenes as you wish.
- Optionally, add assets to the scene in the editor if needed (e.g., soldiers walking around, parked vehicles, etc.)
- Move the scenario folder to your addon folder (as defined by directory property in config; MyAddon\MyScene.Stratis in our example)
Spotlight
Three large square buttons in the middle of the main menu are spotlight buttons. While the left and right ones are hard-coded, the middle one can be used by any mod-maker.
It is possible to define a list of spotlights, with the system picking randomly from them every time the menu refreshes (i.e. startup or returning from sub-menu).
Configuration
class CfgMainMenuSpotlight // RscDisplayMain >> Spotlight works but is considered obsolete since SPOTREP #00064
{
	class CoopCampaign
	{
		text = "Coop Campaign"; // Text displayed on the square button, converted to upper-case
		textIsQuote = 1; // 1 to add quotation marks around the text
		picture = "\a3\Ui_f\Data\GUI\Rsc\RscDisplayMain\spotlight_1_apex_ca.paa"; // Square picture, ideally 512x512
		video = "\a3\Ui_f\Video\spotlight_1_Apex.ogv"; // Video played on mouse hover
		action = "ctrlactivate ((ctrlparent (_this select 0)) displayctrl 101);"; // Code called upon clicking, passed arguments are [<button:Control>]
		actionText = "$STR_A3_RscDisplayMain_Spotlight_Play"; // Text displayed in top left corner of on-hover white frame
		condition = "true"; // Condition for showing the spotlight
	};

	class AnotherCoopCampaign
	{
		text = "Another Coop Campaign";
		picture = "\a3\Ui_f\Data\GUI\Rsc\RscDisplayMain\spotlight_1_eastwind_ca.paa";
		action = "ctrlactivate ((ctrlparent (_this select 0)) displayctrl 149);";
		actionText = "$STR_A3_RscDisplayMain_Spotlight_Play";
		condition = "isKeyActive 'FinishedCoopCampaign';";
	};

	class JoinServer
	{
		text = "Splendid Server";
		picture = "my_mod\data\spotlight.paa";
		action = "connectToServer ['127.0.0.1', 2302, '']";
		actionText = "Join the Splendid Server";
		condition = "true";
	};
};

