AI Squad Command – Arma 2
Introduction
This is a guide originally published in the BIS forums in order to reduce the problems caused by its being buried and people having to use search the Author was asked if it could be transferred and adapted for use in the BIS Wiki.
Author
Original text by rotkeps [1]
Your Squad
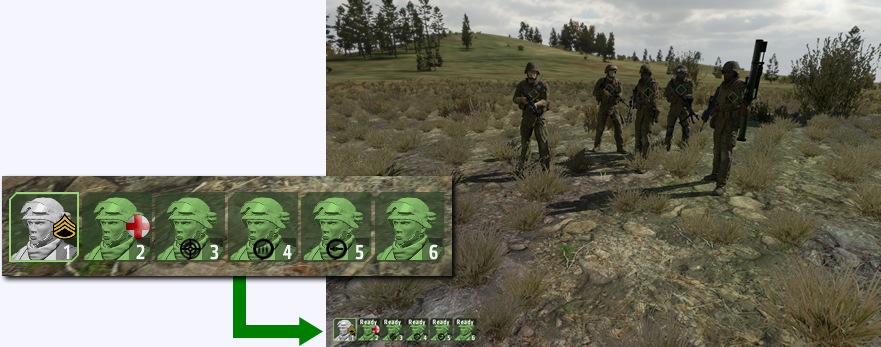
So you have acquired a group of the blighters. What now? I would begin by accustoming yourself to one of the cleaner facets of ArmA II’s UI.

If you have squad members, this should be in the bottom-left of your screen. Those portraits are your window to status of your bit-induced buddies. The colour as well as any icons attached represent each soldiers condition, armaments and what action they’re currently undertaking. You may also notice that each of them is handily numbered, which is used in their selection. This is a pretty straight forward process which can be performed in a number of ways.
Pressing (space-bar) to open the Quick-Command menu will select all of your squad. Selecting individual soldiers can either be done by aiming at them and left clicking whilst in the Quick-Command menu or by pressing the F-key that corresponds to the numbers found on the portrait.
Should you have more than ten members in your squad you will be able to scroll through 'pages' using the [F11] and [F12] keys, which makes creating sub-groups important. They can be chosen by tapping your way through the appropriate F-keys, but you can create preset groups that can be selected easier. This will be covered later on in the guide.
Command Menus
There are several menus that fill with options depending upon what you have selected. They offer a wide range of conditions that allow you to configure how you wish your squad to behave in and out of combat
Each menu is assigned to your number quick key ‘[1] – [0]’ along the top of your querty keyboard. It should be noted that some menus alter depending the type of unit selected as well as based upon the context of what you’re currently aiming at.
The following are covered in this guide:
- Quick Command [spacebar]
- Engagement and watch direction (Default quick key [3])
- Combat Mode (Default quick key [7])
- Formation (Default quick key [8])
- Team Assignment (Default quick key [9])
Not covered in this section are the following:
- Movement relative to the squad commander (Default quick key [1])
- Targeting (Default quick key [2])
- Vehicle interaction (Default quick key [4])
- Squad information requests (Default quick key [5])
- Object and entitiy interacton(Default quick key [6])
- User and Mission designer radio functions and replies to Squad information requests(Default quick key [0])
Quick Command
Your bread and butter of the menus on offer. It features a couple of unique options as well as some of the more important ones from within other menus. Most importantly it will by default display a context sensitive option based upon what you’re currently aiming at.
- Aim at nil - Gives the option to move the selected squad members to that location
- Aim at own squad member - Gives the option to individually select that squad member
- Aim at friendly vehicle - Gives the option for selected squad members to either board or disembark from the vehicle
- Aim at enemy unit - Gives the options to Engage the target (see: Engagement)
You also have the option to order your selected squad members to regroup or stop based upon their current status. Regroup will have them return to formation, whilst stop will have them remain in their current position until ordered to do otherwise. The other options are covered within the other sections of this guide.
Engagement
Here you get to control how your squad members will behave when in range of or under attack from the enemy.
- Hold-Fire - Your squad will attack any enemy it deems to be an immediate threat, usually either very close range targets or those that are firing in your direction
- Open-Fire default - Your squad will attack any enemy it can see and is within range
- Engage - Your squad will remain in formation whilst in combat, any squad members given specific targets will break that formation to attack
- Engage at Will - Your squad members will break formation in combat to attack their self acquired targets
- Disengage default - Your squad will maintain formation under any circumstance
Combat Mode
This menu configures the behaviour of your squad members whilst on the move. Also, you have the option to determine which stance they should try and keep.
- Safe - Your squad moves very quickly. Ignores cover whilst moving often opting to take roads and paths and will not be on the lookout for enemy units
- Aware default - Your squad moves quickly. Will stick loosely to cover sometimes taking roads and paths and will be looking out for enemy units
- Stealth - Your squad moves very slowly. Moving strictly from cover to cover in a bounding fashion, one group will stop to cover whilst one group advances, the squad should spend a lot of time in the prone position
- Danger - Your squad moves slowly. Moving strictly from cover to cover in a bounding fashion, one group will stop to cover whilst one group advances
- Stand Up - Your squad will stay stood up. Useful for traversing long distances on foot
- Stay Crouched - Your squad will remain in the crouched position. Useful for close quarters combat, featuring plenty of cover
- Go Prone - Your squad will stick to the prone position. Useful for quiet movement or long range and low cover engagements
- Keep Low - Your squad matches your current stance
Formation
Simple enough, your squad forms the shape you select in the menu. However it shouldn’t be overlooked so hastily as the chosen formation can play a role in the survivability of your squad members whilst in combat.
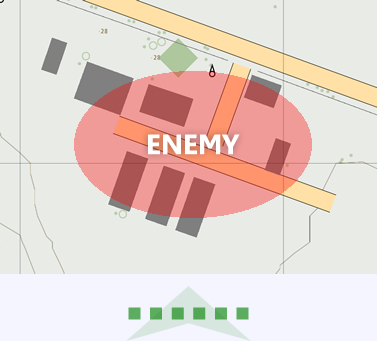
You should try to think of the formation as a plug to an enemy position, picking the shape that best fits their position. This of course relies heavily on your intelligence on the enemy positions but for the most part that can be extrapolated from the immediate terrain.
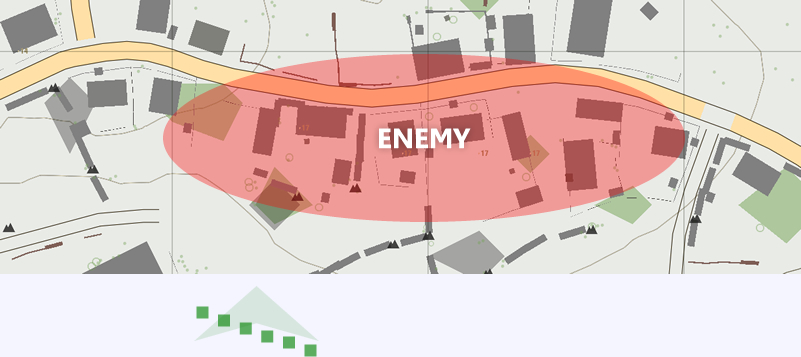
Wedge is the default and is a very solid all round formation. It offers a good forward base of fire whilst giving adequate flank protection on either side. But applying the above rule of ‘round peg; round hole’ you can see a couple of other formations in the below examples that may better suit a combat situation over another.
This one shows slightly bigger village. Here your line formation is nowhere near suitable enough to give the appropriate base of fire across the breadth of the village and will leave your flanks exposed. So opting for an echelon formation with the face towards the main body of the town will give enough a compromise between the forward base of fire and protection of the flank.
Team Assignment
The Team Menu is available with [9] Quick key
At first glance this can just seem like a needless chore. Though the more diverse the mix of units in your squad the more important assigning each of them a team becomes. It may seem cumbersome but once you become proficient with it you will be able to pull of some pretty fancy manoeuvres with your AI buddies, guy.
It gives you the ability to subdivide your squad into teams, each of these teams feature a coloured call-sign (red, green, blue etc.) How you choose to split and use your sub groups is entirely up to you. You may wish to have your vehicles in one group, your infantry in another. You may want to have your infantry split so your heavier, suppressive firepower remains separate to cover your lighter armed squad members as they advance.
Doing it is easier than first impressions may have you believe. In this example I will show an infantry setup with multiple teams:
The Squad
Handpicking my squad I opt for a trusty, all be it, bullet-magnetised medic. A touch of ranged support in the form of a designated marksman and machine gunner. Topping it off with a SMAW wielding maniac and a token rifleman thrown in for good measure.
The Plan
I now want to split them into their corresponding teams. But to do so I need to have an idea of who is going where, which is when your own personal flare comes into play. I have decided that my marksman and gunner will be in one team to provide covering fire for the poor schmoes leading the charge. I want to be floating around somewhere directing all this carnage, so I will be part of neither team. Since I am soppy enough to value my medic’s life, I will also leave him out of those teams, following me about like a bandage obsessed puppy.
Team Blue
I select the marksman and gunner by pressing [F3] and [F4]. Now the Quick-Command menu will have popped up automatically, this has the Team menu on the list which can be scrolled to, otherwise pressing [9] will achieve the same result. Scrolling to ‘Assign Team Blue’ then clicking will finalise the deal creating the first team.
Team Red
Very much the same process as with team blue, only instead pressing [F5] and [F6]. Getting to the Team menu and choosing ‘Assign Team Red’.

I am left with my medic still in the default team white with his overlord (me). My marksman and gunner in team blue. Then the SMAW and rifleman in team red.
Selection
You can now happily select all the members of a team by holding shift and pressing the F-key of any of the contained members. This can also be done through the Team menu, but is bit less succinct in execution.
Putting it All Together
So how does all this playout? Well far be it from me to throw this wall of text at anyone and expect to walk away unscathed. To get my hands dirty I figured I would fire up the editor and quickly throw in the kind of small contact that may erupt during your average CRCTI game.
At first I was going to make the video all fancy and edited, but hit by a distinct lack of skill in the video editing department I have decided to change tact to producing a raw unedited video showing beginning to end how it went. All in one glorious take.
The Mission
Keeping it really simple I give myself a squad, this time adding a UH-1Y helicopter to the mix. I will be starting just south of Vybor, I have placed two squads of enemy infantry and a lone BMP-3 in defence of Stary Sobor. All the AI are on full skill setting within the editor.
I will perform a raid on the town, getting in quick, causing as much mayhem as possible then getting me and hopefully my whole squad out.
What these videos feature
- Basic squad control
- Team Assignment
- Boarding and disembarking from vehicles
- Using AI piloted transport to move infantry
- Controlling multiple units in combat
The Videos
ArmA II AI Squad Command -Video 1
ArmA II AI Squad Command -Video 2
Part 1 of the videos
- 00:15 - I create a team and tell my infantry to board the UH-1Y.
- 00:50 - I order the pilot of the UH-1Y to move to the outskirts of Stary Sobor. It is a dangerously close position but for trying to keep this video reasonably short it will have to do.
- 01:50 - I order the pilot to disembark from the helicopter. This is very important for getting your AI pilots to land without getting you all killed in the process. Trying to make the pilot stop and adjusting his altitude almost always results in failure, ordering him to disembark however has him find a safe open place where he will always land perfectly.
- 2:50 - I order my medic + team red to disembark, however notice that I do this just after the helicopter bumps down to the ground. If I had told them to do this prior to landing they would start exiting at 3m, this will usually cause you to lose at least one soldier from the helicopter then landing on top of them.
- 03:00 - I order my medic to follow me, as I intend to remain behind team red this should keep him out of trouble.
- 03:10 - I Tell the pilot to get back into the UH-1Y. The process is a bit of a pain I admit, but it works!
- 03:20 - I order the pilot to move the helicopter just into town. This will have him take off again to start providing fire support, any other command given, such as regroup or attacking a target will not have him take off.
- 04:00 - Now that the UH-1Y is back safely in the air, I order it to take out the BMP3, whilst I do have a SMAW, I figure it best not trying to risk him getting a shot off in time whilst under fire from the enemy troops.
- 04:45 - The UH-1Y has taken out the BMP so I now want it to maintain an overhead position to lay down some fire as my squad advances, so I order it to regroup on my position. Using the move command is a bit ropey, as it will often fly hundreds of metres past that position and not return leaving you having to repeat a move order every so often.
Part 2 of the videos
- 01:55 - My raid has run its course, so I give the order for the pilot to disembark, which should have him land nearby for pickup.
- 03:35 - I order my pilot to return us to where we began.
- 05:30 - Success! everyone came back alive, the pilot didn't crash us all into a burning mess of metal and soldier-pulp and a few enemies were taken out along the way!.
Back to the ArmA II Hints and Tips


