Autotest Framework – Arma Reforger
The Autotest Framework is a scripted extension of the Testing Framework. It expands the Testing Framework with additional features, such as the execution of the tests via Workbench Plugins, structured test report, CLI argument support, and all the necessary setup to run the tests in the specified environment.
The Autotest Framework allows you to create game feature tests with the minimal setup and less difficulty. You can only execute tests related to what you're working on.
Tests are composed of:
- Test group groups multiple test suites to be executed. It only serves to organize tests. A test group can contain other test groups.
- Test suite provides API for setting up the test environment. It groups test cases.
- Test case runs the actual test, and provides API for setting up test result and logging.
Test Execution: Command Line and Plugins
You can execute a test via Workbench plugins or via command line arguments. Both ways allow running a whole test group and test suites, or a single test case.
When you want the game to run automatically, you can start it with special instructions called command line arguments. But when you are working on the game yourself and want to quickly test something while developing, you can use plugins inside the development tool to run tests or other actions more easily. Below you will find parameters for the command line, as well as information on plugins.
Command Line
| Parameters | Values | Description |
|---|---|---|
| autotest |
|
Tells the game to run specified tests. |
Script Editor Plugin
The Script Editor plugin allows executing of test suites and test cases.
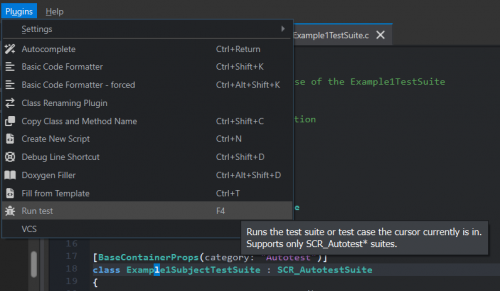
To use it, hover over the class name or the class body, then click Plugins → Run test. The World Editor opens to run the test.
World Editor Plugin
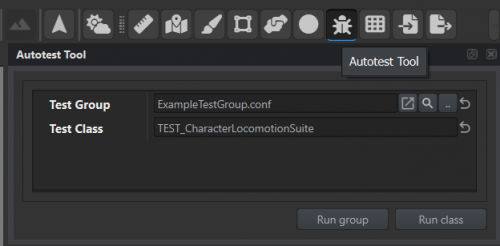
The World Editor can run tests via the Autotest tool.
To use it, either select the test group config or insert the name of the test suite/test case's class that you want to execute, then click Run group or Run class accordingly.
Scripting
In this example, assume that you need to write a simple test where you spawn a player character and make him shoot at the AI.
Create the First Test
- Create a test suite. [BaseContainerProps(category: "Autotest")] class SCR_TEST_CharacterWeaponShootingSuite : SCR_AutotestSuiteBase { override ResourceName GetWorldFile() { // allows us to specify the world the test suite will run in, uses MpTest by default return super.GetWorldFile(); } // you can remove these overrides if you intend to use default values }
- Add the empty test case. You can insert it using the Fill from template plugin. [Test(suite: "SCR_TEST_CharacterWeaponShootingSuite", timeoutS: 5)] class SCR_TEST_CharacterWeaponShooting_MyTestCase_MyExpectedResult : SCR_AutotestCaseBase { [Step(EStage.Setup)] void Setup() { // void returning methods will execute once } [Step(EStage.Setup)] bool Setup_Await() { // bool returning methods will keep executing until the method returns true return true; } [Step(EStage.Main)] bool Execute_DoSomething() { Print("Execute_DoSomething"); // return false; // uncomment this and the test will keep executing until it timeouts return true; } [Step(EStage.Main)] void Execute_Assert() { Print("Execute_Assert"); // assert state of the test environment in separate method // if the state is different than expected SetResult of the test to failure. if (false) { SetResult(SCR_AutotestResult.AsFailure("Test failure due to some reason")); return; } if (true) { SetResult(SCR_AutotestResult.AsFailure("Test failure due to other reason")); return; } SetResult(SCR_AutotestResult.AsSuccess()); } }
- Implement the testing logic. class SCR_TEST_CharacterWeaponShootingCase : SCR_AutotestCaseBase { static string CHARACTER_PREFAB = "{26A9756790131354}Prefabs/Characters/Factions/BLUFOR/US_Army/Character_US_Rifleman.et"; } [Test(suite: "SCR_TEST_CharacterWeaponShootingSuite", timeoutS: 5)] class SCR_TEST_CharacterWeaponShooting_PlayerShoots_AiDies : SCR_TEST_CharacterWeaponShootingCase { SCR_ChimeraCharacter m_PlayerCharacter; SCR_ChimeraCharacter m_TargetCharacter; [Step(EStage.Setup)] void Setup_CreateCharacters() { vector spawnPosPlayer = "120 1 120"; vector spawnPosTarget = spawnPosPlayer + "0 0 2.5"; // Entities created via SCR_TestLib.Spawn* methods will be automatilly deleted before subsequent tests will run m_PlayerCharacter = SCR_ChimeraCharacter.Cast(SCR_TestLib.SpawnPlayer(CHARACTER_PREFAB, spawnPosPlayer)); m_TargetCharacter = SCR_ChimeraCharacter.Cast(SCR_TestLib.SpawnEntity(CHARACTER_PREFAB, spawnPosTarget)); } [Step(EStage.Main)] bool Execute_DoFire() { // this will be executed every frame until the method returns true SCR_TestLib.SetPlayerLookAtEntity(m_TargetCharacter); SCR_TestLib.SetActionValue(SCR_TestLib.ACTION_FIRE, Math.RandomInt(0, 2)); return !SCR_TestLib.IsCharacterAlive(m_TargetCharacter); } [Step(EStage.Main)] void Execute_Assert() { // for readability purposes it's the best to do all assertions in separate method // this test is pretty simple, if it reached this stage it was completed successfully. SetResult(SCR_AutotestResult.AsSuccess()); } }
- In the World Editor, open any world.
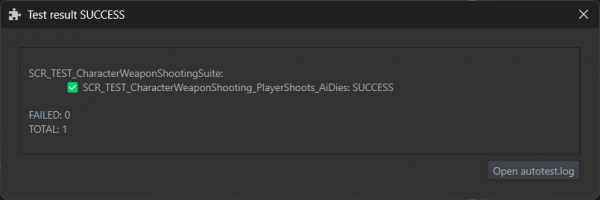
- Hover over the test case or the test suite class, and click Plugins → Run test. The tests will run, and when finished, the dialog window will appear:\
Best Practices
Naming
Follow the next rules when naming test suites and test cases:
| Test Suite | Test Case | |
|---|---|---|
| Name Template | SCR_TEST_TestedFeatureSuite | SCR_TEST_TestedFeature_TestedCase_ExpectedResult |
| Example | SCR_TEST_CharacterLocomotionSuite | SCR_TEST_CharacterLocomotion_RunsForward_ReachesDestination |
Such a naming allows easier and faster navigating through logs and debugging in case of a failed test.
Stateful and Simple tests
In this framework, you should not write your tests as free function that is not a part of any class. Instead, every test should be written as a class, and this class must inherit from SCR_AutotestCaseBase.
If you use simple functions instead, your tests will not be able to use these features, and the framework may not be able to detect or run your tests correctly.
Do's and Don'ts
Prefix Step Methods
| Do | Don't |
|---|---|
class SCR_TEST_MyTest_GoodTestEqualsBetterWorld : SCR_AutotestCase
{
void CreateCharacter()
{
// ...
}
void CreateCar()
{
// ...
}
[Step(EStage.Setup)]
void Setup_CreateScene()
{
CreateCharacters();
CreateCar();
}
[Step(EStage.Main)]
void Execute_Assert()
{
SetResult(SCR_AutotestResult.AsSuccess());
}
[Step(EStage.TearDown)]
void TearDown_ClearScene()
{
SCR_TestLib.DeleteEntities();
}
} |
class SCR_TEST_MyTest_GoodTestEqualsBetterWorld : SCR_AutotestCase
{
void CreateCharacter()
{
// ...
}
void CreateCar()
{
// ...
}
[Step(EStage.Setup)]
void CreateScene()
{
CreateCharacters();
CreateCar();
}
[Step(EStage.Main)]
void Assert()
{
SetResult(SCR_AutotestResult.AsSuccess());
}
[Step(EStage.TearDown)]
void ClearScene()
{
SCR_TestLib.DeleteEntities();
}
} |
Use Shared Methods Instead of Shared Steps
When creating base test classes, it is better to put common actions and logic into regular helper methods, not as special test steps. Then, in each specific test, you can call these helper methods inside your own test steps. This way, it is clearer what happens in each test and makes your tests easier to understand and fix if something goes wrong.
| Do | Don't |
|---|---|
class SCR_TEST_MyTestCase : SCR_AutotestCaseBase
{
void CreateCharacter()
{
// spawn characters
SCR_TestLib.SpawnPlayer("..", "0 0 0");
SCR_TestLib.SpawnEntity("..", "0 0 0");
// ... more complex logic
}
void CreateCar()
{
// spawn car
SCR_TestLib.SpawnEntity("..", "0 0 0");
// ... more complex logic
}
}
class SCR_TEST_MyTest_GoodTestEqualsBetterWorld : SCR_TEST_MyTestCase
{
// you can immediately see what's happening in the test
[Step(EStage.Setup)]
void Setup_CreateScene()
{
CreateCharacters();
CreateCar();
}
[Step(EStage.Main)]
void Execute_DoSomething()
{
// ...
}
} |
class SCR_TEST_MyTestCase : SCR_AutotestCaseBase
{
[Step(EStage.Setup)]
void Setup_CreateCharacters()
{
// spawn characters
SCR_TestLib.SpawnPlayer("..", "0 0 0");
SCR_TestLib.SpawnEntity("..", "0 0 0");
// ... more complex logic
}
[Step(EStage.Setup)]
void Setup_CreateCar()
{
// spawn car
SCR_TestLib.SpawnEntity("..", "0 0 0");
// ... more complex logic
}
}
class SCR_TEST_MyTest_GoodTestEqualsBetterWorld : SCR_TEST_MyTestCase
{
// you can't see that the test will create some entities without
// checking out the parent class
[Step(EStage.Main)]
void Execute_DoSomething()
{
// ...
}
} |


