Scripting Modding – Arma Reforger
Lou Montana (talk | contribs) m (Add wav params) |
Lou Montana (talk | contribs) m (Text replacement - "\{\{GameCategory\|armaR\|Modding\|(Guidelines|Tutorials)\|([^=↵]*)\}\}" to "{{GameCategory|armaR|Modding|$2|$1}}") |
||
| (16 intermediate revisions by 5 users not shown) | |||
| Line 10: | Line 10: | ||
* Playing a sound upon character suicide | * Playing a sound upon character suicide | ||
* Those changes are fairly simple and should be a good showcase about how to proceed when modding files. | * Those changes are fairly simple and should be a good showcase about how to proceed when modding files. | ||
{{Feature|important| | |||
Scripting modding can only happen in '''Modules''', defined in {{armaR}}'s {{hl|.gproj}} ({{hl|{{armaR}} > Script Project Manager Settings > Modules}}): | |||
{{{!}} class{{=}}"wikitable valign-top-row-2" | |||
! Module | |||
! core | |||
! gameLib | |||
! game | |||
! workbench | |||
! workbenchGame | |||
{{!}}- | |||
! Directories | |||
{{!}} | |||
* Core | |||
{{!}} | |||
* GameLib | |||
{{!}} | |||
* Game | |||
* GameCode | |||
{{!}} | |||
* Workbench | |||
{{!}} | |||
* WorkbenchGame | |||
{{!}}} | |||
Scripts placed '''outside of those folders''' will be simply '''ignored!'''}} | |||
== File structure == | == File structure == | ||
[[Image:armareforger-scripting-modding-find-symbol.png|left]] | |||
Before writing any code, let's start with investigating which files we need to modify and then, prepare structure for our modded files. | Before writing any code, let's start with investigating which files we need to modify and then, prepare structure for our modded files. | ||
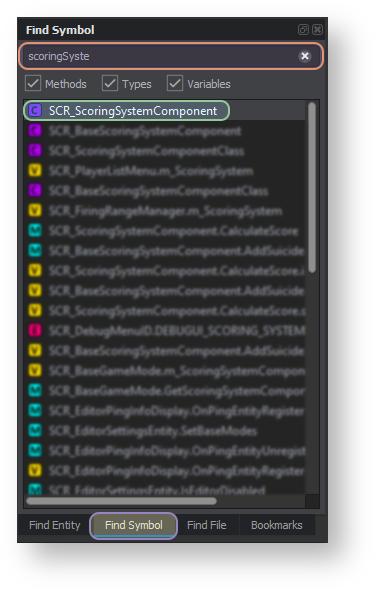
Since we want to modify the scoring system, we can begin by searching for terms related to it. | Since we want to modify the scoring system, we can begin by searching for terms related to it. | ||
By typing {{hl|scoring}} into the '''Find Symbol''' search field, we should see '''SCR_ScoringSystemComponent.c''' on the first place. | By typing {{hl|scoring}} into the '''Find Symbol''' search field, we should see '''SCR_ScoringSystemComponent.c''' on the first place. | ||
Double clicking {{Controls|LMB2}} opens the file containing that class and reveals its location in the file structure. | Double clicking {{Controls|LMB2}} opens the file containing that class and reveals its location in the file structure. | ||
Next to it is '''SCR_BaseScoringSystemComponent.c''' and those two files should be enough to achieve the goals stated above. | Next to it is '''SCR_BaseScoringSystemComponent.c''' and those two files should be enough to achieve the goals stated above. | ||
| Line 26: | Line 57: | ||
We will be interested in changing the behaviour of: | We will be interested in changing the behaviour of: | ||
< | <enforce> | ||
// SCR_BaseScoringSystemComponent.c | // SCR_BaseScoringSystemComponent.c | ||
void AddSuicide(int playerID) // method which increases suicides & deaths count in score system | void AddSuicide(int playerID) // method which increases suicides & deaths count in score system | ||
</ | </enforce> | ||
< | <enforce> | ||
// SCR_ScoringSystemComponent.c | // SCR_ScoringSystemComponent.c | ||
int CalculateScore(SCR_ScoreInfo info) // method used to calculate total score | int CalculateScore(SCR_ScoreInfo info) // method used to calculate total score | ||
</ | </enforce> | ||
SampleMod_ModdedScript/Scripts/Game/GameMode/Scoring/Modded | SampleMod_ModdedScript/Scripts/Game/GameMode/Scoring/Modded | ||
Once the directory is prepared, create two new script files inside the '''Modded''' folder. | Once the directory is prepared, create two new script files inside the '''Modded''' folder. | ||
To do so, right-click on the Resource Browser field to open the context menu. | To do so, right-click on the Resource Browser field to open the context menu. | ||
From there, select "Script" to create a new script file. From here, it is time to create actual code! | From there, select "Script" to create a new script file. From here, it is time to create actual code! | ||
# Create a new Script File: In Resources Manager, click the {{hl|Create}} button then "Script" to create a script file | # Create a new Script File: In Resources Manager, click the {{hl|Create}} button then "Script" to create a script file | ||
# Name the new Script File: the files should have the same name as the modded ones; namely {{hl|SCR_BaseScoringSystemComponent.c}} and {{hl|SCR_ScoringSystemComponent.c}} | # Name the new Script File: the files should have the same name as the modded ones; namely {{hl|SCR_BaseScoringSystemComponent.c}} and {{hl|SCR_ScoringSystemComponent.c}} | ||
{{Feature|informative|It is also recommended to replace '''SCR_ prefix with your own [[Scripting Tags|tag]]''' - this will ensure good inter-compatibility with other scripts by preventing naming conflicts. | |||
For instance, instead of naming file ''SCR_ScoringSystemComponent.c'' you would call it ''YOURTAG_ScoringSystemComponent.c''}}{{Clear}} | |||
It is usually a good habit to keep the original script and file structures; | |||
for the purpose of this tutorial, it assumed that following addon structure is used: | |||
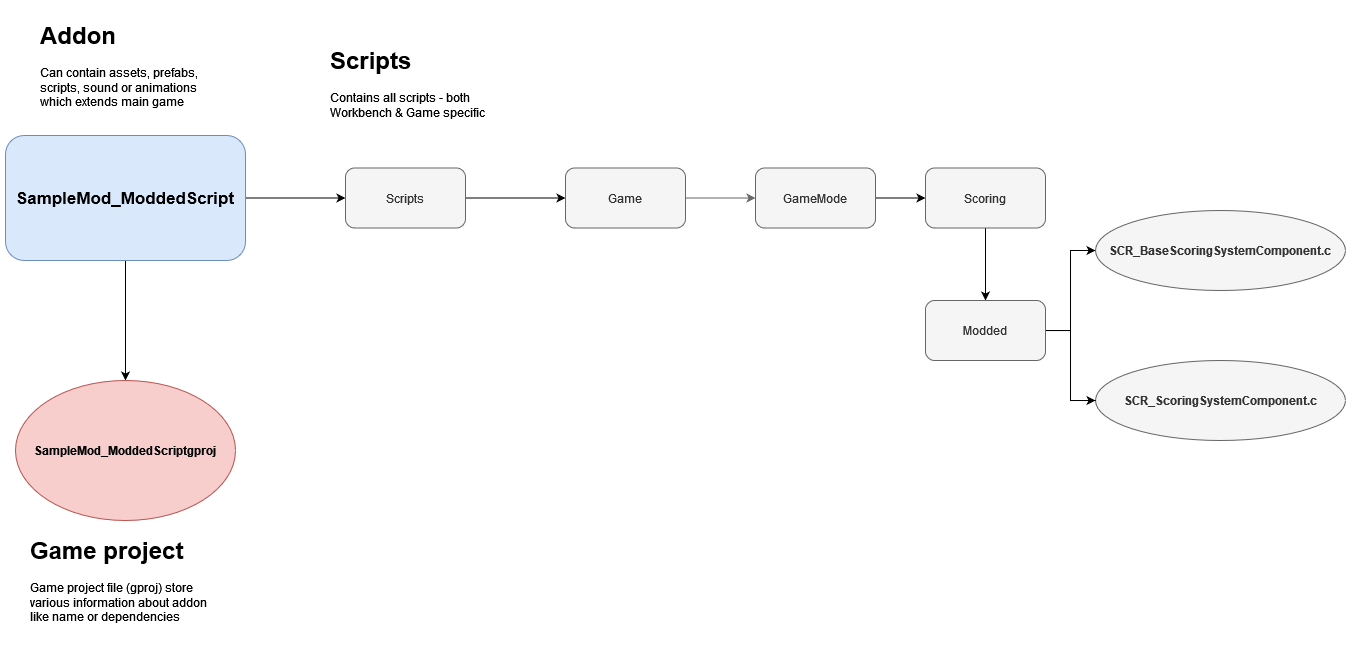
[[Image:armareforger-scripting-modding-file-structure.png]] | |||
== Create a Modified Script == | == Create a Modified Script == | ||
| Line 61: | Line 99: | ||
We will use all these three words to create modded variants of '''SCR_ScoringSystemComponent'''. | We will use all these three words to create modded variants of '''SCR_ScoringSystemComponent'''. | ||
{{Feature|informative|For more elaborate information please refer to the [[Arma_Reforger:Object_Oriented_Programming_Basics]], where more details can be found about how these keywords are working as well as simple examples.}} | |||
{{Feature|informative|For more elaborate information please refer to the | |||
=== Writing === | === Writing === | ||
| Line 76: | Line 112: | ||
First, we will begin with the '''modded''' keyword: | First, we will begin with the '''modded''' keyword: | ||
< | <enforce> | ||
modded class SCR_ScoringSystemComponent // declares which class is being modded | modded class SCR_ScoringSystemComponent // declares which class is being modded | ||
{ | { | ||
} | } | ||
</ | </enforce> | ||
Next, we can proceed with replacing the CalculateScore method by using the override keyword: | Next, we can proceed with replacing the CalculateScore method by using the override keyword: | ||
< | <enforce> | ||
modded class SCR_ScoringSystemComponent | modded class SCR_ScoringSystemComponent | ||
{ | { | ||
override int CalculateScore(SCR_ScoreInfo info) // declares a method replacing an existing one | override int CalculateScore(SCR_ScoreInfo info) // declares a method replacing an existing one | ||
| Line 91: | Line 127: | ||
} | } | ||
} | } | ||
</ | </enforce> | ||
As there is no intention to modify regular kill, team kills or objective score, lines containing: | As there is no intention to modify regular kill, team kills or objective score, lines containing: | ||
* < | * <enforce>info.m_iKills * m_iKillScoreMultiplier</enforce> | ||
* < | * <enforce>info.m_iTeamKills * m_iTeamKillScoreMultiplier</enforce> | ||
* < | * <enforce>info.m_iObjectives * m_iObjectiveScoreMultiplier</enforce> | ||
are left untouched. | are left untouched. | ||
< | <enforce> | ||
int score = info.m_iKills * m_iKillScoreMultiplier + | int score = info.m_iKills * m_iKillScoreMultiplier + | ||
info.m_iTeamKills * m_iTeamKillScoreMultiplier + | info.m_iTeamKills * m_iTeamKillScoreMultiplier + | ||
| Line 105: | Line 141: | ||
info.m_iSuicides * m_iSuicideScoreMultiplier + | info.m_iSuicides * m_iSuicideScoreMultiplier + | ||
info.m_iObjectives * m_iObjectiveScoreMultiplier; | info.m_iObjectives * m_iObjectiveScoreMultiplier; | ||
</ | </enforce> | ||
We are replacing | We are replacing their modifiers which would normally be provided via parameters | ||
* '''m_iDeathScoreMultiplier''' is replaced by 10 | * '''m_iDeathScoreMultiplier''' is replaced by 10 | ||
* '''m_iSuicideScoreMultiplier''' is also replaced by 10 | * '''m_iSuicideScoreMultiplier''' is also replaced by 10 | ||
< | <enforce> | ||
int score = info.m_iKills * m_iKillScoreMultiplier + | int score = info.m_iKills * m_iKillScoreMultiplier + | ||
info.m_iTeamKills * m_iTeamKillScoreMultiplier + | info.m_iTeamKills * m_iTeamKillScoreMultiplier + | ||
| Line 118: | Line 154: | ||
info.m_iSuicides * 10 + | info.m_iSuicides * 10 + | ||
info.m_iObjectives * m_iObjectiveScoreMultiplier; | info.m_iObjectives * m_iObjectiveScoreMultiplier; | ||
</ | </enforce> | ||
This translates into what we want: for every death or suicide, ten points are obtained. | This translates into what we want: for every death or suicide, ten points are obtained. | ||
| Line 124: | Line 160: | ||
Original code - calculated score is only returned if its above 0, otherwise method returns 0. | Original code - calculated score is only returned if its above 0, otherwise method returns 0. | ||
< | <enforce> | ||
if (score < 0) | if (score < 0) | ||
return 0; | return 0; | ||
return score; | return score; | ||
</ | </enforce> | ||
=== Super === | === Super === | ||
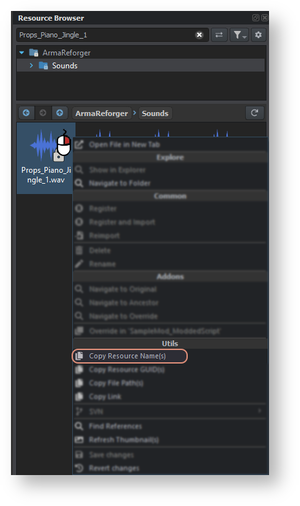
[[Image:armareforger-scripting-modding-get-resource-name.png|right|thumb|300px|'''Resource Name''' can be easily obtained via '''Copy Resource Name(s)''' function available in file context menu. Resource name obtained this way contains GUID and relative path to the file.]] | |||
Same as with '''SCR_ScoringSystemComponent''', we will use the '''modded''' keyword on '''SCR_BaseScoringSystemComponent''' to modify the content of that class. | Same as with '''SCR_ScoringSystemComponent''', we will use the '''modded''' keyword on '''SCR_BaseScoringSystemComponent''' to modify the content of that class. | ||
The '''AddSuicide''' method is called every time the player commits suicide and adds score according to previously defined modifiers. | The '''AddSuicide''' method is called every time the player commits suicide and adds score according to previously defined modifiers. | ||
Since we don't want to change that part and instead want to add a new behaviour to it, we will use the '''super''' keyword to call the overridden method's code. | Since we don't want to change that part and instead want to add a new behaviour to it, we will use the '''super''' keyword to call the overridden method's code. | ||
Once this is done, we can use the '''PlaySound''' method from the '''AudioSystem''' class - this takes one argument, '''ResourceName''' of a sound file - and plays a 2D, non spatial, sound. | Once this is done, we can use the '''PlaySound''' method from the '''AudioSystem''' class - this takes one argument, '''ResourceName''' of a sound file - and plays a 2D, non spatial, sound. | ||
< | <enforce> | ||
modded class SCR_BaseScoringSystemComponent | modded class SCR_BaseScoringSystemComponent | ||
{ | { | ||
override void AddSuicide(int playerId, int count = 1) | override void AddSuicide(int playerId, int count = 1) | ||
| Line 147: | Line 187: | ||
} | } | ||
} | } | ||
</ | </enforce> | ||
A more mod-friendly way would be the following: | A more mod-friendly way would be the following: | ||
< | <enforce> | ||
modded class SCR_BaseScoringSystemComponent | modded class SCR_BaseScoringSystemComponent | ||
{ | { | ||
[Attribute(defvalue: "{E89D9A1F4BA63CDC}Sounds/Props/Furniture/Piano/Samples/Props_Piano_Jingle_1.wav", params: "wav")] | [Attribute(defvalue: "{E89D9A1F4BA63CDC}Sounds/Props/Furniture/Piano/Samples/Props_Piano_Jingle_1.wav", params: "wav")] | ||
| Line 163: | Line 202: | ||
} | } | ||
} | } | ||
</ | </enforce> | ||
The code is now ready to compile ({{Controls|Shift|F7}}) and the result can be tested in-game. | The code is now ready to compile ({{Controls|Shift|F7}}) and the result can be tested in-game. | ||
{{Clear}} | |||
== Mod Test == | == Mod Test == | ||
| Line 172: | Line 212: | ||
=== Terrain Preparation === | === Terrain Preparation === | ||
{{Feature|informative|Below prefabs are using '''Enfusion link''' which directly loads Workbench and points you to a proper resource. | |||
This functionality has to be '''manually enabled''' in '''Resource Manager''' options though! | |||
For more details see [[Arma_Reforger:Resource_Manager:_Options#Register_.22enfusion:.2F.2F.22_protocol|'''Resource Manager: Options page''']].}} | |||
[[Image:armareforger-scripting-modding-hierarchy-prefabs.png|left|600px|thumb|Prefabs in World Editor [[Arma_Reforger:World_Editor#Hierarchy|Hierarchy tab]]]] | |||
At minimum, a new test scenario built in '''World Editor''' requires the following prefabs: | At minimum, a new test scenario built in '''World Editor''' requires the following prefabs: | ||
* [enfusion://ResourceManager/~ArmaReforger:Prefabs/MP/Modes/Deathmatch/GameMode_Deathmatch_Automatic.et GameMode_Deathmatch_Automatic.et] - this prefab contains '''Deathmatch''' game mode configuration | * [enfusion://ResourceManager/~ArmaReforger:Prefabs/MP/Modes/Deathmatch/GameMode_Deathmatch_Automatic.et GameMode_Deathmatch_Automatic.et] - this prefab contains '''Deathmatch''' game mode configuration | ||
| Line 177: | Line 223: | ||
* [enfusion://ResourceManager/~ArmaReforger:Prefabs/MP/Spawning/SpawnPoint_FFA.et SpawnPoint_FFA.et] - spawn point with '''FFA''' specific configuration | * [enfusion://ResourceManager/~ArmaReforger:Prefabs/MP/Spawning/SpawnPoint_FFA.et SpawnPoint_FFA.et] - spawn point with '''FFA''' specific configuration | ||
* [enfusion://ResourceManager/~ArmaReforger:Prefabs/MP/Managers/Loadouts/LoadoutManager_FFA.et LoadoutManager_FFA.et] - respawn loadout manager - the '''FFA''' variants contains all available loadouts for both USSR & US characters | * [enfusion://ResourceManager/~ArmaReforger:Prefabs/MP/Managers/Loadouts/LoadoutManager_FFA.et LoadoutManager_FFA.et] - respawn loadout manager - the '''FFA''' variants contains all available loadouts for both USSR & US characters | ||
{{Clear}} | |||
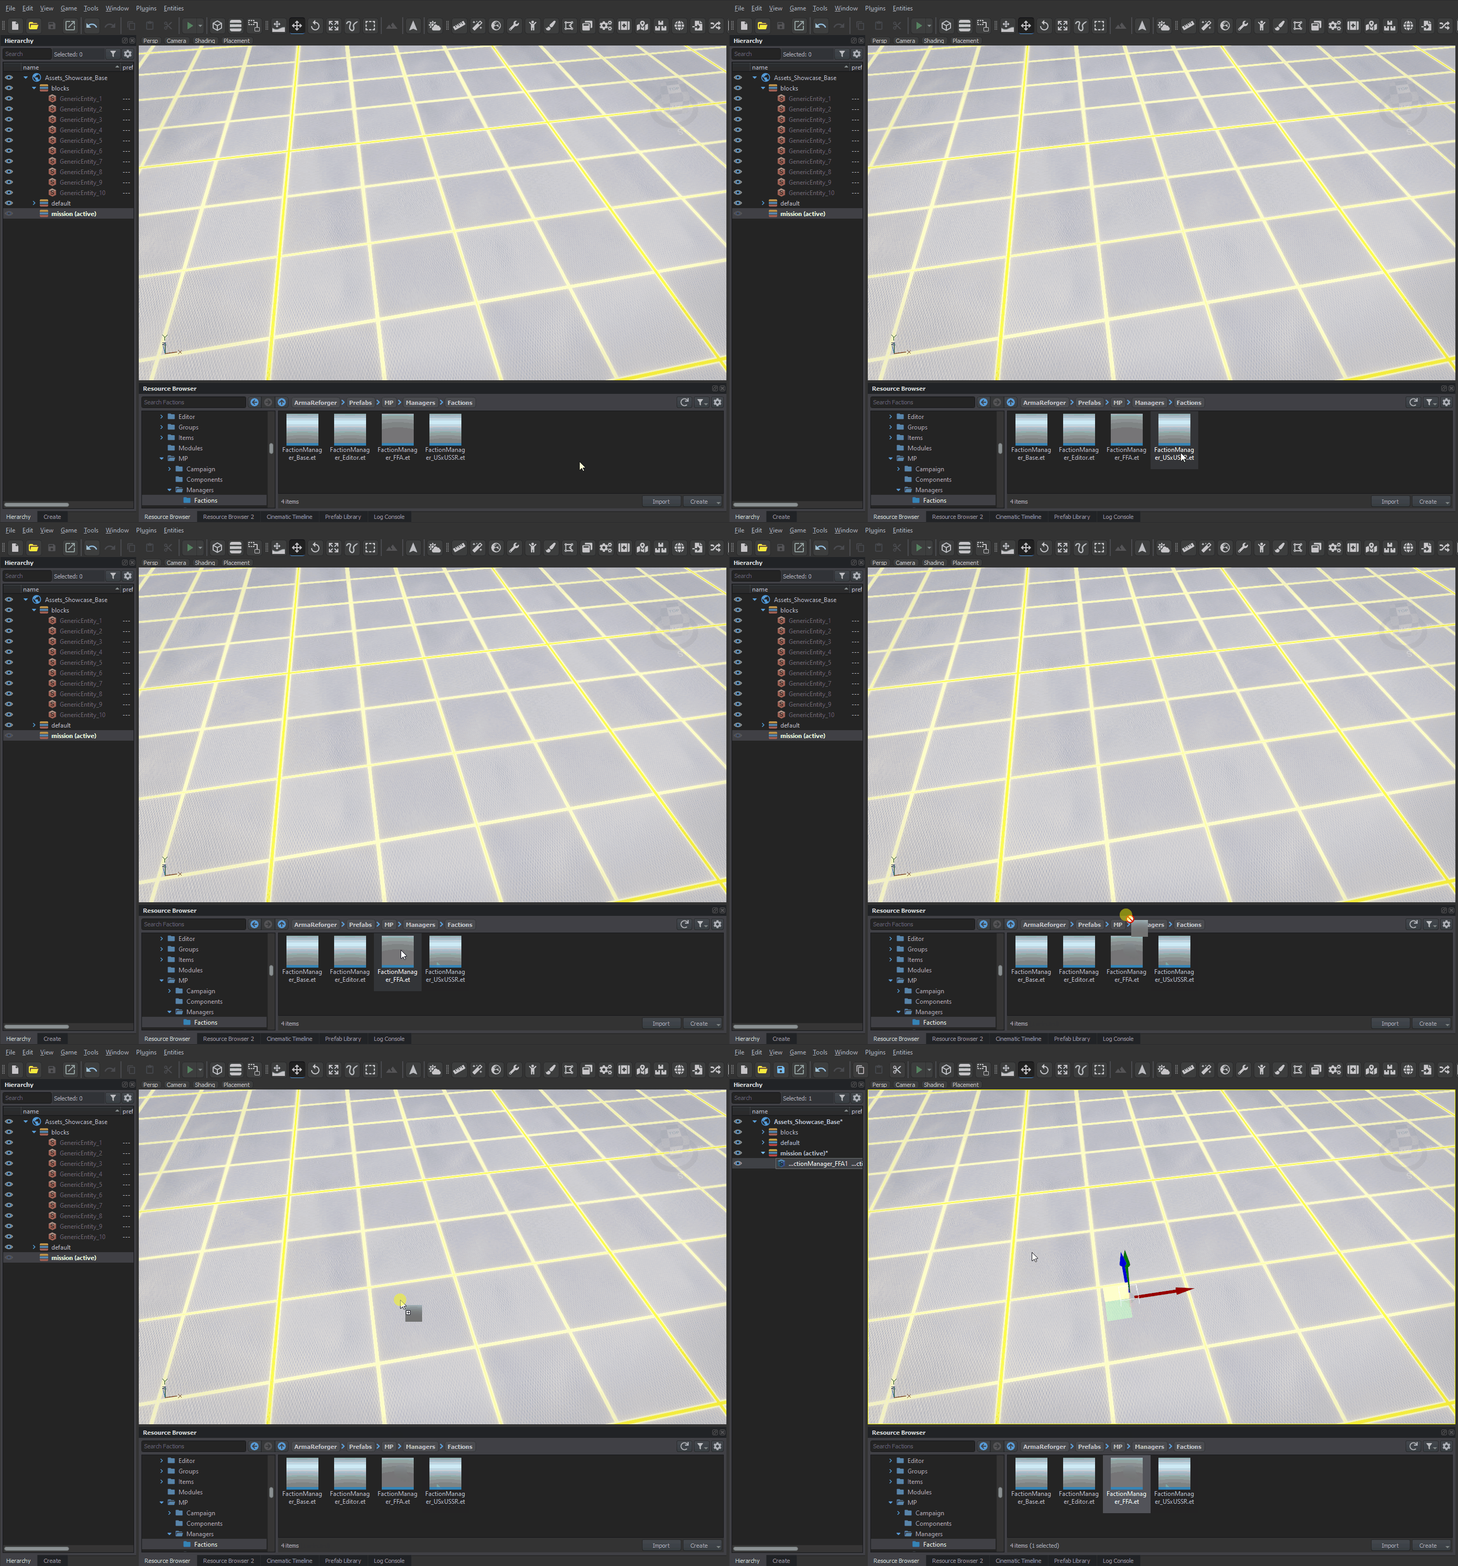
All those prefabs can be placed in '''World Editor'''<nowiki/>'s viewport by drag and dropping them from the '''Resource Browser'''. | |||
[[Image:armareforger-scripting-modding-adding-prefabs.gif]] | |||
=== Debug Process === | === Debug Process === | ||
| Line 184: | Line 232: | ||
While testing scripts, built-in debugging options such as '''Breakpoints''', '''Console''' and '''Watch''' features - see [[Arma Reforger:Script Editor#Debugging|Script Editor - Debugging]] for more information. | While testing scripts, built-in debugging options such as '''Breakpoints''', '''Console''' and '''Watch''' features - see [[Arma Reforger:Script Editor#Debugging|Script Editor - Debugging]] for more information. | ||
[[Image:armareforger-scripting-modding-adding-breakpoints.gif]] | |||
{{GameCategory|armaR|Modding|Tutorials | {{GameCategory|armaR|Modding|Scripting|Tutorials}} | ||
Latest revision as of 13:32, 26 February 2025
Before starting working on modified scripts, we need to prepare the basic structure for our new version of the scoring system. Therefore we will create:
- Basic folder structure (see Directory Structure)
- Empty script files ready for our new code
In this tutorial, the scoring system will be used as an example of script modding and following things will be changed:
Permanently changing scoring coefficients for death & suicide
- Playing a sound upon character suicide
- Those changes are fairly simple and should be a good showcase about how to proceed when modding files.
File structure
Before writing any code, let's start with investigating which files we need to modify and then, prepare structure for our modded files.
Since we want to modify the scoring system, we can begin by searching for terms related to it.
By typing scoring into the Find Symbol search field, we should see SCR_ScoringSystemComponent.c on the first place.
Double clicking ![]() opens the file containing that class and reveals its location in the file structure.
opens the file containing that class and reveals its location in the file structure.
Next to it is SCR_BaseScoringSystemComponent.c and those two files should be enough to achieve the goals stated above.
Note that these two files are located in the Scripts
We will be interested in changing the behaviour of:
SampleMod_ModdedScript/Scripts/Game/GameMode/Scoring/Modded
Once the directory is prepared, create two new script files inside the Modded folder.
To do so, right-click on the Resource Browser field to open the context menu.
From there, select "Script" to create a new script file. From here, it is time to create actual code!
- Create a new Script File: In Resources Manager, click the Create button then "Script" to create a script file
- Name the new Script File: the files should have the same name as the modded ones; namely SCR_BaseScoringSystemComponent.c and SCR_ScoringSystemComponent.c
It is usually a good habit to keep the original script and file structures;
for the purpose of this tutorial, it assumed that following addon structure is used:

Create a Modified Script
Syntax
It is possible to modify already existing scripts by using some of special keyword:
- modded - keyword used to modify existing scripting class
- override - keyword to override methods in modded classes
- super - allows to invoke content of overridden method
We will use all these three words to create modded variants of SCR_ScoringSystemComponent.
Writing
First, we will begin with the modded keyword:
Next, we can proceed with replacing the CalculateScore method by using the override keyword:
As there is no intention to modify regular kill, team kills or objective score, lines containing:
- info.m_iKills * m_iKillScoreMultiplier
- info.m_iTeamKills * m_iTeamKillScoreMultiplier
- info.m_iObjectives * m_iObjectiveScoreMultiplier
are left untouched.
We are replacing their modifiers which would normally be provided via parameters
- m_iDeathScoreMultiplier is replaced by 10
- m_iSuicideScoreMultiplier is also replaced by 10
This translates into what we want: for every death or suicide, ten points are obtained.
Original code - calculated score is only returned if its above 0, otherwise method returns 0.
Super
Same as with SCR_ScoringSystemComponent, we will use the modded keyword on SCR_BaseScoringSystemComponent to modify the content of that class.
The AddSuicide method is called every time the player commits suicide and adds score according to previously defined modifiers.
Since we don't want to change that part and instead want to add a new behaviour to it, we will use the super keyword to call the overridden method's code.
Once this is done, we can use the PlaySound method from the AudioSystem class - this takes one argument, ResourceName of a sound file - and plays a 2D, non spatial, sound.
A more mod-friendly way would be the following:
The code is now ready to compile (⇧ Shift + F7) and the result can be tested in-game.
Mod Test
Terrain Preparation

At minimum, a new test scenario built in World Editor requires the following prefabs:
- GameMode_Deathmatch_Automatic.et - this prefab contains Deathmatch game mode configuration
- FactionManager_FFA.et - prefab defining which factions are participating in the game. FFA means represents Free For All, meaning there is only one faction
- SpawnPoint_FFA.et - spawn point with FFA specific configuration
- LoadoutManager_FFA.et - respawn loadout manager - the FFA variants contains all available loadouts for both USSR & US characters
All those prefabs can be placed in World Editor's viewport by drag and dropping them from the Resource Browser.
Debug Process
While testing scripts, built-in debugging options such as Breakpoints, Console and Watch features - see Script Editor - Debugging for more information.


