Reyhard/Sandbox/Character Gear Creation/Vest – User
< Reyhard | Sandbox | Character Gear Creation
Categories:
(Created page with "{{TOC|side}} == Tutorial Goal == {{Messagebox|In this tutorial you will learn about: * Importing your first FBX file * Adding sockets & skeleton * How to configure new weapon...") |
No edit summary |
||
| (One intermediate revision by the same user not shown) | |||
| Line 3: | Line 3: | ||
{{Messagebox|In this tutorial you will learn about: | {{Messagebox|In this tutorial you will learn about: | ||
* Importing | * Importing vest FBX file | ||
* Adding sockets & skeleton | * Adding sockets & skeleton | ||
* How to configure new | * How to configure new vest|💬|#CDF}}{{Feature|informative|If you '''don't have any experience with Workbench''' yet, it is recommended to '''go through [[Arma_Reforger:Weapon_Creation|weapon creation tutorial]]''' to familiarize with some of the concepts present in the '''Workbench'''.}} | ||
{{Messagebox|Sources files for this tutorial can be found at '''{{Link|https://github.com/BohemiaInteractive/Arma-Reforger-Samples/tree/main/SampleMod_NewCharacter|Arma Reforger Samples Github repository}}'''.|📥|orange}} | {{Messagebox|Sources files for this tutorial can be found at '''{{Link|https://github.com/BohemiaInteractive/Arma-Reforger-Samples/tree/main/SampleMod_NewCharacter|Arma Reforger Samples Github repository}}'''.|📥|orange}} | ||
== Add New | == Add New Vest == | ||
{{Feature|informative|Preparation phase consist of things like: | {{Feature|informative|Preparation phase consist of things like: | ||
| Line 19: | Line 19: | ||
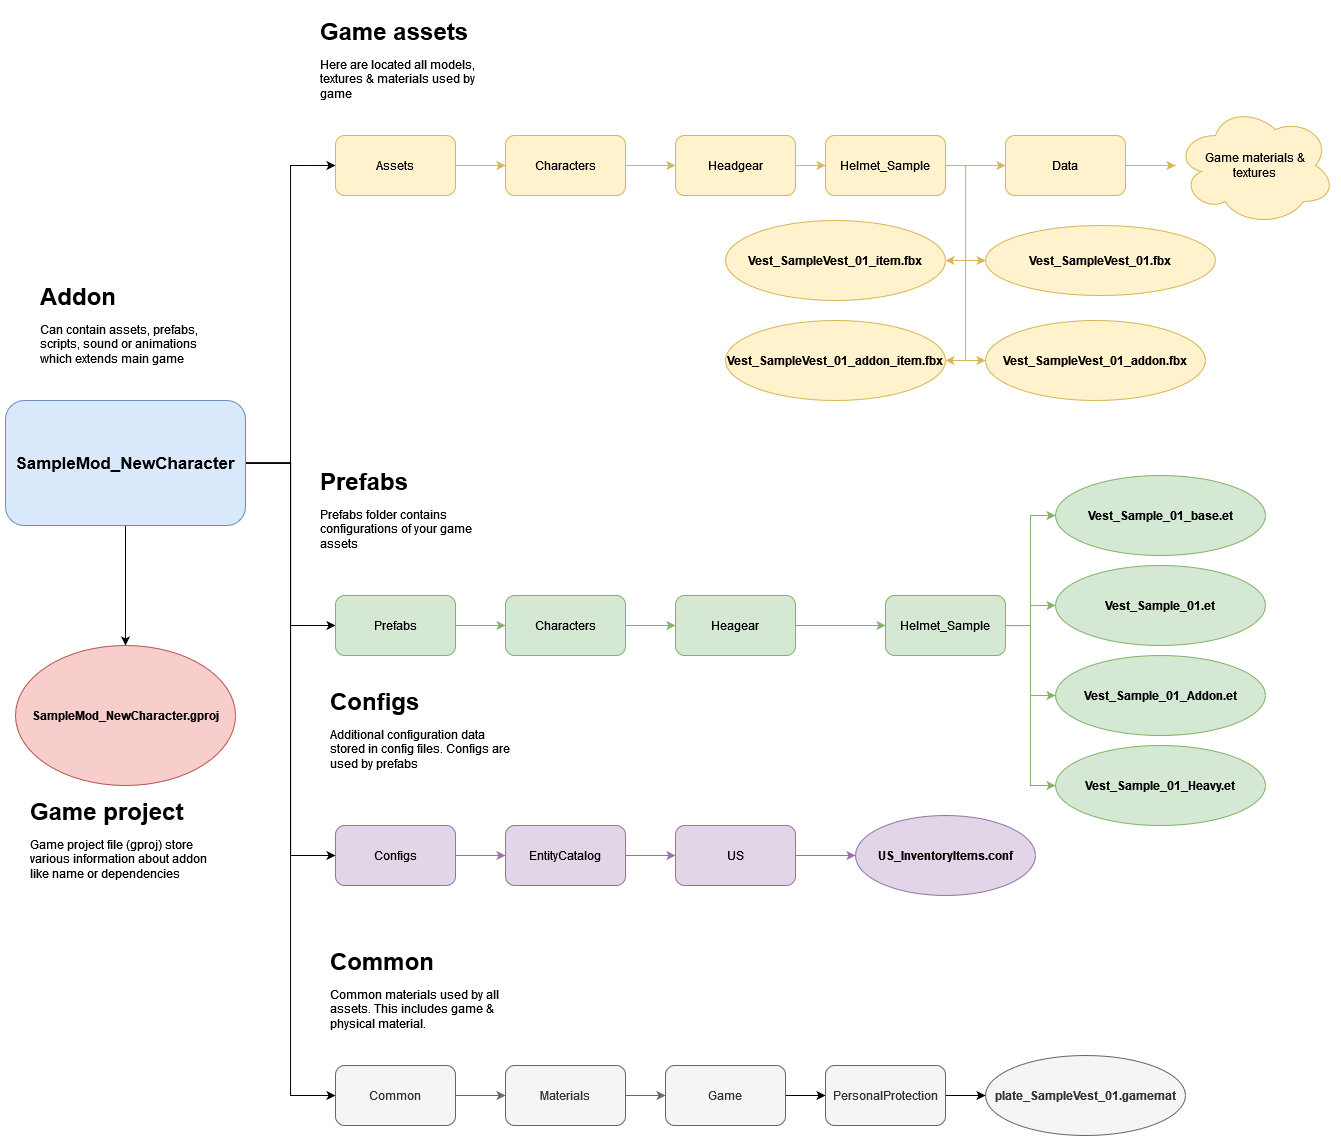
Therefore, your first task will be preparing following file structure | Therefore, your first task will be preparing following file structure | ||
[[File:armareforger-new- | [[File:armareforger-new-vest-file-structure.png]] | ||
== Creation Steps == | == Creation Steps == | ||
#{{Link|Arma_Reforger:Character_Gear_Creation/Vest/Asset Preparation}} | #{{Link|Arma_Reforger:Character_Gear_Creation/Vest/Asset Preparation}} | ||
#{{Link|Arma_Reforger:Character_Gear_Creation/Vest/Prefab Configuration}} | #{{Link|Arma_Reforger:Character_Gear_Creation/Vest/Prefab Configuration}} | ||
Latest revision as of 13:40, 30 August 2023
Tutorial Goal
Add New Vest
Structure Preparation
While sticking to official structure is not mandatory and there are no engine restrictions asset wise about it, it is recommended to follow guidelines listed here - Data (file) structure - to ensure that all automation plugins are parsing your assets correctly and make it later easy to navigate.
Therefore, your first task will be preparing following file structure

