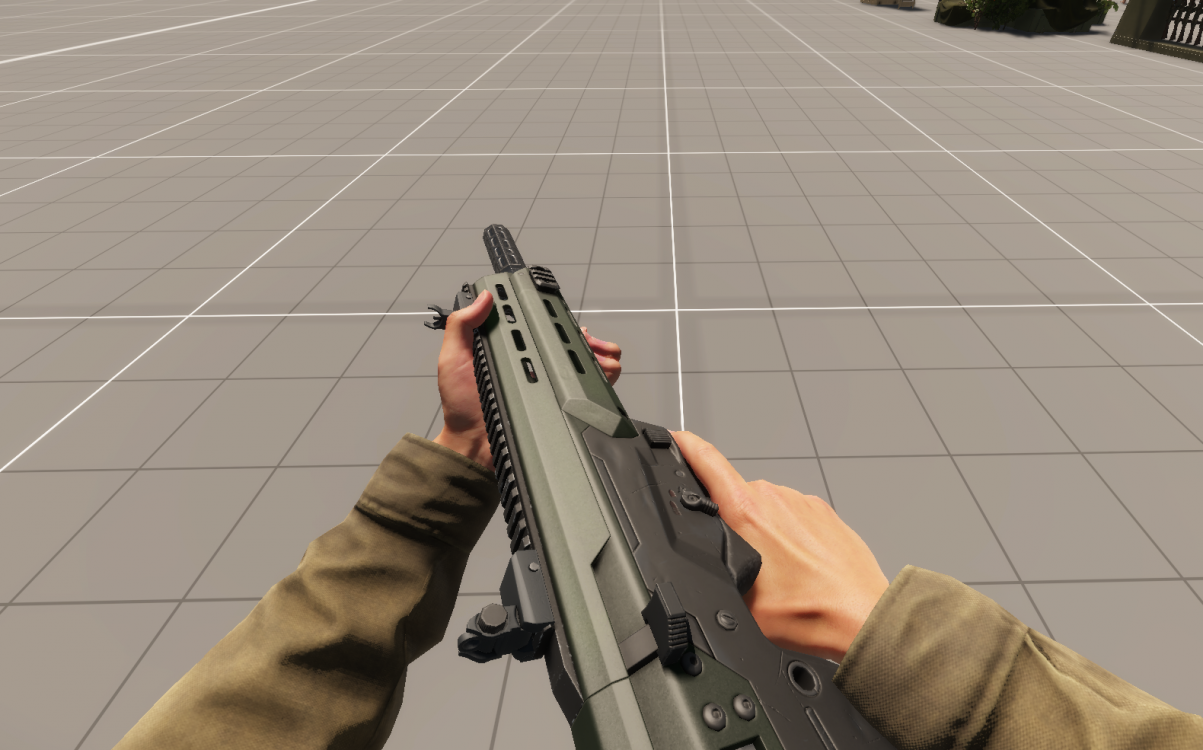
Weapon Suppressor Creation – Arma Reforger
No edit summary |
No edit summary |
||
| (8 intermediate revisions by the same user not shown) | |||
| Line 1: | Line 1: | ||
{{Messagebox|'''Overview''' | {{TOC|side}}{{Messagebox|'''Overview''' | ||
This tutorial covers following topics: | This tutorial covers following topics: | ||
| Line 36: | Line 36: | ||
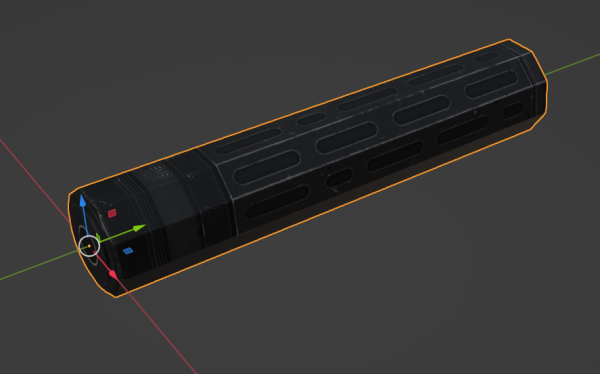
If importing a model from another source (e.g., Arma 3), you may need to rotate it by 90 degrees to align correctly. | If importing a model from another source (e.g., Arma 3), you may need to rotate it by 90 degrees to align correctly. | ||
[[File:armareforger-new-weapon-suppressor-model-orientation.png|600x600px]] | |||
=== Object Naming === | === Object Naming === | ||
| Line 47: | Line 50: | ||
=== Adding Snap Points === | === Adding Snap Points === | ||
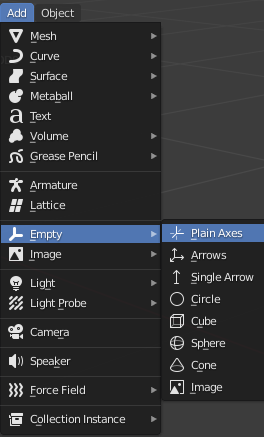
[[File:armareforger-new-weapon-empty-create.png|thumb|437x437px|Adding Plain Axes aka empty objects to Blender scene]] | |||
Snap points are essential for correctly attaching the suppressor to weapons. For suppressor, it will be necessary to only add one empty object - '''snap_weapon.''' This can be achieved in those few steps: | Snap points are essential for correctly attaching the suppressor to weapons. For suppressor, it will be necessary to only add one empty object - '''snap_weapon.''' This can be achieved in those few steps: | ||
| Line 61: | Line 65: | ||
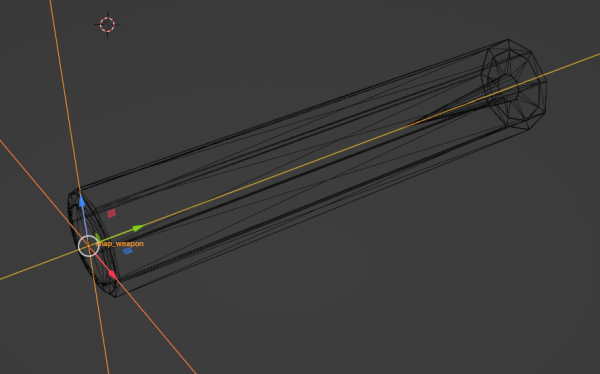
# '''Check Orientation''' : | # '''Check Orientation''' : | ||
#* Verify that the <code>snap_weapon</code> aligns accurately with the suppressor's model. | #* Verify that the <code>snap_weapon</code> aligns accurately with the suppressor's model. | ||
[[File:armareforger-new-weapon-suppressor-snap-orientation.png|600x600px]] | |||
=== Collision Mesh === | |||
For detailed guidance, see [[Arma Reforger:Weapon Slots And Bones|Weapon Slots and Bones]] .{{Messagebox|'''Recommended read:''' Slot/snap points concept is described in [[Arma_Reforger:Weapon_Creation/Asset_Preparation#Add_Slots/Snap_Points|'''Weapon Creation''']] documentation | |||
|📖|lightgrey}}{{Clear}} | |||
===Collision Mesh=== | |||
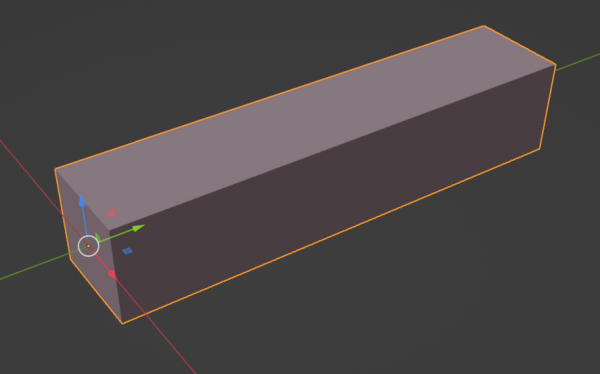
Creating an efficient collision mesh optimizes performance and ensures accurate physical interactions. | Creating an efficient collision mesh optimizes performance and ensures accurate physical interactions. | ||
[[File:armareforger-new-weapon-suppressor-collider.png|thumb|600x600px|In this case convex collider from A3 was used]] | |||
==== Choosing Collider Shape ==== | ====Choosing Collider Shape ==== | ||
Select the appropriate collider shape based on your suppressor's geometry. The collision mesh doesn't have to be a specific type; you can choose from various collider shapes depending on what best fits your suppressor: | Select the appropriate collider shape based on your suppressor's geometry. The collision mesh doesn't have to be a specific type; you can choose from various collider shapes depending on what best fits your suppressor: | ||
* '''Common Collider Types''' : | *'''Common Collider Types''' : | ||
** '''Box Collider''' | **'''Box Collider''' | ||
** '''Convex Collider''' | **'''Convex Collider''' | ||
** '''Cylinder Collider''' | **'''Cylinder Collider''' | ||
** '''Sphere Collider''' | **'''Sphere Collider''' | ||
** '''Capsule Collider''' | **'''Capsule Collider''' | ||
** '''TriMesh Collider''' | **'''TriMesh Collider''' | ||
* '''Naming Colliders''' : | *'''Naming Colliders''' : | ||
** Name your colliders with appropriate prefixes to indicate their type. | **Name your colliders with appropriate prefixes to indicate their type. | ||
** While specific prefixes like <code>UBX_</code>, <code>UCX_</code>, etc., are typically used, focus on selecting the collider that best suits your model's shape | **While specific prefixes like <code>UBX_</code>, <code>UCX_</code>, etc., are typically used, focus on selecting the collider that best suits your model's shape | ||
{{Messagebox|'''Recommended read:''' More details about Inventory Configuration can be found on [[Arma Reforger:Weapon Optic Creation#Inventory system configuration|'''Weapon Optic Creation''']] documentation |📖|lightgrey}} | |||
==== Simplifying the Collider ==== | ====Simplifying the Collider==== | ||
* '''Keep It Simple''' : Use the simplest shape that accurately represents the suppressor. | *'''Keep It Simple''' : Use the simplest shape that accurately represents the suppressor. | ||
* '''Performance Consideration''' : Simplified colliders reduce computational overhead. | *'''Performance Consideration''': Simplified colliders reduce computational overhead. | ||
* '''Avoid Complex Meshes''' : Complex collision meshes can negatively impact performance. | *'''Avoid Complex Meshes''' : Complex collision meshes can negatively impact performance. | ||
==== Assigning Layer Preset and Game Material ==== | ====Assigning Layer Preset and Game Material==== | ||
Assign appropriate properties to your collider: | Assign appropriate properties to your collider: | ||
* '''Layer Preset''' : <code>ItemFireView</code> | *'''Layer Preset''' : <code>ItemFireView</code> | ||
** This layer preset is appropriate for weapon attachments and ensures correct interactions in the game. | ** This layer preset is appropriate for weapon attachments and ensures correct interactions in the game. | ||
* '''Game Material''' : <code>weapon_metal.gamemat</code> | *'''Game Material''' : <code>weapon_metal.gamemat</code> | ||
** This material provides appropriate physical properties and sound effects for metal weapon components. | **This material provides appropriate physical properties and sound effects for metal weapon components. | ||
===== How to Assign ===== | =====How to Assign===== | ||
# '''In Your 3D Software''' : | #'''In Your 3D Software''' : | ||
#* '''Blender with EBT (Optional)''' : | #* '''Blender with EBT (Optional)''' : | ||
#** Use the '''EBT Object Tools''' to assign properties directly in Blender. | #**Use the '''EBT Object Tools''' to assign properties directly in Blender. | ||
#** Navigate to '''Object Properties''' > '''EBT Object Properties''' . | #**Navigate to '''Object Properties''' > '''EBT Object Properties''' . | ||
#** Set '''Layer Preset''' and '''Game Material''' . Reference: [[Arma Reforger:Enfusion Blender Tools: Objects Tools|Enfusion Blender Tools: Object Tools]] . | #**Set '''Layer Preset''' and '''Game Material''' . Reference: [[Arma Reforger:Enfusion Blender Tools: Objects Tools|Enfusion Blender Tools: Object Tools]] . | ||
#* '''Other 3D Software''' : | #*'''Other 3D Software''' : | ||
#** Add custom properties or user-defined attributes to colliders. | #**Add custom properties or user-defined attributes to colliders. | ||
#** Refer to [[Arma Reforger:FBX Import#Setting%20Layer%20Preset%20on%20colliders%20(usage%20parameter)|Setting Layer Preset on Colliders (Usage Parameter)]] . | #**Refer to [[Arma Reforger:FBX Import#Setting%20Layer%20Preset%20on%20colliders%20(usage%20parameter)|Setting Layer Preset on Colliders (Usage Parameter)]] . | ||
# '''In Enfusion Workbench Import Settings''' : | #'''In Enfusion Workbench Import Settings''' : | ||
#* If not set in the 3D software, you can assign them during import. | #* If not set in the 3D software, you can assign them during import. | ||
#* In the '''Import Settings''' , select your collider. | #* In the '''Import Settings''' , select your collider. | ||
#** Set '''Usage''' to <code>ItemFireView</code>. | #**Set '''Usage''' to <code>ItemFireView</code>. | ||
#** Assign '''Game Material''' to <code>weapon_metal.gamemat</code>. Reference: [[Arma Reforger:FBX Import#Setting%20Layer%20Preset%20on%20colliders%20(usage%20parameter)|FBX Import - Setting Layer Preset on Colliders]] . | #**Assign '''Game Material''' to <code>weapon_metal.gamemat</code>. Reference: [[Arma Reforger:FBX Import#Setting%20Layer%20Preset%20on%20colliders%20(usage%20parameter)|FBX Import - Setting Layer Preset on Colliders]] . | ||
=== Exporting the Model === | ===Exporting the Model=== | ||
[[File:armareforger-new-weapon-suppressor-export-ebt.png|thumb|332x332px|Exporting using Enfusion Blender Tools]] | |||
Export your model to the '''FBX''' format suitable for Enfusion. | Export your model to the '''FBX''' format suitable for Enfusion. | ||
* '''Using Enfusion Blender Toolkit (EBT) FBX Exporter''' (Optional): | *'''Using Enfusion Blender Toolkit (EBT) FBX Exporter''' (Optional): | ||
** Simplifies export and ensures compatibility. | **Simplifies export and ensures compatibility. | ||
** Automatically registers FBX in Workbench and enables "'''Export Scene Hierarchy'''". | **'''Automatically imports & registers''' FBX in Workbench and enables "'''Export Scene Hierarchy'''". | ||
* '''Without EBT''' : | *'''Without EBT''' : | ||
** Manually register '''Import & Register''' file | **Manually register '''[[Arma Reforger:Weapon Creation/Asset Preparation#Model Import & Registration|Import & Register]]''' file | ||
** Manually enable '''"Export Scene Hierarchy"''' in export settings. | **Manually enable '''"[[Arma Reforger:Weapon Creation/Asset Preparation#Skeleton & Hierarchy|Export Scene Hierarchy]]"''' in export settings. | ||
** Ensure export settings align with Enfusion requirements. | **Ensure export settings align with Enfusion requirements. | ||
[[File:armareforger-new-weapon-suppressor-imported-model.png|none|thumb|792x792px|Sample Suppressor imported into Workbench. When using Blender, you can verify if settings were correctly passed by inspecting '''Details''' or '''Import Settings'''.]] | |||
==Texturing the Suppressor== | |||
Apply textures to give your suppressor the desired appearance. | |||
====Enfusion Materials Creation==== | |||
*If the import of the model went fine, new Enfusion Materials (<code>.emat</code> files) should be created in the <code>Data</code> folder next to the model. | |||
*These new materials are named based on the material names in your 3D software. | |||
*By default, they use the <code>MatPBRMaterial</code> shader. | |||
[[File:armareforger-new-weapon-suppressor-material-setup.png|thumb|551x551px|Suppressor material setup]] | |||
====Assigning Textures==== | |||
#'''Prepare Textures''' : | |||
#*Assuming you have already created PBR textures (Base Color, Normal Map, etc.) using a tool like Substance Painter. | |||
#*You can use the '''BCR+NMO''' export preset shared on GitHub: | |||
#** GitHub Repository: [https://github.com/BohemiaInteractive/Arma-Reforger-Misc/tree/main/Art/Substance%20Export%20Profiles Arma Reforger Misc - Substance Export Profiles] | |||
#**''This preset ensures that your textures are in the correct format for Arma Reforger''. | |||
#'''Import Textures into the Game''' : | |||
#*Place your exported textures (e.g., <code>Suppressor_BCR.tga</code>, <code>Suppressor_NMO.tga</code>) into the appropriate folder within your mod's <code>Data</code> directory. | |||
#'''Assign Textures to Materials''' : | |||
#*In the Enfusion Workbench, navigate to the <code>.emat</code> files created during the import. | |||
#*Open each material and assign the corresponding textures to the appropriate fields: | |||
#**'''BCR Map''' : | |||
#***Assign your Base Color Roughness texture (<code>_BCR</code>). | |||
#**'''NMO Map''' : | |||
#*** Assign your Normal Map (<code>_NMO</code>). | |||
#*For detailed information on texture types and how to use them, refer to [[Arma Reforger: Textures]] . | |||
#'''Verify Material Settings''' : | |||
#*Ensure that all material properties are set correctly. | |||
#*Adjust parameters like '''Metallic''' , '''Roughness''' , and '''Specular''' as needed. | |||
===Testing the Textures=== | |||
*'''Preview the Model''' : | |||
** Use Enfusion Workbench to ensure textures appear correctly. | |||
*'''Check for Issues''' : | |||
**Look for texture stretching, UV mapping errors, or material issues. | |||
*'''Adjust as Necessary''' : | |||
**Make corrections in your 3D software or texture editor if needed. | |||
==Creating the Attachment Script Class == | |||
Attachment config classes in Arma Reforger establish compatibility between weapons and their attachments. Any attachment using a specific attachment class will be compatible with any weapon that references that class. This system ensures that only appropriate attachments can be mounted on specific weapons, maintaining realism and game balance. | |||
In many cases, existing attachment classes can be used. For example, muzzle attachment classes for 5.45 mm or 5.56 mm calibers are already defined in the game's vanilla data. However, since our '''Sample Weapon''' uses a 6.5 mm barrel, and this caliber doesn't exist in the vanilla data, we need to create a new attachment class specifically for it. This ensures that only attachments intended for 6.5 mm barrels can be mounted on the weapon. | |||
If you intend to make i.e. suppressor suitable for M16, then you could skip that part and move to Creating the Suppressor Prefab part.{{Feature|informative|Existing vanilla muzzle attachment classes can be found in the '''{{Link|enfusion://ScriptEditor/Scripts/Game/Weapon/Attachments/Attachments_muzzle.c;110|Attachments_muzzle.c}}''' script file.}} | |||
===Setting Up the Attachment Config Class=== | |||
To add a new attachment config class, you'll create a new script file in one of your mod's game script folders. For example, you can use the <code>Scripts/Game/Attachments/Muzzles</code> folder. If this folder doesn't exist, you'll need to create it manually. | |||
====Naming Conventions==== | |||
Scripts in Arma Reforger don't use metafiles and can be overwritten if another mod uses the same script name and path. To prevent conflicts, it's recommended to use a unique naming convention for your script files and classes, such as prefixing them with your mod's tag. | |||
*'''Use the <code>TAG_</code> Prefix:''' | |||
**Prefix your script file names and class names with a unique tag to prevent naming conflicts. | |||
** '''In this case, the tag is <code>SampleMod_NewWeapon</code>.''' | |||
*'''Script File:''' | |||
**Use a clear and descriptive filename that includes your mod's tag. | |||
**'''Example:''' <code>SampleMod_NewWeapon_Attachments_Muzzle.c</code> | |||
*'''Class Names:''' | |||
**'''Attachment Config Class:''' Defines the configuration class for your muzzle attachment. | |||
***'''Example:''' <code>AttachmentMuzzle65_39Class</code> | |||
**'''Attachment Class:''' Inherits from <code>AttachmentMuzzle</code>. | |||
***'''Example:''' <code>AttachmentMuzzle65_39</code> | |||
=== | ===Creating the Script File=== | ||
=== | ====Create the Script File==== | ||
#'''Navigate to Your Script Directory:''' | |||
* ''' | #*Go to <code>/Scripts/Game/Attachments/Muzzles/</code> within your mod folder. | ||
** | #*If these folders don't exist, create them accordingly. | ||
* | #'''Create a New Script File:''' | ||
#*Right-click in the <code>Muzzles</code> folder and select '''New Script''' . | |||
#*Name the file <code>SampleMod_NewWeapon_Attachments_Muzzle.c</code>. | |||
#*Ensure the file extension is <code>.c</code>. | |||
# | |||
====Define the Attachment Config Class==== | |||
# | Open the newly created script file and define your classes exactly as follows: | ||
# | |||
<enforce> | <enforce> | ||
class AttachmentMuzzle65_39Class {} | class AttachmentMuzzle65_39Class {} | ||
| Line 153: | Line 229: | ||
</enforce> | </enforce> | ||
=== Recompiling Scripts === | ===Recompiling Scripts=== | ||
After creating the script, recompile the game scripts: | After creating the script, recompile the game scripts: | ||
* '''In Script Editor''' : | *'''In Script Editor''' : | ||
** Use '''Compile and Reload Scripts''' (<code>⇧ Shift + F7</code>). | ** Use '''Compile and Reload Scripts''' (<code>⇧ Shift + F7</code>). | ||
* '''In World Editor''' : | *'''In World Editor''' : | ||
** Use '''Reload Game Scripts''' (<code>Ctrl + R</code>). | **Use '''Reload Game Scripts''' (<code>Ctrl + R</code>). | ||
By following these steps, you've successfully created a new attachment config class for your 6.5 mm suppressor. This class will ensure proper compatibility between your suppressor and the '''Sample Weapon''' , while preventing incompatible attachments from being mounted.{{Messagebox|'''Recommended read:''' For more information on how attachment classes and inheritance affect compatibility, refer to the [[Arma_Reforger:Weapon_Optic_Creation#Attachments_configuration|Weapon Optic Creation: Attachments Configuration]] documentation|📖|lightgrey}} | |||
==Creating the Suppressor Prefab== | |||
===Create Suppressor Prefab=== | |||
[[File:armareforger-new-weapon-suppressor-prefab-structure.png|thumb|Prefab structure]] | |||
When creating a suppressor prefab in Arma Reforger, it is recommended to inherit from the existing base suppressor prefab. The base suppressor prefab can be found at '''Prefabs\Weapons\Core\{{Link|enfusion://ResourceManager/~ArmaReforger:Prefabs/Weapons/Core/Suppressor_base.et|Suppressor_base.et}}'''. This prefab contains most of the necessary configurations for suppressor attachments.{{Feature|informative|In this article, [[Arma_Reforger:Resource_Manager:_Options#Register_.22enfusion:.2F.2F.22_protocol|'''Enfusion links''']] are used. With those links it is possible to open specific resource just by simply clicking on that link. Enfusion links '''has to be manually activated in Workbench options''' (Workbench -> Options -> Workbench -> Register "enfusion://" protocol) before it can be used}}To begin, navigate to '''Prefabs\Weapons\Core''' in the '''Resource Browser''' and locate the '''Suppressor_base.et''' prefab. Right-click on this prefab and select '''[[Arma Reforger:Data Modding Basics#Using "Inherit in..." function|Inherit in...]]''' from the context menu.{{Messagebox|Other method involves duplicating some already existing prefab - this might be handy if you are '''creating something similar to already existing weapons or don't want to add manually components'''. | |||
For instance if you are making some new AK74 suppressor variant, you could use '''{{Link|Arma_Reforger:Data_Modding_Basics#Using_.22Duplicate_to....22_function|Duplicate to "addon name"}}''' function on '''{{Link|enfusion://ResourceManager/~ArmaReforger:Prefabs/Weapons/Attachments/Muzzle/Suppressor_PBS4/Suppressor_PBS4_base.et|Suppressor_PBS4_base.et}}''' and then modify parameters of such new prefab.|✩|#88cc88}}When prompted to name your new prefab, consider adding a <code>_base</code> suffix to maintain consistency and clarity, especially if you plan to have multiple variants of the suppressor. For example, if your suppressor is named "''Suppressor_SampleSuppressor_01''," you might name the prefab '''Suppressor_SampleSuppressor_01_base.et''' . After creating the inherited prefab, move it to a more appropriate location, such as the '''Prefabs\Weapons\Attachments\Muzzle\''Suppressor_SampleSuppressor_01''''' directory.{{Feature|informative|Inheriting from the base suppressor prefab ensures that essential components and configurations are included, saving you time and reducing the potential for errors.}} | |||
{{Clear}} | |||
===Creating a Child Prefab=== | |||
In addition to the base prefab, it's advisable to create a child prefab without the <code>_base</code> suffix. This child prefab will inherit from your base suppressor prefab ('''SampleSuppressor_01_base.et''' ) and will be named '''SampleSuppressor_01.et''' . | |||
To create this child prefab: | |||
#'''Right-click''' on your base suppressor prefab ('''Suppressor_SampleSuppressor_01_base.et''' ) and select '''Inherit''' . | |||
#'''Name''' the new prefab without the <code>_base</code> suffix (e.g., '''Suppressor_SampleSuppressor_01.et''' ). | |||
#'''Move''' this prefab to the appropriate directory alongside your base prefab. | |||
This child prefab will initially be empty and won't hold any unique information. However, it serves an important purpose, especially when reskins or additional variants are present. For example, you might create another variant called '''Suppressor_SampleSuppressor_01_camo.et''' for a camouflage version of the suppressor. '''Suppressor_SampleSuppressor_01_camo''' should inherit from '''Suppressor_SampleSuppressor_01_base.et''' as well. By making changes to the base prefab ('''SampleSuppressor_01_base.et''' ), those changes automatically propagate to all child prefabs, including '''Suppressor_SampleSuppressor_01.et''' and '''Suppressor_SampleSuppressor_01_camo.et''' . This organizational structure makes it easier to manage and update your assets consistently. | |||
Once your prefabs are set up, you can start editing the base prefab to configure your suppressor. Open the prefab in '''[[Arma Reforger:Prefabs Basics#Prefab edit mode|Prefab Edit Mode]]''' by selecting it and clicking the '''Prefab Edit Mode''' button. | |||
=== Edit the Suppressor Prefab === | ===Edit the Suppressor Prefab=== | ||
Configure components within your new prefab. | Configure components within your new prefab. | ||
[[File:armareforger-new-weapon-suppressor-inventory-configuration.png|thumb|1379x1379px|'''InventoryItemComponent''' configuration]] | |||
==== Configure MeshObject ==== | ====Configure MeshObject==== | ||
* Assign your suppressor's mesh to the <code>MeshObject</code> component. | *Assign your suppressor's mesh to the <code>MeshObject</code> component. | ||
==== Configure InventoryItemComponent ==== | ====Configure InventoryItemComponent==== | ||
Next, configure the suppressor's inventory properties: | |||
#Select the '''InventoryItemComponent''' . | |||
#Modify the '''Item Display Name''' to change how the suppressor appears in the inventory. | |||
#Adjust the '''Item Phys Attributes''' to change storage properties like weight and size. | |||
#Under '''Custom Attributes''' , adjust the '''PreviewRenderAttributes''' to change the suppressor's visibility in the inventory preview | |||
==== Configure WeaponAttachmentAttributes ==== | {{Messagebox|'''Recommended read:''' More details about Inventory Configuration can be found on [[Arma Reforger:Weapon Optic Creation#Inventory system configuration|'''Weapon Optic Creation''']] documentation |📖|lightgrey}} | ||
====Configure WeaponAttachmentAttributes==== | |||
In '''Custom Attributes''' of <code>InventoryItemComponent</code>: | In '''Custom Attributes''' of <code>InventoryItemComponent</code>: | ||
* '''WeaponAttachmentAttributes''' is already inherited from the base prefab. | *'''WeaponAttachmentAttributes''' is already inherited from the base prefab. | ||
* '''Set Attachment Type''' : | *'''Set Attachment Type''' : | ||
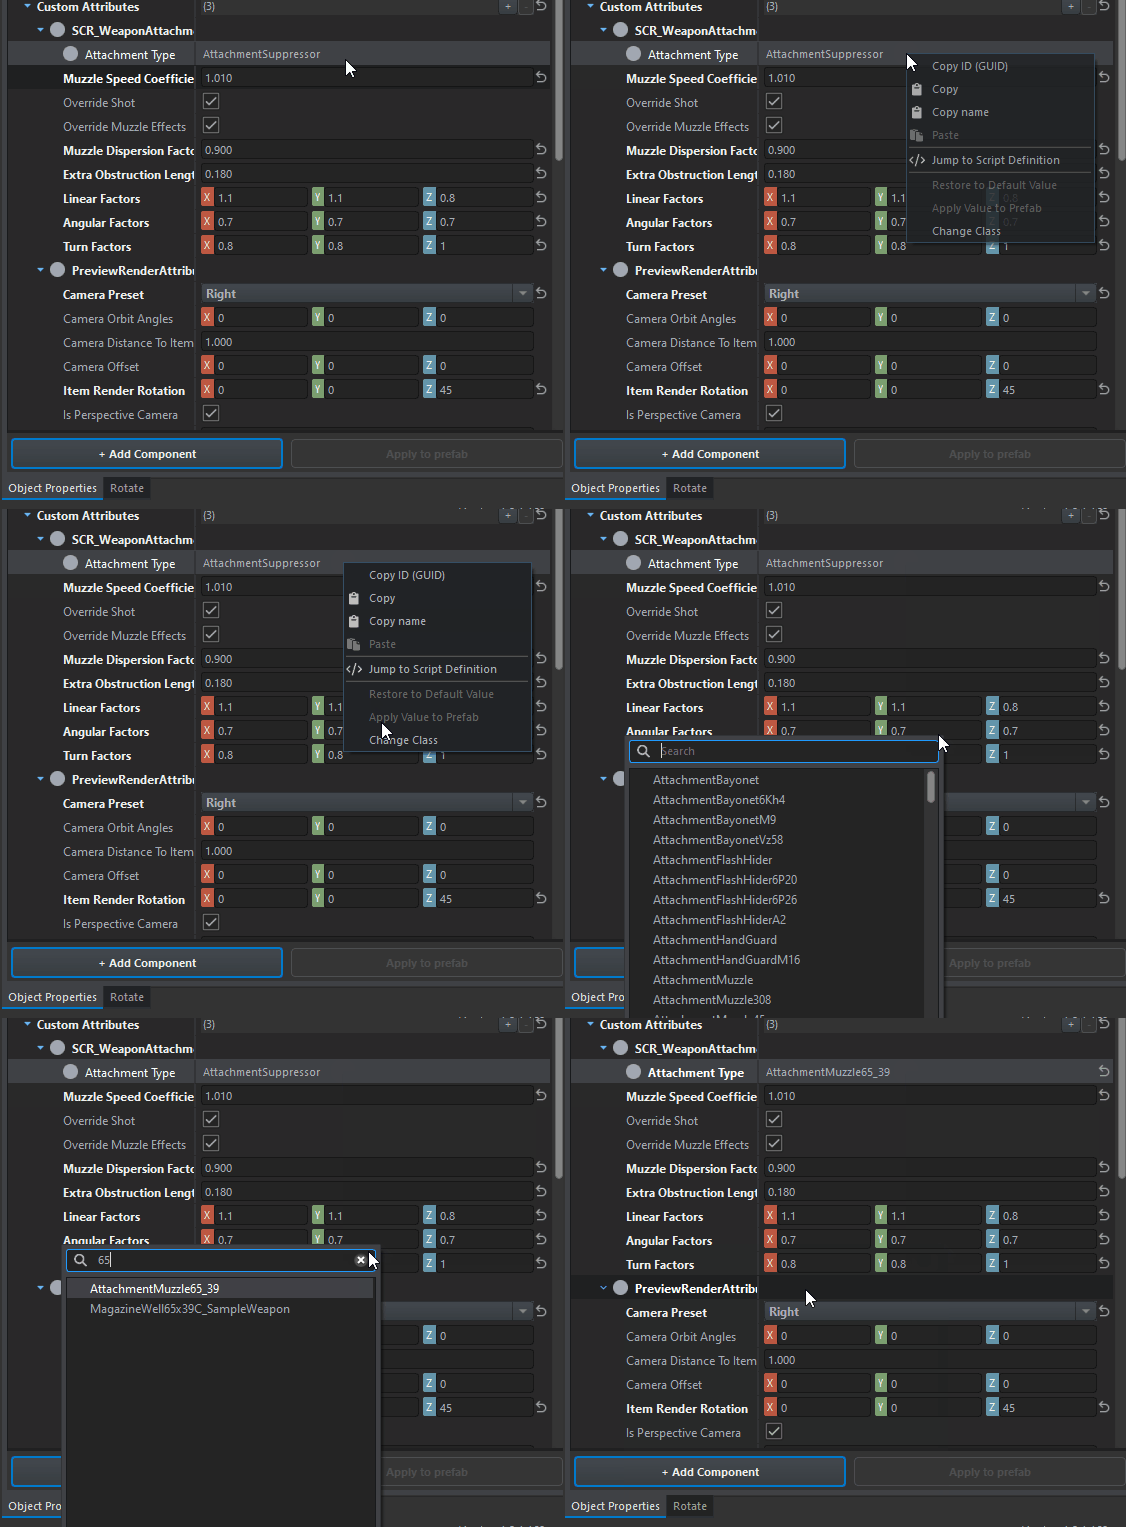
** Assign <code>AttachmentMuzzle65_39</code> | **Assign class of your suppressor (i.e.<code>AttachmentMuzzle65_39</code> ) | ||
** This parameter controls where the suppressor can be attached. | ***Default, inherited selection can be changed by clicking on '''Attachment Type''' class with '''Right Mouse Button''' and selecting '''Change Class''' option from the context menu | ||
**This parameter controls where the suppressor can be attached. | |||
[[File:armareforger-new-weapon-suppressor-change-class.gif]] | |||
==== Configure SCR_WeaponAttachmentSuppressor Component ==== | ====Configure SCR_WeaponAttachmentSuppressor Component==== | ||
Now, configure the suppressor's attachment properties: | |||
#Select the '''SCR_WeaponAttachmentSuppresor''' component. | |||
#'''Attachment Type''' : Set this to the class you created earlier for the suppressor attachment point. | |||
#'''Muzzle Speed Coefficient''' : Adjust this value to reflect the effect of the suppressor on bullet velocity. Suppressors often increase bullet speed due to the extended barrel effect. | |||
#'''Muzzle Dispersion Factor''' : Modify this to account for changes in bullet spread when the suppressor is attached. | |||
#'''Extra Obstruction Length''' : Increase this value to simulate the added length of the suppressor, affecting the weapon's obstruction values in the '''WeaponComponent''' . | |||
#'''Recoil Coefficients''' : | |||
#*'''Linear Factors''' : Adjust to simulate changes in linear recoil. | |||
#*'''Angular Factors''' : Adjust to simulate changes in angular recoil. | |||
#*'''Turn Factors''' : Adjust to simulate changes in weapon turn dynamics due to the suppressor's weigh | |||
=== | ===Configuring the SCR_MuzzleEffectComponent=== | ||
Set up the muzzle effect to represent the suppressor's visual effects when firing: | |||
#Select the '''SCR_MuzzleEffectComponent''' | |||
#'''Particle Effect''' : Assign a suitable particle effect (e.g., '''{{Link|enfusion://ResourceManager/$ArmaReforger:Particles/Weapon/Attachments/Suppressor_Carbine.ptc|Suppressor_Carbine.ptc}}''') to represent the suppressed muzzle flash. | |||
#'''Effect Position''' : | |||
#*Click on the '''Set Class''' button and select '''EntitySlotInfo''' . | |||
#*Name it appropriately (e.g., '''SuppressorEnd''' ). | |||
#*Adjust the '''Offset''' so the effect is positioned at the suppressor's muzzle end. | |||
#'''Reset On Fire''' : Disable this parameter to prevent the effect from resetting after each shot, creating a continuous smoke effect. | |||
====Configure Attachment Obstruction (Optional)==== | |||
Configuring attachment obstruction ensures that certain attachments cannot be used simultaneously and that some attachments require others to be present. The '''SCR_WeaponAttachmentObstructionAttributes''' is already inherited from the parent suppressor prefab, so you do not need to add it manually. | |||
To configure obstruction attributes: | |||
#'''Navigate to SCR_WeaponAttachmentObstructionAttributes:''' | |||
#*In your prefab's '''Custom Attributes''' , locate the '''SCR_WeaponAttachmentObstructionAttributes''' entry. | |||
#'''Adjust Parameters as Needed:''' | |||
** '''Obstructed Attachment Types''' | #*'''Attachment Type''' | ||
#**Class of attachment which following rules applies to | |||
** '''Required Attachment Types''' | #*'''Obstructed Attachment Types:''' | ||
#**List attachment types that cannot be mounted at the same time as this suppressor. | |||
*** Example | #**For example, you might list muzzle devices or bayonets that are incompatible with the suppressor. | ||
#*'''Required Attachment Types:''' | |||
#**List attachment types that must be present for this suppressor to be attachable. | |||
#**For instance, if your suppressor requires a specific muzzle adapter or flash hider, include that attachment type here. | |||
#**''Example:'' An '''M9 Bayonet''' requires the '''A2 Flash Hider''' to be mounted first, as it attaches to the flash hider rather than directly to the barrel. | |||
==== Adjust ActionsManagerComponent (Optional) ==== | By configuring these attributes, you control which attachments can be used together and establish dependencies between attachments. This ensures that weapon customization behaves realistically and prevents players from combining incompatible attachments. | ||
[[File:armareforger-new-weapon-suppressor-m16-suppressor-obstruction.png|none|thumb|677x677px|Example M16 suppressor obstruction setup]] | |||
{{Clear}} | |||
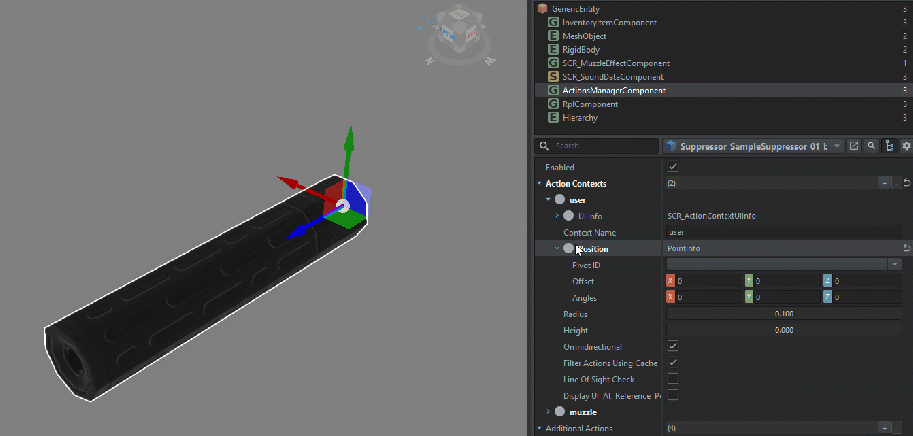
====Adjust ActionsManagerComponent (Optional)==== | |||
Depending on how your suppressor is positioned, you might need to adjust the positions of user and muzzle actions: | |||
#Select the '''ActionsManagerComponent''' . | |||
#Within the '''Action Context''' , locate the user and muzzle actions. | |||
#Modify their '''Offset''' in the '''Position''' property to align them correctly with the suppressor's position | |||
[[File:armareforger-new-weapon-suppressor-action-context-adjustment.gif|913x913px]]{{Messagebox|'''Recommended read:''' [[Arma_Reforger:Action_Context_Setup|'''Action Context Setup''']] documentation |📖|lightgrey}} | |||
===Localization=== | |||
Lastly, it's recommended to localize your suppressor asset: | |||
*This ensures the suppressor's name is displayed correctly in the inspection menu and other UI elements. | |||
*Localize the '''Item Display Name''' using instruction listed on [[Arma Reforger:Mod Localisation]] page. | |||
[[File:armareforger-new-weapon-suppressor-missing-localisation.png|none|thumb|621x621px|Typical '''#AR-UserAction_Dettach''' error when accessory is not localized]] | |||
== | ==Integrating the Suppressor with a Weapon== | ||
=== | ===Configure the Weapon's Muzzle Component=== | ||
To enable your weapon to accept and properly function with your newly created suppressor, you need to configure the weapon's components accordingly. | |||
=== | ===Configuring the Weapon's Muzzle Component=== | ||
First, open your weapon prefab ('''SampleWeapon_01_base.et''' ) in '''[[Arma Reforger:Prefabs Basics#Prefab edit mode|Prefab Edit Mode]]''' . | |||
====Add an AttachmentSlotComponent==== | |||
#'''Select the MuzzleComponent:''' | |||
#*In the '''Entity Tree''' , expand your weapon entity and locate the '''MuzzleComponent'''. | |||
#'''[[Arma Reforger:Prefabs Basics#Adding child component|Add AttachmentSlotComponent as Child Component of Muzzle Component]]''' | |||
====Configure the AttachmentSlotComponent==== | |||
With the '''AttachmentSlotComponent''' selected, configure its properties: | |||
---- | #'''Pivot ID:''' | ||
#*Set the '''Pivot ID''' to the weapon's muzzle slot. | |||
#**This is typically <code>slot_barrel_muzzle</code>. | |||
#*This ensures the attachment point aligns with the muzzle end of the weapon. | |||
#'''Child Pivot ID:''' | |||
#*Set the '''Child Pivot ID''' to <code>snap_weapon</code>. | |||
#*This specifies where the attachment (suppressor) will snap onto the weapon. This bone/empty object should exist in attachment itself. If its not prevent, then Scene Root will be used | |||
#'''Attachment Point Type:''' | |||
#*Assign the attachment point type to match your suppressor's attachment class. | |||
#**Click on the '''Attachment Point Type''' property. | |||
#**Select '''Change Class''' from the context menu. | |||
#**Search for muzzle class appropriate for the weapon - in this case it is<code>AttachmentMuzzle65_39</code> (the class you created earlier). | |||
#**Select it to assign it to the attachment point. | |||
#'''Show in Inspection:''' | |||
#*Enable the '''Show in Inspection''' option. | |||
#*This allows the attachment slot to be visible when inspecting the weapon in-game. | |||
====Add SCR_WeaponStatsManagerComponent==== | |||
To ensure the weapon correctly handles parameter adjustments and sound switching when the suppressor is attached, you need to add the '''SCR_WeaponStatsManagerComponent'''. | |||
#'''[[Arma Reforger:Prefabs Basics#Adding new components to entity instance|Add SCR_WeaponStatsManagerComponent Component]]''' | |||
#'''No Additional Configuration Needed:''' | |||
#*The '''SCR_WeaponStatsManagerComponent''' doesn't have any parameters other than '''Enabled''' . | |||
#*Simply adding this component is sufficient. | |||
#*This component is crucial for handling parameter adjustments and sound switching when attachments like suppressors are used. | |||
{{Feature|informative|The '''SCR_WeaponStatsManagerComponent''' manages changes to the weapon's stats and sounds when attachments are added or removed. For more detailed information, you can refer to the [[Arma Reforger:Weapon Stats-Modifing Attachments|Weapon Stats Modifying Attachments]] documentation.}} | |||
===Updating the WeaponSoundComponent=== | |||
To ensure that the weapon produces the correct sounds when the suppressor is attached, you need to update the '''WeaponSoundComponent'''. | |||
#'''Select the WeaponSoundComponent:''' | |||
#*In the '''Entity Tree''', locate and select the '''WeaponSoundComponent'''. | |||
#'''Add Suppressed Sounds:''' | |||
#*In the '''Properties''' panel, find the '''Filenames''' property. | |||
#*'''Add the Suppressed Firing Sound:''' | |||
#**Click on the '''Add Element''' button (often a '''+''' icon) next to the '''Filenames''' array to add a new sound file. | |||
#**Assign the suppressed firing sound file to this new element. | |||
#***Choose an appropriate sound file (e.g., '''{{Link|enfusion://ResourceManager/$ArmaReforger:Sounds/Weapons/Rifles/AK-74/Weapons_Rifles_AK-74_Shot_Suppressed_SuperSonic.acp|Weapons_Rifles_AK-74_Shot_Suppressed_SuperSonic.acp}}'''). | |||
#*'''Configure the Filenames:''' | |||
#**Ensure that both the normal and suppressed firing sounds are included in the '''Filenames''' array. | |||
#**The '''WeaponSoundComponent''' will automatically handle the sound selection based on the weapon's state and attachments. | |||
{{Feature|informative|The '''WeaponSoundComponent''' uses the '''Filenames''' array to determine which sounds to play when the weapon is fired. It will automatically switch between the normal and suppressed firing sounds depending on whether the suppressor is attached. The order of the sound files in the '''Filenames''' array does not affect which sound is played. What matters, is presence of '''SOUND_SUPPRESSED_SHOT''' node.}} | |||
==Making the Suppressor Available in the Arsenal== | |||
To make your suppressor more accessible to players in-game, you need to add it to the arsenal. This involves including the suppressor prefab in the '''Entity Catalog''' so that it appears in the game's inventory and supply systems. | |||
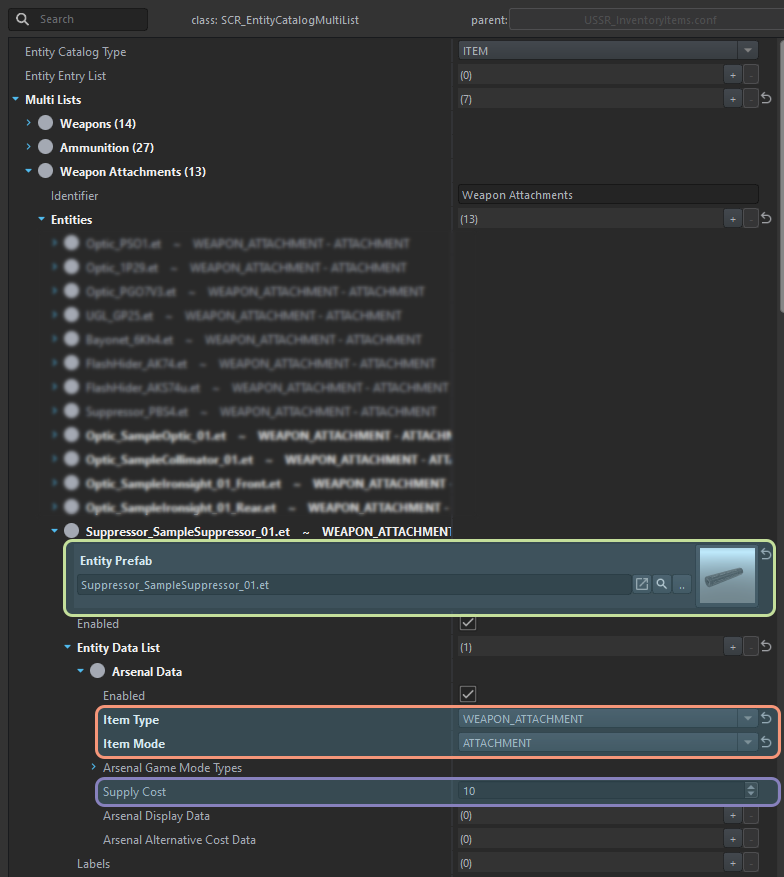
* '''Include in Entity Catalog:''' | |||
** Ensure that your suppressor prefab is added to the '''Weapon Attachments''' '''Entities''' list within the '''Entity Catalog''' of selected faction that you want to expose your weapon. | |||
*** '''Item Type''' should be set to '''WEAPON_ATTACHMENT''' | |||
*** '''Item Mode''' should be set to '''ATTACHMENT''' | |||
*** Adjust '''Supply Cost''' in line with vanilla | |||
** This allows the game to recognize the suppressor as available equipment. | |||
* '''Access in Game:''' | |||
** After adding it to the '''Entity Catalog''' , the suppressor will be available in-game for players to acquire and use. | |||
** Players can find the suppressor in arsenals or supply crates of given faction that draw from the '''Entity Catalog''' . | |||
[[File:armareforger-new-weapon-suppressor-arsenal-setup.png]] | |||
For detailed instructions on how to add items to the '''Entity Catalog''' and configure arsenals, please refer to the [[Arma Reforger:Weapon Creation/Prefab Configuration#Crate%20Filling|Crate Filling]] section of the '''Weapon Creation''' documentation. | |||
== Finalizing the Integration == | |||
After configuring the components and making the suppressor available in the arsenal: | |||
== | * '''Save All Prefabs:''' | ||
** Ensure that all changes to prefabs are saved. | |||
* '''Test Thoroughly:''' | |||
** Load your mod in the game or editor. | |||
** Verify that: | |||
*** The suppressor appears in the arsenal. | |||
*** It can be added to the player's inventory. | |||
*** It attaches correctly to the weapon. | |||
*** The weapon functions correctly with and without the suppressor. | |||
* '''Troubleshoot If Necessary:''' | |||
** If you encounter issues, double-check the steps above to ensure all configurations are correct | |||
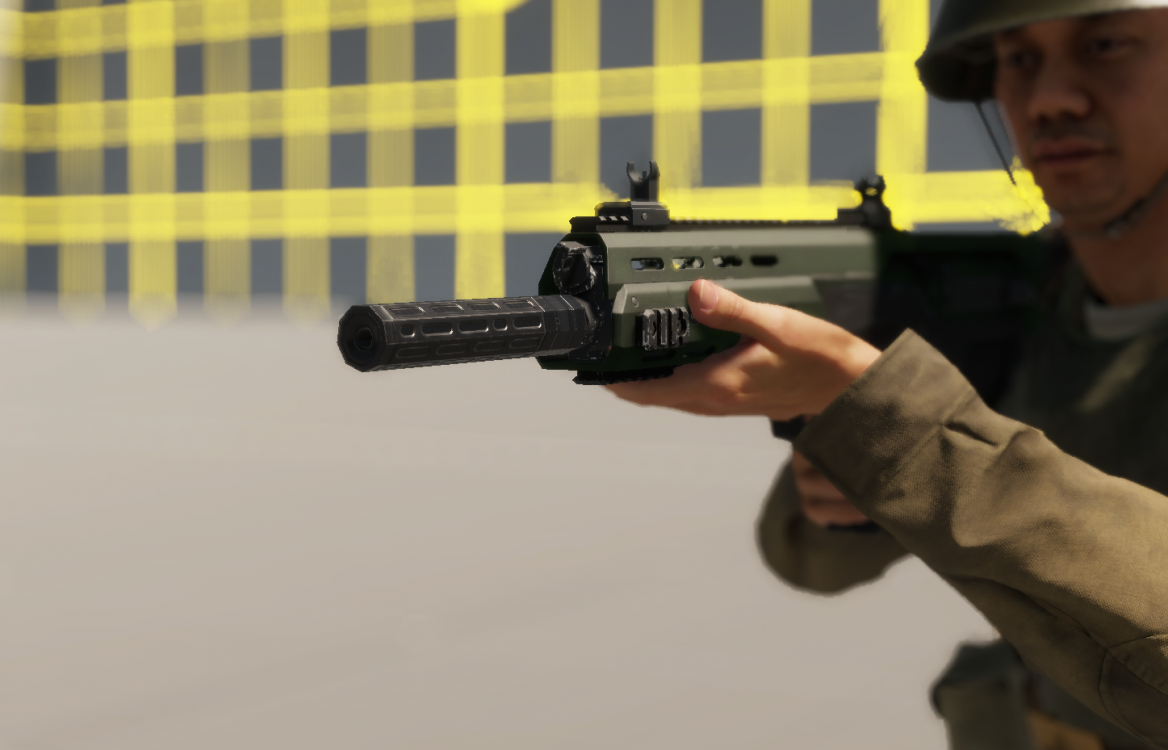
<gallery mode="packed" widths="700" heights="500"> | |||
File:armareforger-new-weapon-suppressor-final-result-1.png | |||
File:armareforger-new-weapon-suppressor-final-results-2.png | |||
</gallery> | |||
{{GameCategory|armaR|Modding|Tutorials|Assets}} | |||
{{GameCategory|armaR|Modding|Tutorials|Assets|Weapon Creation}} | |||
Latest revision as of 12:11, 11 December 2024
Prerequisites
- Basic understanding of Enfusion Engine and Arma Reforger modding.
- Access to a 3D modeling tool that can export FBX files.
- Familiarity with scripting in Enforce Script .
- A mod tag or identifier (e.g.,
SampleMod_NewWeapon) for naming conventions. - Required tools and software:
- Enfusion Workbench .
- Enfusion Blender Tools (EBT) (optional but recommended for Blender users).
Structure Preparation
While sticking to official structure is not mandatory and there are no engine restrictions asset wise about it, it is recommended to follow guidelines listed here - Data (file) structure - to ensure that all automation plugins are parsing your assets correctly and make it later easy to navigate.
Therefore, your first task will be preparing following file structure
Preparing the Suppressor Asset
Model Orientation
Ensuring proper model orientation is crucial for correct attachment and in-game behavior. According to the Arma Reforger: FBX Import guidelines:
- Blender and 3ds Max Users :
- The model should point along the positive Y-axis .
- Maya Users :
- The model should point along the positive Z-axis .
If importing a model from another source (e.g., Arma 3), you may need to rotate it by 90 degrees to align correctly.
Object Naming
Follow these naming conventions to ensure proper import and functioning:
- Level of Detail (LOD) Suffixes :
- Use
_LOD0,_LOD1, etc., to indicate different LODs. - Example:
Suppressor_LOD0,Suppressor_LOD1.
- Use
Proper naming ensures that the engine correctly interprets your model's components during the import process. For a full list of naming conventions and detailed explanations, refer to the Arma Reforger: FBX Import - Naming Conventions page.
Adding Snap Points
Snap points are essential for correctly attaching the suppressor to weapons. For suppressor, it will be necessary to only add one empty object - snap_weapon. This can be achieved in those few steps:
- Create an Empty Object :
- In Blender, add an Empty object of type Plain Axes .
- Place it at the point where the suppressor will attach to the weapon.
- Name the Empty Object :
- Set the name to
snap_weapon.
- Set the name to
- Align the Empty Object :
- Ensure the empty object's orientation matches the weapon's attachment point.
- The forward direction (front) should align along:
- Positive Y-axis in Blender/3ds Max.
- Positive Z-axis in Maya.
- Check Orientation :
- Verify that the
snap_weaponaligns accurately with the suppressor's model.
- Verify that the
For detailed guidance, see Weapon Slots and Bones .
Collision Mesh
Creating an efficient collision mesh optimizes performance and ensures accurate physical interactions.
Choosing Collider Shape
Select the appropriate collider shape based on your suppressor's geometry. The collision mesh doesn't have to be a specific type; you can choose from various collider shapes depending on what best fits your suppressor:
- Common Collider Types :
- Box Collider
- Convex Collider
- Cylinder Collider
- Sphere Collider
- Capsule Collider
- TriMesh Collider
- Naming Colliders :
- Name your colliders with appropriate prefixes to indicate their type.
- While specific prefixes like
UBX_,UCX_, etc., are typically used, focus on selecting the collider that best suits your model's shape
Simplifying the Collider
- Keep It Simple : Use the simplest shape that accurately represents the suppressor.
- Performance Consideration: Simplified colliders reduce computational overhead.
- Avoid Complex Meshes : Complex collision meshes can negatively impact performance.
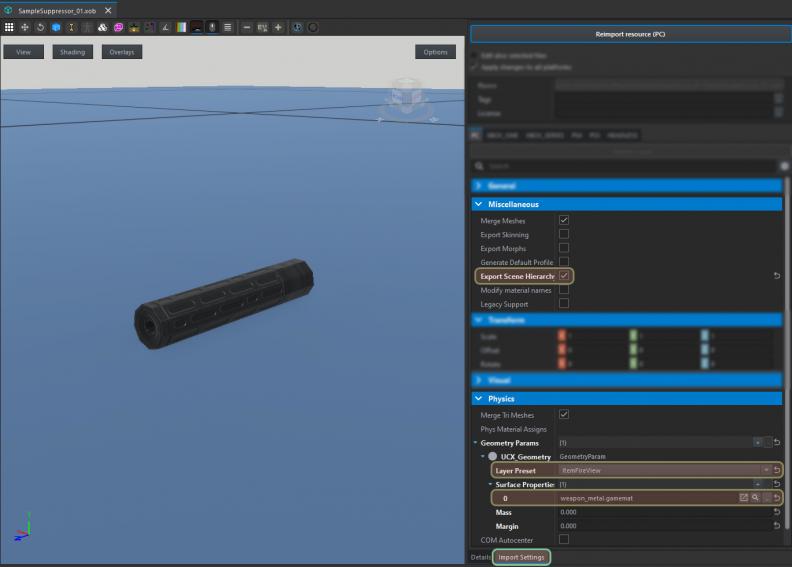
Assigning Layer Preset and Game Material
Assign appropriate properties to your collider:
- Layer Preset :
ItemFireView- This layer preset is appropriate for weapon attachments and ensures correct interactions in the game.
- Game Material :
weapon_metal.gamemat- This material provides appropriate physical properties and sound effects for metal weapon components.
How to Assign
- In Your 3D Software :
- Blender with EBT (Optional) :
- Use the EBT Object Tools to assign properties directly in Blender.
- Navigate to Object Properties > EBT Object Properties .
- Set Layer Preset and Game Material . Reference: Enfusion Blender Tools: Object Tools .
- Other 3D Software :
- Add custom properties or user-defined attributes to colliders.
- Refer to Setting Layer Preset on Colliders (Usage Parameter) .
- Blender with EBT (Optional) :
- In Enfusion Workbench Import Settings :
- If not set in the 3D software, you can assign them during import.
- In the Import Settings , select your collider.
- Set Usage to
ItemFireView. - Assign Game Material to
weapon_metal.gamemat. Reference: FBX Import - Setting Layer Preset on Colliders .
- Set Usage to
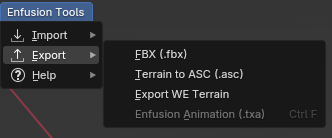
Exporting the Model
Export your model to the FBX format suitable for Enfusion.
- Using Enfusion Blender Toolkit (EBT) FBX Exporter (Optional):
- Simplifies export and ensures compatibility.
- Automatically imports & registers FBX in Workbench and enables "Export Scene Hierarchy".
- Without EBT :
- Manually register Import & Register file
- Manually enable "Export Scene Hierarchy" in export settings.
- Ensure export settings align with Enfusion requirements.
Texturing the Suppressor
Apply textures to give your suppressor the desired appearance.
Enfusion Materials Creation
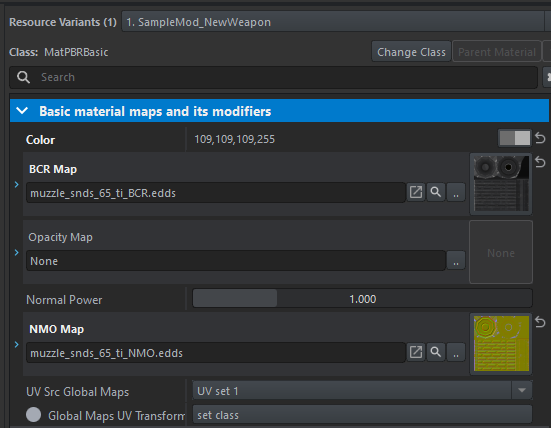
- If the import of the model went fine, new Enfusion Materials (
.ematfiles) should be created in theDatafolder next to the model. - These new materials are named based on the material names in your 3D software.
- By default, they use the
MatPBRMaterialshader.
Assigning Textures
- Prepare Textures :
- Assuming you have already created PBR textures (Base Color, Normal Map, etc.) using a tool like Substance Painter.
- You can use the BCR+NMO export preset shared on GitHub:
- GitHub Repository: Arma Reforger Misc - Substance Export Profiles
- This preset ensures that your textures are in the correct format for Arma Reforger.
- Import Textures into the Game :
- Place your exported textures (e.g.,
Suppressor_BCR.tga,Suppressor_NMO.tga) into the appropriate folder within your mod'sDatadirectory.
- Place your exported textures (e.g.,
- Assign Textures to Materials :
- In the Enfusion Workbench, navigate to the
.ematfiles created during the import. - Open each material and assign the corresponding textures to the appropriate fields:
- BCR Map :
- Assign your Base Color Roughness texture (
_BCR).
- Assign your Base Color Roughness texture (
- NMO Map :
- Assign your Normal Map (
_NMO).
- Assign your Normal Map (
- BCR Map :
- For detailed information on texture types and how to use them, refer to Arma Reforger: Textures .
- In the Enfusion Workbench, navigate to the
- Verify Material Settings :
- Ensure that all material properties are set correctly.
- Adjust parameters like Metallic , Roughness , and Specular as needed.
Testing the Textures
- Preview the Model :
- Use Enfusion Workbench to ensure textures appear correctly.
- Check for Issues :
- Look for texture stretching, UV mapping errors, or material issues.
- Adjust as Necessary :
- Make corrections in your 3D software or texture editor if needed.
Creating the Attachment Script Class
Attachment config classes in Arma Reforger establish compatibility between weapons and their attachments. Any attachment using a specific attachment class will be compatible with any weapon that references that class. This system ensures that only appropriate attachments can be mounted on specific weapons, maintaining realism and game balance.
In many cases, existing attachment classes can be used. For example, muzzle attachment classes for 5.45 mm or 5.56 mm calibers are already defined in the game's vanilla data. However, since our Sample Weapon uses a 6.5 mm barrel, and this caliber doesn't exist in the vanilla data, we need to create a new attachment class specifically for it. This ensures that only attachments intended for 6.5 mm barrels can be mounted on the weapon.
If you intend to make i.e. suppressor suitable for M16, then you could skip that part and move to Creating the Suppressor Prefab part.
Setting Up the Attachment Config Class
To add a new attachment config class, you'll create a new script file in one of your mod's game script folders. For example, you can use the Scripts/Game/Attachments/Muzzles folder. If this folder doesn't exist, you'll need to create it manually.
Naming Conventions
Scripts in Arma Reforger don't use metafiles and can be overwritten if another mod uses the same script name and path. To prevent conflicts, it's recommended to use a unique naming convention for your script files and classes, such as prefixing them with your mod's tag.
- Use the
TAG_Prefix:- Prefix your script file names and class names with a unique tag to prevent naming conflicts.
- In this case, the tag is
SampleMod_NewWeapon.
- Script File:
- Use a clear and descriptive filename that includes your mod's tag.
- Example:
SampleMod_NewWeapon_Attachments_Muzzle.c
- Class Names:
- Attachment Config Class: Defines the configuration class for your muzzle attachment.
- Example:
AttachmentMuzzle65_39Class
- Example:
- Attachment Class: Inherits from
AttachmentMuzzle.- Example:
AttachmentMuzzle65_39
- Example:
- Attachment Config Class: Defines the configuration class for your muzzle attachment.
Creating the Script File
Create the Script File
- Navigate to Your Script Directory:
- Go to
/Scripts/Game/Attachments/Muzzles/within your mod folder. - If these folders don't exist, create them accordingly.
- Go to
- Create a New Script File:
- Right-click in the
Muzzlesfolder and select New Script . - Name the file
SampleMod_NewWeapon_Attachments_Muzzle.c. - Ensure the file extension is
.c.
- Right-click in the
Define the Attachment Config Class
Open the newly created script file and define your classes exactly as follows:
Recompiling Scripts
After creating the script, recompile the game scripts:
- In Script Editor :
- Use Compile and Reload Scripts (
⇧ Shift + F7).
- Use Compile and Reload Scripts (
- In World Editor :
- Use Reload Game Scripts (
Ctrl + R).
- Use Reload Game Scripts (
By following these steps, you've successfully created a new attachment config class for your 6.5 mm suppressor. This class will ensure proper compatibility between your suppressor and the Sample Weapon , while preventing incompatible attachments from being mounted.
Creating the Suppressor Prefab
Create Suppressor Prefab
When creating a suppressor prefab in Arma Reforger, it is recommended to inherit from the existing base suppressor prefab. The base suppressor prefab can be found at Prefabs\Weapons\Core\Suppressor_base.et. This prefab contains most of the necessary configurations for suppressor attachments.
To begin, navigate to Prefabs\Weapons\Core in the Resource Browser and locate the Suppressor_base.et prefab. Right-click on this prefab and select Inherit in... from the context menu.
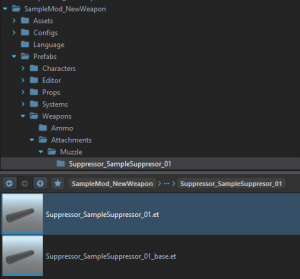
When prompted to name your new prefab, consider adding a _base suffix to maintain consistency and clarity, especially if you plan to have multiple variants of the suppressor. For example, if your suppressor is named "Suppressor_SampleSuppressor_01," you might name the prefab Suppressor_SampleSuppressor_01_base.et . After creating the inherited prefab, move it to a more appropriate location, such as the Prefabs\Weapons\Attachments\Muzzle\Suppressor_SampleSuppressor_01 directory.
Creating a Child Prefab
In addition to the base prefab, it's advisable to create a child prefab without the _base suffix. This child prefab will inherit from your base suppressor prefab (SampleSuppressor_01_base.et ) and will be named SampleSuppressor_01.et .
To create this child prefab:
- Right-click on your base suppressor prefab (Suppressor_SampleSuppressor_01_base.et ) and select Inherit .
- Name the new prefab without the
_basesuffix (e.g., Suppressor_SampleSuppressor_01.et ). - Move this prefab to the appropriate directory alongside your base prefab.
This child prefab will initially be empty and won't hold any unique information. However, it serves an important purpose, especially when reskins or additional variants are present. For example, you might create another variant called Suppressor_SampleSuppressor_01_camo.et for a camouflage version of the suppressor. Suppressor_SampleSuppressor_01_camo should inherit from Suppressor_SampleSuppressor_01_base.et as well. By making changes to the base prefab (SampleSuppressor_01_base.et ), those changes automatically propagate to all child prefabs, including Suppressor_SampleSuppressor_01.et and Suppressor_SampleSuppressor_01_camo.et . This organizational structure makes it easier to manage and update your assets consistently.
Once your prefabs are set up, you can start editing the base prefab to configure your suppressor. Open the prefab in Prefab Edit Mode by selecting it and clicking the Prefab Edit Mode button.
Edit the Suppressor Prefab
Configure components within your new prefab.
Configure MeshObject
- Assign your suppressor's mesh to the
MeshObjectcomponent.
Configure InventoryItemComponent
Next, configure the suppressor's inventory properties:
- Select the InventoryItemComponent .
- Modify the Item Display Name to change how the suppressor appears in the inventory.
- Adjust the Item Phys Attributes to change storage properties like weight and size.
- Under Custom Attributes , adjust the PreviewRenderAttributes to change the suppressor's visibility in the inventory preview
Configure WeaponAttachmentAttributes
In Custom Attributes of InventoryItemComponent:
- WeaponAttachmentAttributes is already inherited from the base prefab.
- Set Attachment Type :
- Assign class of your suppressor (i.e.
AttachmentMuzzle65_39)- Default, inherited selection can be changed by clicking on Attachment Type class with Right Mouse Button and selecting Change Class option from the context menu
- This parameter controls where the suppressor can be attached.
- Assign class of your suppressor (i.e.
Configure SCR_WeaponAttachmentSuppressor Component
Now, configure the suppressor's attachment properties:
- Select the SCR_WeaponAttachmentSuppresor component.
- Attachment Type : Set this to the class you created earlier for the suppressor attachment point.
- Muzzle Speed Coefficient : Adjust this value to reflect the effect of the suppressor on bullet velocity. Suppressors often increase bullet speed due to the extended barrel effect.
- Muzzle Dispersion Factor : Modify this to account for changes in bullet spread when the suppressor is attached.
- Extra Obstruction Length : Increase this value to simulate the added length of the suppressor, affecting the weapon's obstruction values in the WeaponComponent .
- Recoil Coefficients :
- Linear Factors : Adjust to simulate changes in linear recoil.
- Angular Factors : Adjust to simulate changes in angular recoil.
- Turn Factors : Adjust to simulate changes in weapon turn dynamics due to the suppressor's weigh
Configuring the SCR_MuzzleEffectComponent
Set up the muzzle effect to represent the suppressor's visual effects when firing:
- Select the SCR_MuzzleEffectComponent
- Particle Effect : Assign a suitable particle effect (e.g., Suppressor_Carbine.ptc) to represent the suppressed muzzle flash.
- Effect Position :
- Click on the Set Class button and select EntitySlotInfo .
- Name it appropriately (e.g., SuppressorEnd ).
- Adjust the Offset so the effect is positioned at the suppressor's muzzle end.
- Reset On Fire : Disable this parameter to prevent the effect from resetting after each shot, creating a continuous smoke effect.
Configure Attachment Obstruction (Optional)
Configuring attachment obstruction ensures that certain attachments cannot be used simultaneously and that some attachments require others to be present. The SCR_WeaponAttachmentObstructionAttributes is already inherited from the parent suppressor prefab, so you do not need to add it manually.
To configure obstruction attributes:
- Navigate to SCR_WeaponAttachmentObstructionAttributes:
- In your prefab's Custom Attributes , locate the SCR_WeaponAttachmentObstructionAttributes entry.
- Adjust Parameters as Needed:
- Attachment Type
- Class of attachment which following rules applies to
- Obstructed Attachment Types:
- List attachment types that cannot be mounted at the same time as this suppressor.
- For example, you might list muzzle devices or bayonets that are incompatible with the suppressor.
- Required Attachment Types:
- List attachment types that must be present for this suppressor to be attachable.
- For instance, if your suppressor requires a specific muzzle adapter or flash hider, include that attachment type here.
- Example: An M9 Bayonet requires the A2 Flash Hider to be mounted first, as it attaches to the flash hider rather than directly to the barrel.
- Attachment Type
By configuring these attributes, you control which attachments can be used together and establish dependencies between attachments. This ensures that weapon customization behaves realistically and prevents players from combining incompatible attachments.
Adjust ActionsManagerComponent (Optional)
Depending on how your suppressor is positioned, you might need to adjust the positions of user and muzzle actions:
- Select the ActionsManagerComponent .
- Within the Action Context , locate the user and muzzle actions.
- Modify their Offset in the Position property to align them correctly with the suppressor's position
Localization
Lastly, it's recommended to localize your suppressor asset:
- This ensures the suppressor's name is displayed correctly in the inspection menu and other UI elements.
- Localize the Item Display Name using instruction listed on Arma Reforger:Mod Localisation page.
Integrating the Suppressor with a Weapon
Configure the Weapon's Muzzle Component
To enable your weapon to accept and properly function with your newly created suppressor, you need to configure the weapon's components accordingly.
Configuring the Weapon's Muzzle Component
First, open your weapon prefab (SampleWeapon_01_base.et ) in Prefab Edit Mode .
Add an AttachmentSlotComponent
- Select the MuzzleComponent:
- In the Entity Tree , expand your weapon entity and locate the MuzzleComponent.
- Add AttachmentSlotComponent as Child Component of Muzzle Component
Configure the AttachmentSlotComponent
With the AttachmentSlotComponent selected, configure its properties:
- Pivot ID:
- Set the Pivot ID to the weapon's muzzle slot.
- This is typically
slot_barrel_muzzle.
- This is typically
- This ensures the attachment point aligns with the muzzle end of the weapon.
- Set the Pivot ID to the weapon's muzzle slot.
- Child Pivot ID:
- Set the Child Pivot ID to
snap_weapon. - This specifies where the attachment (suppressor) will snap onto the weapon. This bone/empty object should exist in attachment itself. If its not prevent, then Scene Root will be used
- Set the Child Pivot ID to
- Attachment Point Type:
- Assign the attachment point type to match your suppressor's attachment class.
- Click on the Attachment Point Type property.
- Select Change Class from the context menu.
- Search for muzzle class appropriate for the weapon - in this case it is
AttachmentMuzzle65_39(the class you created earlier). - Select it to assign it to the attachment point.
- Assign the attachment point type to match your suppressor's attachment class.
- Show in Inspection:
- Enable the Show in Inspection option.
- This allows the attachment slot to be visible when inspecting the weapon in-game.
Add SCR_WeaponStatsManagerComponent
To ensure the weapon correctly handles parameter adjustments and sound switching when the suppressor is attached, you need to add the SCR_WeaponStatsManagerComponent.
- Add SCR_WeaponStatsManagerComponent Component
- No Additional Configuration Needed:
- The SCR_WeaponStatsManagerComponent doesn't have any parameters other than Enabled .
- Simply adding this component is sufficient.
- This component is crucial for handling parameter adjustments and sound switching when attachments like suppressors are used.
Updating the WeaponSoundComponent
To ensure that the weapon produces the correct sounds when the suppressor is attached, you need to update the WeaponSoundComponent.
- Select the WeaponSoundComponent:
- In the Entity Tree, locate and select the WeaponSoundComponent.
- Add Suppressed Sounds:
- In the Properties panel, find the Filenames property.
- Add the Suppressed Firing Sound:
- Click on the Add Element button (often a + icon) next to the Filenames array to add a new sound file.
- Assign the suppressed firing sound file to this new element.
- Choose an appropriate sound file (e.g., Weapons_Rifles_AK-74_Shot_Suppressed_SuperSonic.acp).
- Configure the Filenames:
- Ensure that both the normal and suppressed firing sounds are included in the Filenames array.
- The WeaponSoundComponent will automatically handle the sound selection based on the weapon's state and attachments.
Making the Suppressor Available in the Arsenal
To make your suppressor more accessible to players in-game, you need to add it to the arsenal. This involves including the suppressor prefab in the Entity Catalog so that it appears in the game's inventory and supply systems.
- Include in Entity Catalog:
- Ensure that your suppressor prefab is added to the Weapon Attachments Entities list within the Entity Catalog of selected faction that you want to expose your weapon.
- Item Type should be set to WEAPON_ATTACHMENT
- Item Mode should be set to ATTACHMENT
- Adjust Supply Cost in line with vanilla
- This allows the game to recognize the suppressor as available equipment.
- Ensure that your suppressor prefab is added to the Weapon Attachments Entities list within the Entity Catalog of selected faction that you want to expose your weapon.
- Access in Game:
- After adding it to the Entity Catalog , the suppressor will be available in-game for players to acquire and use.
- Players can find the suppressor in arsenals or supply crates of given faction that draw from the Entity Catalog .
For detailed instructions on how to add items to the Entity Catalog and configure arsenals, please refer to the Crate Filling section of the Weapon Creation documentation.
Finalizing the Integration
After configuring the components and making the suppressor available in the arsenal:
- Save All Prefabs:
- Ensure that all changes to prefabs are saved.
- Test Thoroughly:
- Load your mod in the game or editor.
- Verify that:
- The suppressor appears in the arsenal.
- It can be added to the player's inventory.
- It attaches correctly to the weapon.
- The weapon functions correctly with and without the suppressor.
- Troubleshoot If Necessary:
- If you encounter issues, double-check the steps above to ensure all configurations are correct
