
Character Gear Creation/Headgear/Prefab Configuration – Arma Reforger
Prefab Setup
Creating Prefab
First step in this process will be inheriting from Headgear_Helmet_Base.et (use Headgear_Base.et if your headgear is not armored helmet) or duplicate one of existing helmets like Helmet_PASGT_01.et. When inheriting from Headgear_Helmet_Base.et, few more steps will be required but those are listed later. Because of that, it might be faster & simpler to duplicate some prefab.
Also, don't forget to properly organize your prefab - it is quite useful to have base prefab with _base suffix, since its clear in such setup which file was used as parent for sub sequential child prefabs, which change slightly materials or mesh.
Similar to vests, helmets are using SCR_ArmorDamageManagerComponent and if your helmet prefab is inheriting from Headgear_Helmet_Base.et, then it is not necessary to do any changes. Otherwise, check Vest Prefab page for tips how to set it up.
Tweaking BaseLoadoutClothComponent

Once you have new prefab for your helmet, open it in for example Prefab Edit Mode and start with tweaking things located in BaseLoadoutClothComponent
- Enable PhysicsOnWearEnabled & AnimateCollidersOnWear properties
- Assign item model to ItemModel in BaseLoadoutClothComponent & to property Object in MeshOjbect component
- Assign worn model to WornModel
- Change SoundInt parameter to 120
- This parameter is responsible for additional sounds that are being played when certain type of headgear is worn. For instance if you wear harness, you can hear some extra metal rattle when moving through the landscape. See Character SoundInfo Signals Reference page for more info
If you inherited from Headgear_Helmet_Base.et prefab, then you would also need to tweak following things
- Tweaking drop item sound in SCR_SoundDataComponent from Items_Drop_Clothes.acp to Items_Drop_Helmet.acp
- Changes the sound which is being played when item is placed on the ground
- Tweak position of default action context in ActionsManagerComponent

Inventory Configuration

Configuration of inventory is quite similar compared to weapon, therefor it is suggested to take a look at Weapon Creation page for details regarding how each of those params are working. Below is list of things which were adjusted in InventoryItemComponent on base Sample Helmet prefab:
- Item Display Name
- Name - controls in game display name
- Description - description of the item visible in in-game inventory menu
- Item Phys Attributes
- Weight was changed to 3.5 [kg] to be more or less in line with real life helmet
- Size Setup Strategy was changed to Manual
- Item Dimensions were changed to X:27, Y:25, Z:20 to more or less correspond to its actual dimensions
- Item Volume was set to 2500
- PeviewRenderAttributes in Custom Attributes section:
- Camera Orbit Angles& FOV values are basically copy paste from Helmet_PASGT_01.et and only Camera Distance To Item was adjusted so that whole helmet fits the preview image in the inventory
Vanilla helmets are using 2x1 slots and once those tweaks are completed, it should look like that in game:

Adding to Arsenal
Process of adding headgear to the crates is very similar to the one described on Weapon Creation page. There are few differences though - notable different labels are used. So in short, if you intend to add helmet to i.e. existing US arsenal box, then perform following steps:
- Override in your addon InventoryItems_EntityCatalog_US.conf
- Open overridden file and locate Clothing section inside of it
- Add new entry to Entities list by clicking on + button on the right side
- Assign your prefab to Entity Prefab field
- Add new SCR_ArsenalItem (Arsenal Data) entry to Entity Data List array by clicking on + button on the right side
- Change Item Type in Arsenal Data to HEADWEAR
If everything went fine, you should end up with something like on the picture below

Testing & Diags
Once you done all above steps, you can proceed with testing helmet in play mode. Place helmet prefab somewhere on the map in World Editor and then verify that everything works. Below is list some of the common problems
Helmet is not moving with character
Check that helmet has exactly 230 bones in total (dummies + real bones) - not more nor less - it has to be exactly 230.
Verify that Armature is called Armature and there are no extra dummy objects nor skeletons in your 3D software
Helmet colliders doesn't seem to work
You can check if item is correctly skinned by turning on following diagnostics
Physics → Show bodies - change it to one of non-disabled values, flat-mesh is usually quite good to verify it. You can also use Left Alt + 6 on numpad shortcut to toggle show bodies modes.
Physics → Show layer → FireGeometry - this tell the engine to only show colliders which are interacting FireGeometry layer
Physics → Show simulation state → All - toggles visibility of non active colliders like gear ones.
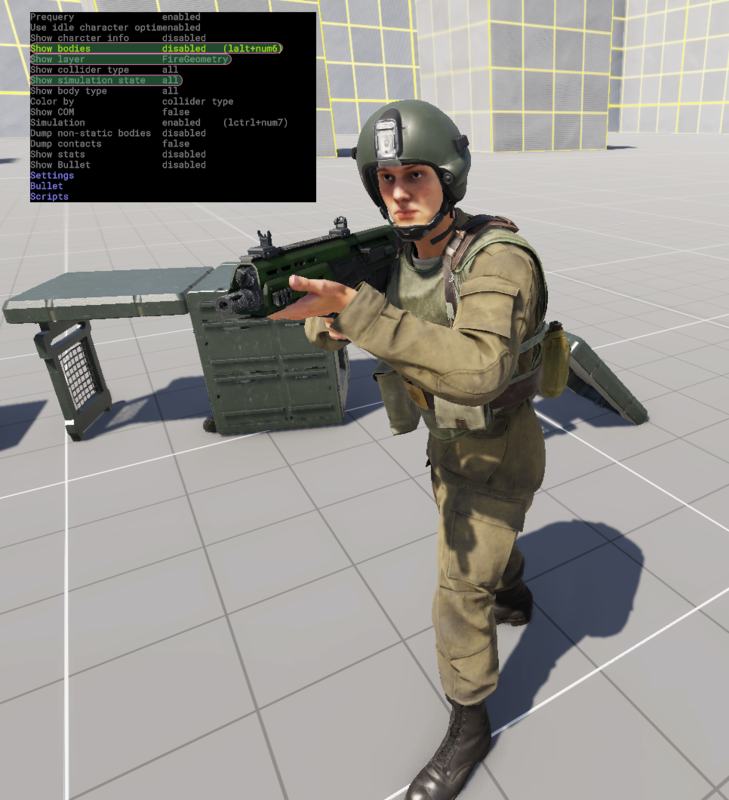
Firegeometry debug turned off
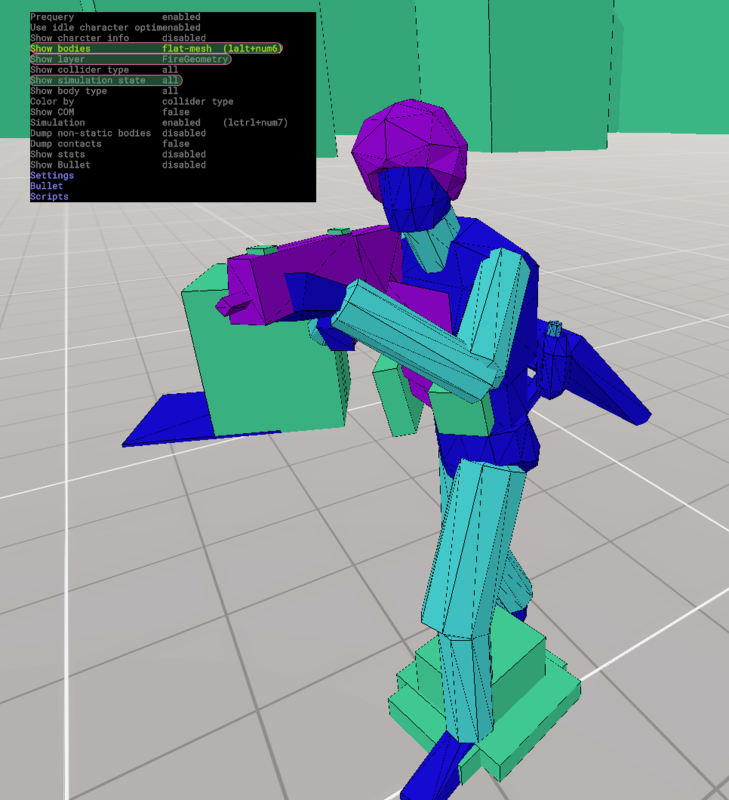
Firegeometry debug using flat mesh


If helmet is not following character, then make sure that it is properly parented to skeleton via Relations and that colliders are active in BaseLoadoutClothComponent
I cannot store helmet in the inventory
Check Item Dimensions and Item Volume of the item - perhaps item is too large for any of the available containers that you are wearing